Jekyll2023-08-17T01:32:00+00:00http://www.jimmdenton.com/feed.xmlJames DentonA blog about cloud and networking and other (un)related thingsWhy I Can’t Recommend Renegade Tonneau Covers (An Honest Review)2023-08-14T00:00:00+00:002023-08-14T00:00:00+00:00http://www.jimmdenton.com/renegade-covers<p>For this 2013 Ford F-350 Super Duty owner, the Renegade Tonneau Cover gets 2.5/10 stars.
<!--more--></p>
<p>I bought the <a href="https://renegadecovers.com">Renegade Tonneau Cover</a> in April 2021 after weeks of research. Having been a previous BAK Revolver X2 customer, I was looking for something a little more forgiving and durable. I spotted another truck with a DiamondBack cover, and research into that led me to Renegade.</p>
<p>After finally receiving my cover nearly four months after ordering, here’s what I found:</p>
<ul>
<li>It covers the bed</li>
<li>It keeps things in the bed pretty secure</li>
<li>It keeps those secure things pretty dry</li>
<li>It’s heavy duty</li>
<li>It looks awesome</li>
<li>It’s L-track system can come in handy</li>
</ul>
<p>These are all qualities of a typical tonneau cover, except for maybe the heavy-dutyness and the unique L-track system.</p>
<p>Fast forward nearly two years…</p>
<ul>
<li>50% of the time I can’t get it to open properly</li>
<li>The panels are pretty heavy</li>
<li>50% of the time I can’t get it to close properly</li>
<li>The panels have a habit of shifting, especially in an open position on a bumpy road</li>
<li>Did I mention that it’s heavy?</li>
</ul>
<p>In all seriousness, though, the heavy dutyness of this tonneau cover (2,000 lbs bearing weight!) does come at a cost: you won’t be taking this off by yourself unless you have a Tacoma. Opening and closing the front or rear panel is an exercise in delicateness. Close it too hard, and the rail might come out of alignment and you’ll find yourself in the bed of the truck trying to get it situated just right. Allow it to slam down and you’ll be lucky to not lose a finger.</p>
<p>The attachment points for the rails in my F-350 are near the front and rear stake pockets (the holes in the bed rails). So, for each rail, there’s only two mounting points. This allows the rail to sort of ‘tilt’ down from its ordinary parallel position (to the rail itself) and fall out of alignment, causing the pins to bind or some other complication that results in the cover not opening or closing properly. This is my biggest complaint. I spend 80% of my time making adjustments to the rail and/or the cover to get it to open or close properly until the next time I need to open or close it. It’s a <em>constant</em> battle, and one that has escalated beyond annoying.</p>
<p>The rubber seal at the tailgate has degraded and separated from the cover due to the plastic tailgate end cap not sitting flush with the seal. A few months of this annoyance led me to solving the problem with some Gorilla glue, which has seemed to have help up well over the last 60 days.</p>
<p>Renegade has been fairly responsive to my complaints; enough to send me a shim to help with rail alignment when the torsion bar is installed. The torsion bar allows you to open both rails while only using a single handle. Given my rail alignment issues, however, I have found it less painful to simply use both handles.</p>
<p>I am willing to accept that my particular application may not be the greatest matchup for this cover, given the lack of solid mounting locations compared to, say, the late model F-150 and Super Duty models (with aluminum bed) and maybe smaller trucks. Had I known just how inconvenient and annoying it would be to operate the tonneau <em>every time</em> I use the bed of the truck, I would’ve gone with the DiamondBack or no cover at all. While I do occasionally use the L-track system, I find it hard to put faith in the sturdyness of the setup given the possibility of one or more corners not being fully “locked down”. The concept is cool, though, and having all sorts of tools and utilities mounted to the cover is definitely a selling point. But those accessories scattered on Interstate 10 doesn’t really sound appealing.</p>
<p>In 2023, I have serious regrets about purchasing the Renegade tonneau cover and given the opportunity to buy new, might look at the DiamondBack SwitchBack cover (vs HD) given the similarity in function to the Renegade cover.</p>
<p><img src="/assets/images/2023-08-14-renegade-covers/cover.png" alt="Tonneau" /></p>
<p>2.5 stars for fitting the part of a great looking and somewhat function tonneau. -7.5 stars for all of the stress it induces.</p>jamesdentonFor this 2013 Ford F-350 Super Duty owner, the Renegade Tonneau Cover gets 2.5/10 stars.Neutron Dynamic Routing - What it is (and isn’t)2022-10-12T00:00:00+00:002022-10-12T00:00:00+00:00http://www.jimmdenton.com/openstack-bgp-speaker<p>To understand OpenStack Neutron’s Dynamic Routing feature, you must first understand what BGP Speaker is… and what it isn’t.
<!--more--></p>
<p>Recent workshops with a customer made it very clear to me that Neutron’s Dynamic Routing feature leaves a lot on the table, and likely isn’t a good fit for many of the environments that would look at using it. That doesn’t mean it isn’t useful, though.</p>
<p>Before jumping too far into Neutron Dynamic Routing and it’s core function, advertising tenant networks, let’s revisit Neutron’s logical network designs.</p>
<h2 id="tenant-networking">Tenant Networking</h2>
<p>Whether you’re using ML2/LXB (Linux Bridge), ML2/OVS (Open vSwitch), or ML2/OVN, the <em>logical</em> network topology for tenant networking looks relatively the same. It’s composed of:</p>
<ul>
<li>An external provider network</li>
<li>A virtual router</li>
<li>One or more tenant networks</li>
</ul>
<p>On paper, it looks something like this:</p>
<p><img src="/assets/images/2022-10-12-openstack-bgp-speaker/standard_tenant_networking.png" alt="Standard Tenant Networking" /></p>
<p>
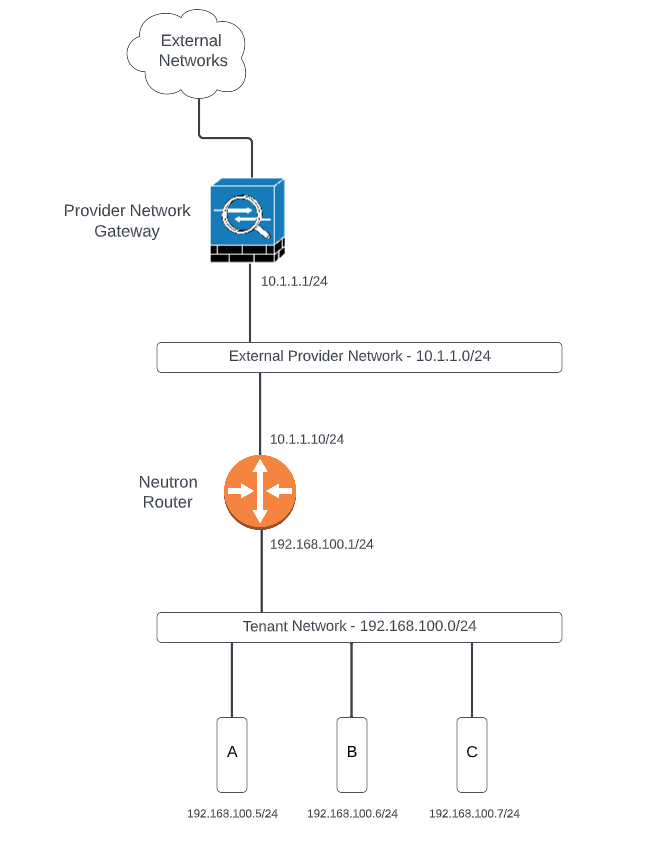
Tenant networks are not reachable by default. The virtual router can source NAT (SNAT) outbound traffic from instances in tenant networks to allow connectivity to external networks or the Internet. Inbound traffic in this scenario is not possible without the use of Floating IPs. Floating IPs, in turn, are sourced from the <strong>external provider network</strong>. Your standard Neutron tenant network topology looks something like this:</p>
<p><img src="/assets/images/2022-10-12-openstack-bgp-speaker/floating_tenant_networking.png" alt="Floating Tenant Networking" /></p>
<p>
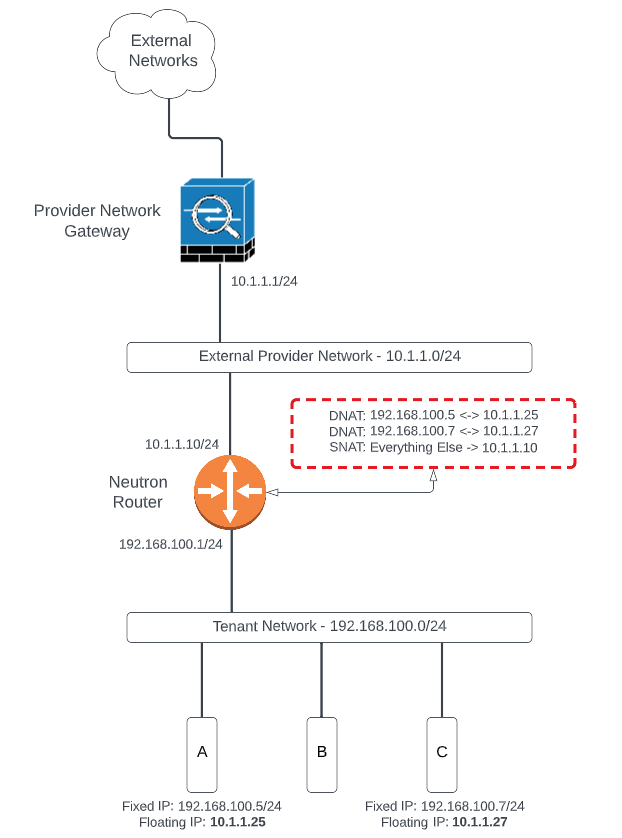
To reach tenant networks directly and bypass the use of floating IPs, one <em>could</em> implement a static route on the provider network gateway device and redistribute that route upstream. In fact, we’ve done this for many years as far back as the Grizzly release of OpenStack, when Neutron (neé Quantum) was in its infancy. Where this falls apart, though, is in the <strong><em>self-servicing</em></strong> of tenant networking. Tenants can’t (or shouldn’t) access that provider gateway device and would not be able to add that static route.</p>
<h2 id="neutron-dynamic-routing">Neutron Dynamic Routing</h2>
<p>The obvious solution is to implement some sort of dynamic routing mechanism to allow tenants to advertise their tenant network(s) upstream with no involvement from the network administrator. Neutron provides this capability with a combination of <strong>Neutron Dynamic Routing</strong>, <strong>Subnet Pools</strong>, and <strong>Address Scopes</strong>.</p>
<p>Neutron Dynamic Routing provides a service known as <strong>BGP Speaker</strong> that peers with external routers to advertise the tenant networks using BGP. Subnet pools and address scopes are used together to avoid overlapping subnets, especially when advertising to a given peer.</p>
<p>Where the misunderstanding appears to sneak in is <em>how</em> and <em>where</em> the advertisements occur. It’s fairly common practice to have two routers directly connected to one another to exchange routes, like so:</p>
<p><img src="/assets/images/2022-10-12-openstack-bgp-speaker/bgp.png" alt="BGP" /></p>
<p>
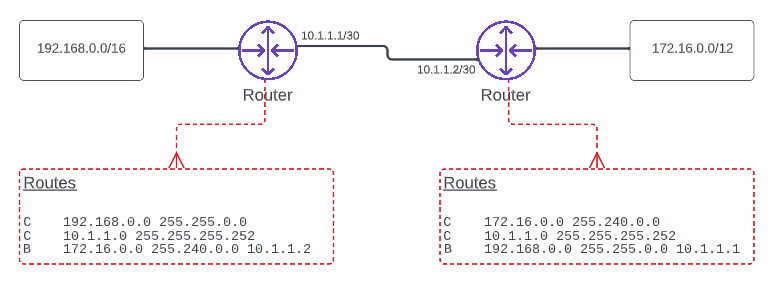
One might assume, then, that the Neutron router would peer with the provider network router in this fashion. They’d be wrong!</p>
<p><img src="/assets/images/2022-10-12-openstack-bgp-speaker/soup.jpg" alt="No BGP For you!" width="350" /></p>
<p>That’s where <strong>BGP Speaker</strong> comes into play. The BGP Speaker is a <em>control plane</em> service that advertises tenant network(s) on behalf of the tenant router. The BGP Speaker peers with the provider network router and advertises the tenant network with a next hop of the tenant router, like so:</p>
<p><img src="/assets/images/2022-10-12-openstack-bgp-speaker/speaker.png" alt="BGP Speaker!" /></p>
<p>
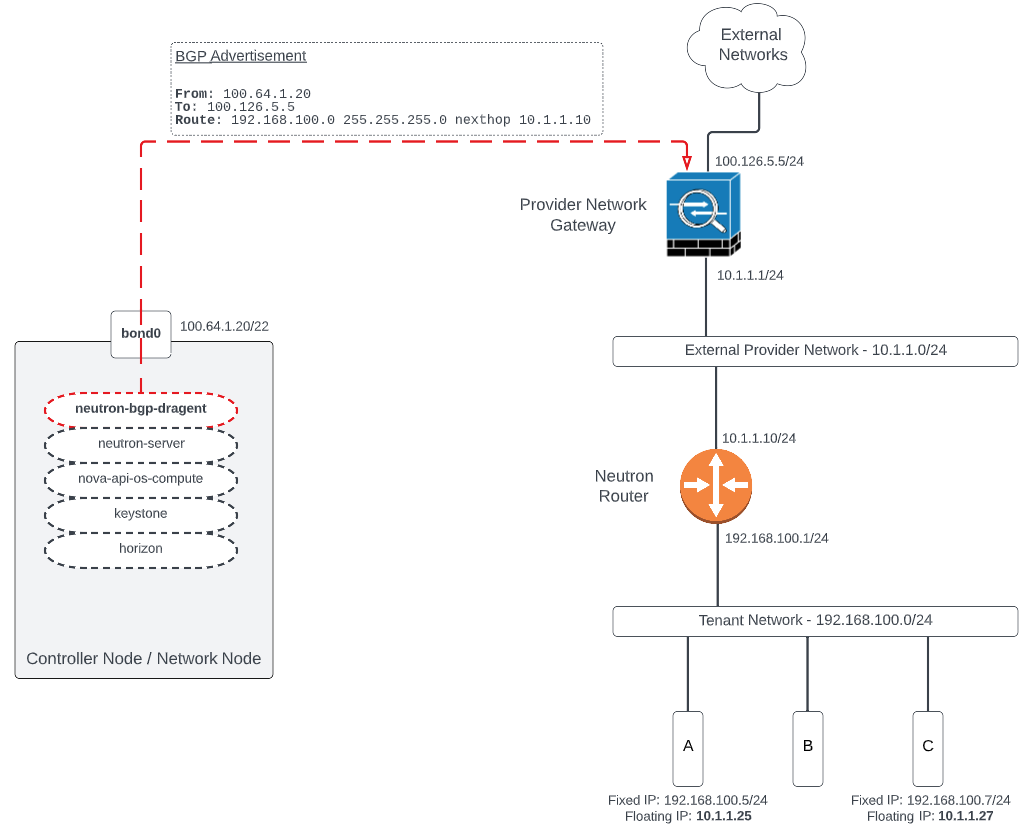
The BGP Speaker is not a router. It is not a route reflector. It does not accept BGP routes from other speakers or routers. It. Only. Speaks. BGP. And, it does this from the control plane or network node hosting the BGP “dragent”. What that means in practice is that the controller or network node hosting the agent needs L3 connectivity to the provider network gateway device: either the WAN, the LAN, or some other interface to peer on. This requirement is not ideal in many environments and could be a deal breaker in others.</p>
<h2 id="summary">Summary</h2>
<p>The documentation upstream for <a href="https://docs.openstack.org/neutron/latest/admin/config-bgp-dynamic-routing.html">Neutron Dynamic Routing</a> has some pretty good diagrams and goes into further detail than what I’ve described here. The BGP speaker can even advertise floating IPs, though I’m not sure how this makes sense if the provider router is locally connected. However, I’m sure there’s a use case I haven’t considered. There have been attempts to implement BGP at the Neutron router itself, as seen in <a href="https://bugs.launchpad.net/neutron/+bug/1921461">RFE</a>, but it has not really made much traction since late 2021. This functionality would mirror something I’ve seen in NSX and other (legacy) cases, but might result in too much overhead; especially when hundreds of routers are involved.</p>
<hr />
<p>If you have some thoughts or comments on this post, I’d love to hear ‘em. Feel free to reach out on Twitter at @jimmdenton or hit me up on LinkedIn.</p>jamesdentonTo understand OpenStack Neutron’s Dynamic Routing feature, you must first understand what BGP Speaker is… and what it isn’t.[OpenStack] Migrating from LinuxBridge to OVN2022-08-31T00:00:00+00:002022-08-31T00:00:00+00:00http://www.jimmdenton.com/migrating-lxb-to-ovn<p>Migrating from one Neutron mechanism driver to another, especially in a production environment, is not a decision one takes on without giving much thought. In many cases, the process involves migrating to a “Greenfield” environment, or a new environment that is stood up running the same or similar operating system and cloud service software but configured in a new way, then migrating entire workloads in a weekend (or more). To say this process is tedious is an understatement.
<!--more--></p>
<p>Brave individuals have sometimes taken to in-place migrations. In fact, my first OpenStack Summit presentation involved migrating from ML2/OVS to ML2/LXB in-place due to issues with Open vSwitch stability and performance in the early days. Since then, I have been involved with multiple OVS->LXB and LXB->OVS migrations, as well as LXB->OVN.</p>
<h2 id="overview">Overview</h2>
<p>Since performing the initial migration(s) in the lab, I’ve decided to better document the process here so you, the reader, can see what’s involved and determine if this is the right move for your environment. I’m running OpenStack-Ansible Wallaby, so the steps may need to be extrapolated for environments that involve a more ‘manual’ process of modifying configurations.</p>
<p>The environment here consists of five nodes:</p>
<ul>
<li>3x controller</li>
<li>2x compute</li>
</ul>
<p>The original plugin/driver is ML2/LinuxBridge with multiple Neutron resources:</p>
<ul>
<li>2x routers</li>
<li>2x provider (vlan) networks</li>
<li>3x tenant (vxlan) networks</li>
</ul>
<div class="language-plaintext highlighter-rouge"><div class="highlight"><pre class="highlight"><code>root@infra1:~# openstack router list
+--------------------------------------+---------+--------+-------+----------------------------------+
| ID | Name | Status | State | Project |
+--------------------------------------+---------+--------+-------+----------------------------------+
| cee5e805-ecf9-456b-87be-d60f155c8fd8 | rtr-web | ACTIVE | UP | d1ae5313d10c411fa772e8fa697a6aeb |
| d5052734-53e8-4a58-9fbd-2b76ec138af6 | rtr-db | ACTIVE | UP | d1ae5313d10c411fa772e8fa697a6aeb |
+--------------------------------------+---------+--------+-------+----------------------------------+
root@infra1:~# openstack network list
+--------------------------------------+----------------------------------------------------+--------------------------------------+
| ID | Name | Subnets |
+--------------------------------------+----------------------------------------------------+--------------------------------------+
| 12a0ab09-d130-4e69-9aa2-c28c66509b02 | db | 37ae585e-1c48-4aff-98de-dad4f9502428 |
| 282e63e3-5120-4396-a63d-0186e5e96466 | app | d6974d0e-685e-4cfd-ba06-4335c2834788 |
| 3fb2d48e-8c71-4bca-92ce-f64a4c932338 | vlan200 | 6e960212-2104-4aea-b51f-686d2b1190d7 |
| 9e151884-67a5-4905-b157-f08f1b3b0040 | HA network tenant d1ae5313d10c411fa772e8fa697a6aeb | 5db20ee1-1d8d-42fe-9724-301fee8c6f43 |
| ab3f0f85-a509-406a-8dca-5db13fbcb48b | web | 90d2e2fe-2301-47b8-b31c-bb6dc7264acb |
| dddfdce8-a8fd-4802-a01c-261b92043488 | vlan100 | 6799e6c1-5b66-4894-81b6-6dc698d43462 |
+--------------------------------------+----------------------------------------------------+--------------------------------------+
root@infra1:~# openstack subnet list
+--------------------------------------+---------------------------------------------------+--------------------------------------+------------------+
| ID | Name | Network | Subnet |
+--------------------------------------+---------------------------------------------------+--------------------------------------+------------------+
| 37ae585e-1c48-4aff-98de-dad4f9502428 | db | 12a0ab09-d130-4e69-9aa2-c28c66509b02 | 192.168.55.0/24 |
| 5db20ee1-1d8d-42fe-9724-301fee8c6f43 | HA subnet tenant d1ae5313d10c411fa772e8fa697a6aeb | 9e151884-67a5-4905-b157-f08f1b3b0040 | 169.254.192.0/18 |
| 6799e6c1-5b66-4894-81b6-6dc698d43462 | vlan100 | dddfdce8-a8fd-4802-a01c-261b92043488 | 192.168.100.0/24 |
| 6e960212-2104-4aea-b51f-686d2b1190d7 | vlan200 | 3fb2d48e-8c71-4bca-92ce-f64a4c932338 | 192.168.200.0/24 |
| 90d2e2fe-2301-47b8-b31c-bb6dc7264acb | web | ab3f0f85-a509-406a-8dca-5db13fbcb48b | 10.5.0.0/24 |
| d6974d0e-685e-4cfd-ba06-4335c2834788 | app | 282e63e3-5120-4396-a63d-0186e5e96466 | 172.25.0.0/24 |
+--------------------------------------+---------------------------------------------------+--------------------------------------+------------------+
</code></pre></div></div>
<p>Six virtual machine instances were deployed across two compute nodes:</p>
<div class="language-plaintext highlighter-rouge"><div class="highlight"><pre class="highlight"><code>root@infra1:~# openstack server list
+--------------------------------------+---------+--------+-----------------------------------+--------------+--------+
| ID | Name | Status | Networks | Image | Flavor |
+--------------------------------------+---------+--------+-----------------------------------+--------------+--------+
| b3a33fb1-98dc-4cf9-99c3-53d5352310e5 | vm-db2 | ACTIVE | db=192.168.55.223 | cirros-0.5.2 | 1-1-1 |
| e2ea6e2a-aa47-4f44-b285-1b727ad4f709 | vm-db1 | ACTIVE | db=192.168.100.215, 192.168.55.21 | cirros-0.5.2 | 1-1-1 |
| 916052d7-a5f7-4e4a-87a0-7249eef45801 | vm-app2 | ACTIVE | app=172.25.0.250 | cirros-0.5.2 | 1-1-1 |
| dd3046a3-128a-4585-8ffd-54c11b516052 | vm-app1 | ACTIVE | app=172.25.0.50 | cirros-0.5.2 | 1-1-1 |
| 7e1af764-a034-4ef2-9695-ca19838812e5 | vm-web1 | ACTIVE | web=10.5.0.121, 192.168.100.90 | cirros-0.5.2 | 1-1-1 |
| dbb98201-52fc-420d-bf6e-5a40fad74327 | vm-web2 | ACTIVE | web=10.5.0.162 | cirros-0.5.2 | 1-1-1 |
+--------------------------------------+---------+--------+-----------------------------------+--------------+--------+
</code></pre></div></div>
<div class="language-plaintext highlighter-rouge"><div class="highlight"><pre class="highlight"><code>root@compute1:~# virsh list
Id Name State
-----------------------------------
1 instance-00000006 running
2 instance-0000000c running
3 instance-00000012 running
root@compute2:~# virsh list
Id Name State
-----------------------------------
1 instance-00000009 running
2 instance-0000000f running
3 instance-00000015 running
</code></pre></div></div>
<h2 id="inspections">Inspections</h2>
<p>Before conducting the migration, I performed a series of tests to ensure the following was successful:</p>
<h4 id="icmp-to-all-instances-from-the-dhcp-namespaces">ICMP to all instances from the DHCP namespace(s)</h4>
<div class="language-plaintext highlighter-rouge"><div class="highlight"><pre class="highlight"><code>root@infra1:~# ip netns exec qdhcp-12a0ab09-d130-4e69-9aa2-c28c66509b02 ping 192.168.55.223 -c2
PING 192.168.55.223 (192.168.55.223) 56(84) bytes of data.
64 bytes from 192.168.55.223: icmp_seq=1 ttl=64 time=13.3 ms
64 bytes from 192.168.55.223: icmp_seq=2 ttl=64 time=1.20 ms
--- 192.168.55.223 ping statistics ---
2 packets transmitted, 2 received, 0% packet loss, time 1002ms
rtt min/avg/max/mdev = 1.204/7.239/13.275/6.035 ms
root@infra1:~# ip netns exec qdhcp-12a0ab09-d130-4e69-9aa2-c28c66509b02 ping 192.168.55.21 -c2
PING 192.168.55.21 (192.168.55.21) 56(84) bytes of data.
64 bytes from 192.168.55.21: icmp_seq=1 ttl=64 time=1.61 ms
64 bytes from 192.168.55.21: icmp_seq=2 ttl=64 time=1.19 ms
--- 192.168.55.21 ping statistics ---
2 packets transmitted, 2 received, 0% packet loss, time 1002ms
rtt min/avg/max/mdev = 1.193/1.401/1.610/0.208 ms
root@infra1:~# ip netns exec qdhcp-282e63e3-5120-4396-a63d-0186e5e96466 ping 172.25.0.250 -c2
PING 172.25.0.250 (172.25.0.250) 56(84) bytes of data.
64 bytes from 172.25.0.250: icmp_seq=1 ttl=64 time=1.69 ms
64 bytes from 172.25.0.250: icmp_seq=2 ttl=64 time=1.34 ms
--- 172.25.0.250 ping statistics ---
2 packets transmitted, 2 received, 0% packet loss, time 1002ms
rtt min/avg/max/mdev = 1.341/1.516/1.691/0.175 ms
root@infra1:~# ip netns exec qdhcp-282e63e3-5120-4396-a63d-0186e5e96466 ping 172.25.0.50 -c2
PING 172.25.0.50 (172.25.0.50) 56(84) bytes of data.
64 bytes from 172.25.0.50: icmp_seq=1 ttl=64 time=1.27 ms
64 bytes from 172.25.0.50: icmp_seq=2 ttl=64 time=1.24 ms
--- 172.25.0.50 ping statistics ---
2 packets transmitted, 2 received, 0% packet loss, time 1002ms
rtt min/avg/max/mdev = 1.241/1.255/1.270/0.014 ms
root@infra1:~# ip netns exec qdhcp-ab3f0f85-a509-406a-8dca-5db13fbcb48b ping 10.5.0.121 -c2
PING 10.5.0.121 (10.5.0.121) 56(84) bytes of data.
64 bytes from 10.5.0.121: icmp_seq=1 ttl=64 time=1.94 ms
64 bytes from 10.5.0.121: icmp_seq=2 ttl=64 time=1.44 ms
--- 10.5.0.121 ping statistics ---
2 packets transmitted, 2 received, 0% packet loss, time 1001ms
rtt min/avg/max/mdev = 1.437/1.687/1.937/0.250 ms
root@infra1:~# ip netns exec qdhcp-ab3f0f85-a509-406a-8dca-5db13fbcb48b ping 10.5.0.162 -c2
PING 10.5.0.162 (10.5.0.162) 56(84) bytes of data.
64 bytes from 10.5.0.162: icmp_seq=1 ttl=64 time=1.71 ms
64 bytes from 10.5.0.162: icmp_seq=2 ttl=64 time=1.61 ms
--- 10.5.0.162 ping statistics ---
2 packets transmitted, 2 received, 0% packet loss, time 1002ms
rtt min/avg/max/mdev = 1.608/1.656/1.705/0.048 ms
</code></pre></div></div>
<h4 id="ssh-to-all-instances-from-the-dhcp-namespaces">SSH to all instances from the DHCP namespace(s)</h4>
<div class="language-plaintext highlighter-rouge"><div class="highlight"><pre class="highlight"><code>root@infra1:~# ip netns exec qdhcp-ab3f0f85-a509-406a-8dca-5db13fbcb48b ssh cirros@10.5.0.162 uptime
The authenticity of host '10.5.0.162 (10.5.0.162)' can't be established.
ECDSA key fingerprint is SHA256:NAb9iUzaNKhRptbCLQj/ROZ1vJKisSlFM2amR/s/1Dk.
Are you sure you want to continue connecting (yes/no/[fingerprint])? yes
Warning: Permanently added '10.5.0.162' (ECDSA) to the list of known hosts.
cirros@10.5.0.162's password:
14:15:52 up 20 min, 0 users, load average: 0.00, 0.00, 0.00
root@infra1:~# ip netns exec qdhcp-282e63e3-5120-4396-a63d-0186e5e96466 ssh cirros@172.25.0.50 uptime
The authenticity of host '172.25.0.50 (172.25.0.50)' can't be established.
ECDSA key fingerprint is SHA256:GMBDGbQ1g1JiyqCTH/kIlrzaojtAXoCGCG/J8BdxEKA.
Are you sure you want to continue connecting (yes/no/[fingerprint])? yes
Warning: Permanently added '172.25.0.50' (ECDSA) to the list of known hosts.
cirros@172.25.0.50's password:
14:16:26 up 18 min, 0 users, load average: 0.00, 0.00, 0.00
root@infra1:~# ip netns exec qdhcp-12a0ab09-d130-4e69-9aa2-c28c66509b02 ssh cirros@192.168.55.223 uptime
The authenticity of host '192.168.55.223 (192.168.55.223)' can't be established.
ECDSA key fingerprint is SHA256:WRuu37KvrvU16c7cgF3f4EbA+U9oWMVTY59r/X7rRaA.
Are you sure you want to continue connecting (yes/no/[fingerprint])? yes
Warning: Permanently added '192.168.55.223' (ECDSA) to the list of known hosts.
cirros@192.168.55.223's password:
14:16:51 up 13 min, 0 users, load average: 0.00, 0.00, 0.00
</code></pre></div></div>
<h4 id="icmp-between-instances">ICMP between instances</h4>
<p>DB2->DB1</p>
<div class="language-plaintext highlighter-rouge"><div class="highlight"><pre class="highlight"><code>$ hostname
vm-db2
$ ping 192.168.55.21 -c2
PING 192.168.55.21 (192.168.55.21): 56 data bytes
64 bytes from 192.168.55.21: seq=0 ttl=64 time=1.481 ms
64 bytes from 192.168.55.21: seq=1 ttl=64 time=1.868 ms
--- 192.168.55.21 ping statistics ---
2 packets transmitted, 2 packets received, 0% packet loss
round-trip min/avg/max = 1.481/1.674/1.868 ms
</code></pre></div></div>
<p>WEB1 -> WEB2 and WEB1 -> APP2</p>
<div class="language-plaintext highlighter-rouge"><div class="highlight"><pre class="highlight"><code>root@infra1:~# ip netns exec qdhcp-ab3f0f85-a509-406a-8dca-5db13fbcb48b ssh cirros@10.5.0.121
cirros@10.5.0.121's password:
$ hostname
vm-web1
$ ping 10.5.0.162 -c2
PING 10.5.0.162 (10.5.0.162): 56 data bytes
64 bytes from 10.5.0.162: seq=0 ttl=64 time=2.099 ms
64 bytes from 10.5.0.162: seq=1 ttl=64 time=1.880 ms
--- 10.5.0.162 ping statistics ---
2 packets transmitted, 2 packets received, 0% packet loss
round-trip min/avg/max = 1.880/1.989/2.099 ms
$ ping 172.25.0.50 -c2
PING 172.25.0.50 (172.25.0.50): 56 data bytes
64 bytes from 172.25.0.50: seq=0 ttl=63 time=9.040 ms
64 bytes from 172.25.0.50: seq=1 ttl=63 time=2.553 ms
--- 172.25.0.50 ping statistics ---
2 packets transmitted, 2 packets received, 0% packet loss
round-trip min/avg/max = 2.553/5.796/9.040 ms
</code></pre></div></div>
<h4 id="connectivity-to-floating-ip">Connectivity to floating IP</h4>
<p>WEB1->DB1 via FLOAT</p>
<div class="language-plaintext highlighter-rouge"><div class="highlight"><pre class="highlight"><code>root@infra1:~# ip netns exec qdhcp-ab3f0f85-a509-406a-8dca-5db13fbcb48b ssh cirros@10.5.0.121
cirros@10.5.0.121's password:
$ hostname
vm-web1
$ ping 192.168.100.215 -c2
PING 192.168.100.215 (192.168.100.215): 56 data bytes
64 bytes from 192.168.100.215: seq=0 ttl=62 time=11.783 ms
64 bytes from 192.168.100.215: seq=1 ttl=62 time=10.835 ms
--- 192.168.100.215 ping statistics ---
2 packets transmitted, 2 packets received, 0% packet loss
round-trip min/avg/max = 10.835/11.309/11.783 ms
</code></pre></div></div>
<h2 id="pre-flight">Pre-Flight</h2>
<p>Before starting the migration, there are a few config changes that can be staged. Please note that this entire process will result in downtime, and is probably not well suited to any sort of “rollback” without serious testing beforehand.</p>
<p>I like to live dangerously.</p>
<p>First, modify the <code class="language-plaintext highlighter-rouge">/etc/openstack_deploy/user_variables.yml</code> file to include some overrides:</p>
<div class="language-plaintext highlighter-rouge"><div class="highlight"><pre class="highlight"><code>neutron_plugin_type: ml2.ovn
neutron_plugin_base:
- neutron.services.ovn_l3.plugin.OVNL3RouterPlugin
- qos
neutron_ml2_drivers_type: "geneve,vxlan,vlan,flat"
</code></pre></div></div>
<p>The <code class="language-plaintext highlighter-rouge">qos</code> plugin may be required if not already enabled in your environment. Previous testing showed that the Neutron API server would not start without it. YMMV.</p>
<p>Next, Update the <code class="language-plaintext highlighter-rouge">openstack_inventory.json</code> inventory file to remove members of L3, DHCP, LinuxBridge and Metadata groups (this will have to be done by hand).</p>
<h4 id="before">BEFORE</h4>
<div class="language-plaintext highlighter-rouge"><div class="highlight"><pre class="highlight"><code>"neutron_dhcp_agent": {
"children": [],
"hosts": [
"infra1",
"infra2",
"infra3"
]
},
"neutron_l3_agent": {
"children": [],
"hosts": [
"infra1",
"infra2",
"infra3"
]
},
"neutron_linuxbridge_agent": {
"children": [],
"hosts": [
"compute1",
"compute2",
"infra1",
"infra2",
"infra3"
]
},
"neutron_metadata_agent": {
"children": [],
"hosts": [
"infra1",
"infra2",
"infra3"
]
}
</code></pre></div></div>
<h4 id="after">AFTER</h4>
<div class="language-plaintext highlighter-rouge"><div class="highlight"><pre class="highlight"><code>"neutron_dhcp_agent": {
"children": [],
"hosts": [
]
},
"neutron_l3_agent": {
"children": [],
"hosts": [
]
},
"neutron_linuxbridge_agent": {
"children": [],
"hosts": [
]
},
"neutron_metadata_agent": {
"children": [],
"hosts": [
]
}
</code></pre></div></div>
<p>Then, update the <code class="language-plaintext highlighter-rouge">/etc/openstack_deploy/group_vars/network_hosts</code> file to add an OVS-related override:</p>
<div class="language-plaintext highlighter-rouge"><div class="highlight"><pre class="highlight"><code>openstack_host_specific_kernel_modules:
- name: "openvswitch"
pattern: "CONFIG_OPENVSWITCH"
</code></pre></div></div>
<p>Modify the <code class="language-plaintext highlighter-rouge">/etc/openstack_deploy/env.d/neutron.yml</code> file to update Neutron-related group memberships:</p>
<div class="language-plaintext highlighter-rouge"><div class="highlight"><pre class="highlight"><code>---
component_skel:
neutron_ovn_controller:
belongs_to:
- neutron_all
neutron_ovn_northd:
belongs_to:
- neutron_all
container_skel:
neutron_agents_container:
contains: {}
neutron_ovn_northd_container:
belongs_to:
- network_containers
contains:
- neutron_ovn_northd
properties:
is_metal: true
neutron_server_container:
belongs_to:
- network_containers
contains:
- neutron_server
- opendaylight
properties:
is_metal: true
</code></pre></div></div>
<p>Also, modify the <code class="language-plaintext highlighter-rouge">/etc/openstack_deploy/env.d/nova.yml</code> file to update Nova-related group memberships:</p>
<div class="language-plaintext highlighter-rouge"><div class="highlight"><pre class="highlight"><code>---
container_skel:
nova_api_container:
belongs_to:
- compute-infra_containers
- os-infra_containers
contains:
- nova_api_metadata
- nova_api_os_compute
- nova_conductor
- nova_scheduler
- nova_console
properties:
is_metal: true
nova_compute_container:
belongs_to:
- compute_containers
- kvm-compute_containers
- lxd-compute_containers
- qemu-compute_containers
contains:
- neutron_ovn_controller
- nova_compute
properties:
is_metal: true
</code></pre></div></div>
<p>The network definitions in <code class="language-plaintext highlighter-rouge">openstack_user_config.yml</code> will need to be updated to reflect changes to support OVN. In this environment there are two bridges: <code class="language-plaintext highlighter-rouge">br-vlan</code> and <code class="language-plaintext highlighter-rouge">br-flat</code>. I am taking the opportunity to rename <code class="language-plaintext highlighter-rouge">br-vlan</code> to <code class="language-plaintext highlighter-rouge">br-ex</code> to better match upstream documentation. Also, <code class="language-plaintext highlighter-rouge">host_bind_override</code> is really no good in an OVS-based deployment, we should use <code class="language-plaintext highlighter-rouge">network_interface</code> instead.</p>
<h4 id="before-1">BEFORE</h4>
<div class="language-plaintext highlighter-rouge"><div class="highlight"><pre class="highlight"><code> - network:
container_bridge: "br-vxlan"
container_type: "veth"
container_interface: "eth10"
ip_from_q: "tunnel"
type: "vxlan"
range: "1:1000"
net_name: "vxlan"
group_binds:
- neutron_linuxbridge_agent
- network:
container_bridge: "br-vlan"
container_type: "veth"
container_interface: "eth11"
type: "vlan"
range: "1:1"
net_name: "vlan"
group_binds:
- neutron_linuxbridge_agent
- network:
container_bridge: "br-flat"
container_type: "veth"
container_interface: "eth12"
host_bind_override: "veth2"
type: "flat"
net_name: "flat"
group_binds:
- neutron_linuxbridge_agent
- utility_all
</code></pre></div></div>
<h4 id="after-1">AFTER</h4>
<div class="language-plaintext highlighter-rouge"><div class="highlight"><pre class="highlight"><code> - network:
container_bridge: "br-vxlan"
container_type: "veth"
container_interface: "eth10"
ip_from_q: "tunnel"
type: "geneve"
range: "1:1000"
net_name: "geneve"
group_binds:
- neutron_ovn_controller
- network:
container_bridge: "br-ex"
container_type: "veth"
container_interface: "eth11"
type: "vlan"
range: "1:1"
net_name: "vlan"
group_binds:
- neutron_ovn_controller
- network:
container_bridge: "br-flat"
container_type: "veth"
container_interface: "eth12"
network_interface: "veth2"
type: "flat"
net_name: "flat"
group_binds:
- neutron_ovn_controller
- utility_all
</code></pre></div></div>
<p>Once those changes are made, notate and stop all running VMs:</p>
<div class="language-plaintext highlighter-rouge"><div class="highlight"><pre class="highlight"><code>root@infra1:~# openstack server list --all | grep ACTIVE
| b3a33fb1-98dc-4cf9-99c3-53d5352310e5 | vm-db2 | ACTIVE | db=192.168.55.223 | cirros-0.5.2 | 1-1-1 |
| e2ea6e2a-aa47-4f44-b285-1b727ad4f709 | vm-db1 | ACTIVE | db=192.168.100.215, 192.168.55.21 | cirros-0.5.2 | 1-1-1 |
| 916052d7-a5f7-4e4a-87a0-7249eef45801 | vm-app2 | ACTIVE | app=172.25.0.250 | cirros-0.5.2 | 1-1-1 |
| dd3046a3-128a-4585-8ffd-54c11b516052 | vm-app1 | ACTIVE | app=172.25.0.50 | cirros-0.5.2 | 1-1-1 |
| 7e1af764-a034-4ef2-9695-ca19838812e5 | vm-web1 | ACTIVE | web=10.5.0.121, 192.168.100.90 | cirros-0.5.2 | 1-1-1 |
| dbb98201-52fc-420d-bf6e-5a40fad74327 | vm-web2 | ACTIVE | web=10.5.0.162 | cirros-0.5.2 | 1-1-1 |
root@infra1:~# for i in $(openstack server list --all | grep ACTIVE | awk {'print $2'}); do openstack server stop $i; done
</code></pre></div></div>
<h2 id="lift-off">Lift Off</h2>
<p>Now that everything is staged, it’s time to kick off the changes.</p>
<p><strong>STOP</strong> and <strong>DISABLE</strong> existing Neutron agents on network and compute hosts:</p>
<div class="language-plaintext highlighter-rouge"><div class="highlight"><pre class="highlight"><code>cd /opt/openstack-ansible/playbooks
ansible network_hosts,compute_hosts -m shell -a 'systemctl stop neutron-linuxbridge-agent'
ansible network_hosts,compute_hosts -m shell -a 'systemctl stop neutron-l3-agent'
ansible network_hosts,compute_hosts -m shell -a 'systemctl stop neutron-dhcp-agent'
ansible network_hosts,compute_hosts -m shell -a 'systemctl stop neutron-metadata-agent'
ansible network_hosts,compute_hosts -m shell -a 'systemctl disable neutron-linuxbridge-agent'
ansible network_hosts,compute_hosts -m shell -a 'systemctl disable neutron-l3-agent'
ansible network_hosts,compute_hosts -m shell -a 'systemctl disable neutron-dhcp-agent'
ansible network_hosts,compute_hosts -m shell -a 'systemctl disable neutron-metadata-agent'
</code></pre></div></div>
<p>Delete the Neutron-managed network namespaces (qdhcp,qrouter) from controller and compute hosts (repeat as necessary):</p>
<div class="language-plaintext highlighter-rouge"><div class="highlight"><pre class="highlight"><code>ssh infra1;
for i in $(ip netns | grep 'qdhcp\|qrouter' | awk {'print $1'}); do ip netns delete $i; done;
exit
</code></pre></div></div>
<p>Delete all ‘brq’ bridges and ‘tap’ interfaces from controller and compute hosts (repeat as necessary):</p>
<div class="language-plaintext highlighter-rouge"><div class="highlight"><pre class="highlight"><code>ssh infra1;
for i in $(ip -br link show | grep brq | awk {'print $1'}); do ip link delete $i; done
for i in $(ip -br link show | grep tap | awk {'print $1'} | sed 's/@.*//'); do ip link delete $i; done
exit;
</code></pre></div></div>
<p>Run the playbooks:</p>
<div class="language-plaintext highlighter-rouge"><div class="highlight"><pre class="highlight"><code>cd /opt/openstack-ansible/playbooks
openstack-ansible os-nova-install.yml
openstack-ansible os-neutron-install.yml
</code></pre></div></div>
<h2 id="turbulance">Turbulance</h2>
<p>After the playbooks have executed, you should expect to have Open vSwitch installed where needed and if configured correctly, you may even have the physical interfaces connected (via <code class="language-plaintext highlighter-rouge">network_interface</code>).</p>
<p>Check the agent list – the L3, DHCP, and LXB agents should be down and can be deleted. Metering is TBD:</p>
<div class="language-plaintext highlighter-rouge"><div class="highlight"><pre class="highlight"><code>root@infra1:~# openstack network agent list
+--------------------------------------+------------------------------+----------+-------------------+-------+-------+----------------------------+
| ID | Agent Type | Host | Availability Zone | Alive | State | Binary |
+--------------------------------------+------------------------------+----------+-------------------+-------+-------+----------------------------+
| 002dd54a-7637-4989-b217-10cf79d6b7f2 | L3 agent | infra3 | nova | XXX | UP | neutron-l3-agent |
| 06ba670f-d560-43aa-b1e7-be60d5914551 | Metering agent | infra2 | None | :-) | UP | neutron-metering-agent |
| 1d3bf53f-dcc5-453c-893e-05b053dda55f | Metering agent | infra3 | None | :-) | UP | neutron-metering-agent |
| 4353a993-d512-4d42-a554-eccdd4ceeaf8 | Metadata agent | infra2 | None | XXX | UP | neutron-metadata-agent |
| 491f1be3-407d-48dd-b8ed-364f2b90c6cb | DHCP agent | infra1 | nova | XXX | UP | neutron-dhcp-agent |
| 55a04c8e-f54e-4e32-81e7-b12c1e2e1c3f | Metadata agent | infra1 | None | XXX | UP | neutron-metadata-agent |
| 581954d1-25c8-4b63-a82e-5792250f8b58 | L3 agent | infra2 | nova | XXX | UP | neutron-l3-agent |
| 70d614fa-d3f4-4be9-8fb7-a37eb76d5e38 | DHCP agent | infra2 | nova | XXX | UP | neutron-dhcp-agent |
| 76a84bb3-84b1-4ba9-b2bb-00f4d2776b6d | Linux bridge agent | infra2 | None | XXX | UP | neutron-linuxbridge-agent |
| 8153be7b-82d5-4077-b5df-b7e414756220 | Linux bridge agent | compute2 | None | XXX | UP | neutron-linuxbridge-agent |
| 9ed0c376-44c1-4150-b7ab-23138cee7430 | Linux bridge agent | infra3 | None | XXX | UP | neutron-linuxbridge-agent |
| a7d803df-191e-413c-bafc-23049c7732e0 | Linux bridge agent | compute1 | None | XXX | UP | neutron-linuxbridge-agent |
| bb9986d4-5d44-4040-8490-a1a5af1feb33 | Metadata agent | infra3 | None | XXX | UP | neutron-metadata-agent |
| d04290ee-1215-42b2-af34-3ce84eada471 | Metering agent | infra1 | None | :-) | UP | neutron-metering-agent |
| d1bd340d-8da8-4915-8eba-f7078d08e9ed | Linux bridge agent | infra1 | None | XXX | UP | neutron-linuxbridge-agent |
| eb868890-7b6d-41e3-8fbd-54730963bca7 | DHCP agent | infra3 | nova | XXX | UP | neutron-dhcp-agent |
| f13952a5-ba28-4767-ad3c-b72fe6c0db6a | L3 agent | infra1 | nova | XXX | UP | neutron-l3-agent |
| fc536b52-a35c-4523-885d-0708759445e0 | OVN Controller Gateway agent | compute1 | | :-) | UP | ovn-controller |
| d60d8a20-d977-4352-a886-c7b5ef477446 | OVN Controller Gateway agent | compute2 | | :-) | UP | ovn-controller |
| c3c7ff97-998c-5adb-ac2a-75c930724959 | OVN Metadata agent | compute2 | | :-) | UP | neutron-ovn-metadata-agent |
| f20d28dd-83c7-5589-8f9f-37a4f974996d | OVN Metadata agent | compute1 | | :-) | UP | neutron-ovn-metadata-agent |
+--------------------------------------+------------------------------+----------+-------------------+-------+-------+----------------------------+
</code></pre></div></div>
<p><strong>DELETE</strong> the now-stale agents:</p>
<div class="language-plaintext highlighter-rouge"><div class="highlight"><pre class="highlight"><code>root@infra1:~# for i in $(openstack network agent list | grep XXX | awk {'print $2'}); do openstack network agent delete $i; done
root@infra1:~# openstack network agent list
+--------------------------------------+------------------------------+----------+-------------------+-------+-------+----------------------------+
| ID | Agent Type | Host | Availability Zone | Alive | State | Binary |
+--------------------------------------+------------------------------+----------+-------------------+-------+-------+----------------------------+
| 06ba670f-d560-43aa-b1e7-be60d5914551 | Metering agent | infra2 | None | :-) | UP | neutron-metering-agent |
| 1d3bf53f-dcc5-453c-893e-05b053dda55f | Metering agent | infra3 | None | :-) | UP | neutron-metering-agent |
| d04290ee-1215-42b2-af34-3ce84eada471 | Metering agent | infra1 | None | :-) | UP | neutron-metering-agent |
| fc536b52-a35c-4523-885d-0708759445e0 | OVN Controller Gateway agent | compute1 | | :-) | UP | ovn-controller |
| d60d8a20-d977-4352-a886-c7b5ef477446 | OVN Controller Gateway agent | compute2 | | :-) | UP | ovn-controller |
| c3c7ff97-998c-5adb-ac2a-75c930724959 | OVN Metadata agent | compute2 | | :-) | UP | neutron-ovn-metadata-agent |
| f20d28dd-83c7-5589-8f9f-37a4f974996d | OVN Metadata agent | compute1 | | :-) | UP | neutron-ovn-metadata-agent |
+--------------------------------------+------------------------------+----------+-------------------+-------+-------+----------------------------+
</code></pre></div></div>
<p>Check the OVN DBs using the local server IP - the northbound database is likely empty, while the southbound database should be populated:</p>
<div class="language-plaintext highlighter-rouge"><div class="highlight"><pre class="highlight"><code>root@infra1:~# ovn-nbctl --db=tcp:10.0.236.100:6641 show
root@infra1:~# ovn-sbctl --db=tcp:10.0.236.100:6642 show
Chassis "d60d8a20-d977-4352-a886-c7b5ef477446"
hostname: compute2
Encap vxlan
ip: "10.0.240.121"
options: {csum="true"}
Encap geneve
ip: "10.0.240.121"
options: {csum="true"}
Chassis "fc536b52-a35c-4523-885d-0708759445e0"
hostname: compute1
Encap vxlan
ip: "10.0.240.120"
options: {csum="true"}
Encap geneve
ip: "10.0.240.120"
options: {csum="true"}
</code></pre></div></div>
<p>An empty northbound database is the result of a lack of sync between OVN and Neutron, and can be resolved by running the <code class="language-plaintext highlighter-rouge">neutron-ovn-db-sync-util</code> command in <code class="language-plaintext highlighter-rouge">repair</code> mode:</p>
<div class="language-plaintext highlighter-rouge"><div class="highlight"><pre class="highlight"><code>/openstack/venvs/neutron-23.4.1.dev3/bin/neutron-ovn-db-sync-util \
--config-file /etc/neutron/neutron.conf \
--config-file /etc/neutron/plugins/ml2/ml2_conf.ini \
--ovn-neutron_sync_mode repair
</code></pre></div></div>
<h4 id="example">EXAMPLE</h4>
<div class="language-plaintext highlighter-rouge"><div class="highlight"><pre class="highlight"><code>Example:
root@infra1:~# /openstack/venvs/neutron-23.4.1.dev3/bin/neutron-ovn-db-sync-util \
> --config-file /etc/neutron/neutron.conf \
> --config-file /etc/neutron/plugins/ml2/ml2_conf.ini \
> --ovn-neutron_sync_mode repair
/openstack/venvs/neutron-23.4.1.dev3/lib/python3.8/site-packages/sqlalchemy/orm/relationships.py:1994: SAWarning: Setting backref / back_populates on relationship QosNetworkPolicyBinding.port to refer to viewonly relationship Port.qos_network_policy_binding should include sync_backref=False set on the QosNetworkPolicyBinding.port relationship. (this warning may be suppressed after 10 occurrences)
util.warn_limited(
/openstack/venvs/neutron-23.4.1.dev3/lib/python3.8/site-packages/sqlalchemy/orm/relationships.py:1994: SAWarning: Setting backref / back_populates on relationship Tag.standard_attr to refer to viewonly relationship StandardAttribute.tags should include sync_backref=False set on the Tag.standard_attr relationship. (this warning may be suppressed after 10 occurrences)
util.warn_limited(
root@infra1:~# echo $?
0
</code></pre></div></div>
<p>A successful run should result in logical switch, ports, floating IPs, etc. being populated in the northbound DB:</p>
<div class="language-plaintext highlighter-rouge"><div class="highlight"><pre class="highlight"><code>root@infra1:~# ovn-nbctl --db=tcp:10.0.236.100:6641 show
switch 44717724-6a70-4ee7-b0ab-143bdcb12c79 (neutron-12a0ab09-d130-4e69-9aa2-c28c66509b02) (aka db)
port f3e92114-f005-4029-81e3-65f1d60e8862
addresses: ["fa:16:3e:8c:1b:8f 192.168.55.2", "unknown"]
port 196d3e0e-295d-4317-a04c-e9d950160e61
addresses: ["fa:16:3e:b6:b1:7f 192.168.55.223"]
port c762d350-417c-4a3b-b40c-d595dafcc368
type: localport
addresses: ["fa:16:3e:e4:21:7c 192.168.55.5"]
port b0c5e704-fe40-4538-9232-94a091b7adb7
addresses: ["fa:16:3e:6c:6d:57 192.168.55.21"]
port 60c8459c-be90-44b0-8007-56cfa995da4f
addresses: ["fa:16:3e:19:0c:14 192.168.55.4", "unknown"]
port 76dd53d9-7eac-4bc6-92f9-48cf975235b5
type: router
router-port: lrp-76dd53d9-7eac-4bc6-92f9-48cf975235b5
port 2837c67c-c7c0-44dd-be82-1192226cb7b8
addresses: ["fa:16:3e:dc:07:6f 192.168.55.3", "unknown"]
switch 38efee60-da0c-4ed8-ad21-e76ce12a4cb3 (neutron-282e63e3-5120-4396-a63d-0186e5e96466) (aka app)
port c8caf3c7-ac86-4cb5-85eb-12e88f3713eb
addresses: ["fa:16:3e:73:70:29 172.25.0.50"]
port ae7b0df8-4343-448b-af68-5f3afd78e869
type: localport
addresses: ["fa:16:3e:56:b9:6a 172.25.0.5"]
port a448543b-fe5c-4aaf-aef4-cdcd6421e84b
addresses: ["fa:16:3e:56:b7:dc 172.25.0.2", "unknown"]
port 4626c5a9-f578-4849-8fb3-93700f3ddb06
addresses: ["fa:16:3e:60:8c:2d 172.25.0.250"]
port cf2644b6-abc4-42e7-bbdb-0e204f261446
addresses: ["fa:16:3e:aa:42:c8 172.25.0.3", "unknown"]
port 8dcc107d-272f-4ced-b601-3090171ce01c
addresses: ["fa:16:3e:51:6c:b8 172.25.0.4", "unknown"]
port 9b4eb252-e69e-43e1-8585-8b79c986d07c
type: router
router-port: lrp-9b4eb252-e69e-43e1-8585-8b79c986d07c
switch f56b65e0-8638-4e0d-baeb-2194ec8dacac (neutron-3fb2d48e-8c71-4bca-92ce-f64a4c932338) (aka vlan200)
port 07e29662-6e52-4ccb-b2de-361a888e633c
addresses: ["fa:16:3e:c7:9b:37 192.168.200.4", "unknown"]
port c2bbb3e0-2c65-45d7-b8f6-573e665dfc6e
addresses: ["fa:16:3e:e4:69:4f 192.168.200.2", "unknown"]
port d493513f-8b81-4e01-9dfd-89b43f2fa3f5
addresses: ["fa:16:3e:da:44:d6 192.168.200.3", "unknown"]
port c3d08e61-41a9-4495-83f1-6720cf798c75
type: localport
addresses: ["fa:16:3e:05:61:e9 192.168.200.5"]
port provnet-ccfefb4d-0da0-4138-ac74-be1934eca9d7
type: localnet
tag: 200
addresses: ["unknown"]
switch 08c14ec5-c809-467d-92e4-a9dc5092217e (neutron-dddfdce8-a8fd-4802-a01c-261b92043488) (aka vlan100)
port ee9592f0-d028-4941-ad02-77385cd371aa
type: router
router-port: lrp-ee9592f0-d028-4941-ad02-77385cd371aa
port d4478a35-0406-46b9-bab9-17df99e1e44c
addresses: ["fa:16:3e:a4:71:eb 192.168.100.2", "unknown"]
port 7484fd6e-c82c-4679-aa5b-a7f7b6ef5f9a
type: localport
addresses: ["fa:16:3e:57:3c:8f 192.168.100.5"]
port 555e54dd-4edc-4286-84d1-d639cc7fb143
addresses: ["fa:16:3e:6b:80:b5 192.168.100.4", "unknown"]
port provnet-fc4d896e-9eb8-4a73-a363-223a5dc81ec5
type: localnet
tag: 100
addresses: ["unknown"]
port 10062270-348a-473a-8ed0-f551cfacfce5
type: router
router-port: lrp-10062270-348a-473a-8ed0-f551cfacfce5
port ae75e43e-c4e6-4972-8917-59f5779b3d5c
addresses: ["fa:16:3e:07:86:b5 192.168.100.3", "unknown"]
switch 74bd93f5-0434-4c64-8b65-1a44d4370bef (neutron-9e151884-67a5-4905-b157-f08f1b3b0040) (aka HA network tenant d1ae5313d10c411fa772e8fa697a6aeb)
port 15a2cb60-d85f-4ae2-b867-4621c4e66b72 (aka HA port tenant d1ae5313d10c411fa772e8fa697a6aeb)
type: router
router-port: lrp-15a2cb60-d85f-4ae2-b867-4621c4e66b72
port cdb9739f-9b11-453e-b1c2-3bfbb8bad187 (aka HA port tenant d1ae5313d10c411fa772e8fa697a6aeb)
type: router
router-port: lrp-cdb9739f-9b11-453e-b1c2-3bfbb8bad187
port 9634c76e-e309-40cf-b701-1bcf38b4bde4
type: localport
addresses: ["fa:16:3e:2e:78:c3"]
port 106ede6e-1f6f-4c17-a478-9e58045da88b (aka HA port tenant d1ae5313d10c411fa772e8fa697a6aeb)
type: router
router-port: lrp-106ede6e-1f6f-4c17-a478-9e58045da88b
port e1918430-42ca-40dc-aa59-5c54934e121c (aka HA port tenant d1ae5313d10c411fa772e8fa697a6aeb)
type: router
router-port: lrp-e1918430-42ca-40dc-aa59-5c54934e121c
port 850149e1-8f9c-4c64-8b47-90df032a8d65 (aka HA port tenant d1ae5313d10c411fa772e8fa697a6aeb)
type: router
router-port: lrp-850149e1-8f9c-4c64-8b47-90df032a8d65
port 3670eea6-7adf-42d9-b524-cd438cf51a09 (aka HA port tenant d1ae5313d10c411fa772e8fa697a6aeb)
type: router
router-port: lrp-3670eea6-7adf-42d9-b524-cd438cf51a09
switch de0dac56-f19e-45b9-b7fb-ee12ccb2fea4 (neutron-ab3f0f85-a509-406a-8dca-5db13fbcb48b) (aka web)
port 09380ac6-cfcf-4969-b704-4f0de6433f89
type: router
router-port: lrp-09380ac6-cfcf-4969-b704-4f0de6433f89
port 45f94f9a-2a3d-489e-9b64-23002a1d495c
addresses: ["fa:16:3e:b6:02:c7 10.5.0.3", "unknown"]
port 37511b88-ee9a-4be2-bb46-fff22d01d5af
addresses: ["fa:16:3e:6d:3a:91 10.5.0.162"]
port 53a7a6c2-d350-4e98-91e3-9c3df6ebc3e2
addresses: ["fa:16:3e:a2:cd:b8 10.5.0.4", "unknown"]
port cf4dc1f3-0774-496a-87e1-b9954cb90320
type: localport
addresses: ["fa:16:3e:31:2b:9b 10.5.0.5"]
port 637e2a67-c198-4a1d-b836-55757227eb39
addresses: ["fa:16:3e:b5:d2:44 10.5.0.121"]
port 7a94ca01-8e5a-4248-b56d-8343e3a15fe8
addresses: ["fa:16:3e:10:c9:68 10.5.0.2", "unknown"]
router 5e9befda-2983-44a9-ab68-195858ca89f8 (neutron-d5052734-53e8-4a58-9fbd-2b76ec138af6) (aka rtr-db)
port lrp-cdb9739f-9b11-453e-b1c2-3bfbb8bad187
mac: "fa:16:3e:82:19:af"
networks: ["169.254.194.128/18"]
port lrp-850149e1-8f9c-4c64-8b47-90df032a8d65
mac: "fa:16:3e:c9:6c:7d"
networks: ["169.254.193.130/18"]
port lrp-15a2cb60-d85f-4ae2-b867-4621c4e66b72
mac: "fa:16:3e:8f:03:97"
networks: ["169.254.195.150/18"]
port lrp-76dd53d9-7eac-4bc6-92f9-48cf975235b5
mac: "fa:16:3e:f0:d2:09"
networks: ["192.168.55.1/24"]
port lrp-10062270-348a-473a-8ed0-f551cfacfce5
mac: "fa:16:3e:64:41:cb"
networks: ["192.168.100.235/24"]
gateway chassis: [d60d8a20-d977-4352-a886-c7b5ef477446 fc536b52-a35c-4523-885d-0708759445e0]
nat 6c32224c-1d97-44a4-abb8-184bea546880
external ip: "192.168.100.235"
logical ip: "169.254.192.0/18"
type: "snat"
nat 917d1234-ebb7-4578-a8c0-5355302e5aab
external ip: "192.168.100.215"
logical ip: "192.168.55.21"
type: "dnat_and_snat"
nat df8a97a6-0954-4ccc-a742-26e32c493974
external ip: "192.168.100.235"
logical ip: "192.168.55.0/24"
type: "snat"
nat e0d236dc-63e0-4c51-9451-588a3ac5c051
external ip: "192.168.100.235"
logical ip: "169.254.192.0/18"
type: "snat"
nat f0ee4069-7d38-47f2-ad48-9d6b393aa773
external ip: "192.168.100.235"
logical ip: "169.254.192.0/18"
type: "snat"
router dfde8f9a-c539-48ec-82ce-a3fda47c7a86 (neutron-cee5e805-ecf9-456b-87be-d60f155c8fd8) (aka rtr-web)
port lrp-e1918430-42ca-40dc-aa59-5c54934e121c
mac: "fa:16:3e:0a:cc:de"
networks: ["169.254.193.111/18"]
port lrp-ee9592f0-d028-4941-ad02-77385cd371aa
mac: "fa:16:3e:60:72:8a"
networks: ["192.168.100.202/24"]
gateway chassis: [fc536b52-a35c-4523-885d-0708759445e0 d60d8a20-d977-4352-a886-c7b5ef477446]
port lrp-09380ac6-cfcf-4969-b704-4f0de6433f89
mac: "fa:16:3e:90:36:8f"
networks: ["10.5.0.1/24"]
port lrp-3670eea6-7adf-42d9-b524-cd438cf51a09
mac: "fa:16:3e:3a:fe:53"
networks: ["169.254.195.230/18"]
port lrp-106ede6e-1f6f-4c17-a478-9e58045da88b
mac: "fa:16:3e:be:b5:54"
networks: ["169.254.194.238/18"]
port lrp-9b4eb252-e69e-43e1-8585-8b79c986d07c
mac: "fa:16:3e:70:e3:46"
networks: ["172.25.0.1/24"]
nat 02530272-13cf-4690-aad9-4160943b7418
external ip: "192.168.100.202"
logical ip: "172.25.0.0/24"
type: "snat"
nat 4149ca39-b9f2-4e35-8be7-9c0d3a343bf7
external ip: "192.168.100.202"
logical ip: "10.5.0.0/24"
type: "snat"
nat bc084986-d1a6-4877-810a-ca39fc01d064
external ip: "192.168.100.202"
logical ip: "169.254.192.0/18"
type: "snat"
nat d83383c4-91f4-47ca-9fac-9d1cfb56ed01
external ip: "192.168.100.202"
logical ip: "169.254.192.0/18"
type: "snat"
nat dddaa10e-6a24-4133-8efa-612517247c88
external ip: "192.168.100.202"
logical ip: "169.254.192.0/18"
type: "snat"
nat ef26f8a2-b61b-431f-a288-3fa6c6b6488c
external ip: "192.168.100.90"
logical ip: "10.5.0.121"
type: "dnat_and_snat"
</code></pre></div></div>
<h2 id="approach">Approach</h2>
<p>One of the last steps of this process is one of the trickiest: Neutron ports must be updated to reflect a <code class="language-plaintext highlighter-rouge">vif_type</code> of <code class="language-plaintext highlighter-rouge">ovs</code> rather than <code class="language-plaintext highlighter-rouge">bridge</code>. Unfortunately, this is not an API-driven change but one that must be done within the database itself.</p>
<p>The following command can be used:</p>
<div class="language-plaintext highlighter-rouge"><div class="highlight"><pre class="highlight"><code>use neutron;
update ml2_port_bindings set vif_type='ovs' where vif_type='bridge';
</code></pre></div></div>
<h4 id="example-1">EXAMPLE</h4>
<div class="language-plaintext highlighter-rouge"><div class="highlight"><pre class="highlight"><code>MariaDB [neutron]> select * from ml2_port_bindings where vif_type='bridge';
+--------------------------------------+----------+----------+-----------+---------+---------------------------------------------+--------+
| port_id | host | vif_type | vnic_type | profile | vif_details | status |
+--------------------------------------+----------+----------+-----------+---------+---------------------------------------------+--------+
| 07e29662-6e52-4ccb-b2de-361a888e633c | infra3 | bridge | normal | | {"connectivity": "l2", "port_filter": true} | ACTIVE |
| 09380ac6-cfcf-4969-b704-4f0de6433f89 | infra3 | bridge | normal | | {"connectivity": "l2", "port_filter": true} | ACTIVE |
| 106ede6e-1f6f-4c17-a478-9e58045da88b | infra2 | bridge | normal | | {"connectivity": "l2", "port_filter": true} | ACTIVE |
| 15a2cb60-d85f-4ae2-b867-4621c4e66b72 | infra3 | bridge | normal | | {"connectivity": "l2", "port_filter": true} | ACTIVE |
| 196d3e0e-295d-4317-a04c-e9d950160e61 | compute2 | bridge | normal | | {"connectivity": "l2", "port_filter": true} | ACTIVE |
| 2837c67c-c7c0-44dd-be82-1192226cb7b8 | infra2 | bridge | normal | | {"connectivity": "l2", "port_filter": true} | ACTIVE |
| 3670eea6-7adf-42d9-b524-cd438cf51a09 | infra3 | bridge | normal | | {"connectivity": "l2", "port_filter": true} | ACTIVE |
| 37511b88-ee9a-4be2-bb46-fff22d01d5af | compute1 | bridge | normal | | {"connectivity": "l2", "port_filter": true} | ACTIVE |
| 45f94f9a-2a3d-489e-9b64-23002a1d495c | infra1 | bridge | normal | | {"connectivity": "l2", "port_filter": true} | ACTIVE |
| 4626c5a9-f578-4849-8fb3-93700f3ddb06 | compute2 | bridge | normal | | {"connectivity": "l2", "port_filter": true} | ACTIVE |
| 53a7a6c2-d350-4e98-91e3-9c3df6ebc3e2 | infra3 | bridge | normal | | {"connectivity": "l2", "port_filter": true} | ACTIVE |
| 555e54dd-4edc-4286-84d1-d639cc7fb143 | infra3 | bridge | normal | | {"connectivity": "l2", "port_filter": true} | ACTIVE |
| 60c8459c-be90-44b0-8007-56cfa995da4f | infra1 | bridge | normal | | {"connectivity": "l2", "port_filter": true} | ACTIVE |
| 637e2a67-c198-4a1d-b836-55757227eb39 | compute2 | bridge | normal | | {"connectivity": "l2", "port_filter": true} | ACTIVE |
| 76dd53d9-7eac-4bc6-92f9-48cf975235b5 | infra3 | bridge | normal | | {"connectivity": "l2", "port_filter": true} | ACTIVE |
| 7a94ca01-8e5a-4248-b56d-8343e3a15fe8 | infra2 | bridge | normal | | {"connectivity": "l2", "port_filter": true} | ACTIVE |
| 850149e1-8f9c-4c64-8b47-90df032a8d65 | infra2 | bridge | normal | | {"connectivity": "l2", "port_filter": true} | ACTIVE |
| 8dcc107d-272f-4ced-b601-3090171ce01c | infra1 | bridge | normal | | {"connectivity": "l2", "port_filter": true} | ACTIVE |
| 9b4eb252-e69e-43e1-8585-8b79c986d07c | infra3 | bridge | normal | | {"connectivity": "l2", "port_filter": true} | ACTIVE |
| a448543b-fe5c-4aaf-aef4-cdcd6421e84b | infra3 | bridge | normal | | {"connectivity": "l2", "port_filter": true} | ACTIVE |
| ae75e43e-c4e6-4972-8917-59f5779b3d5c | infra2 | bridge | normal | | {"connectivity": "l2", "port_filter": true} | ACTIVE |
| b0c5e704-fe40-4538-9232-94a091b7adb7 | compute1 | bridge | normal | | {"connectivity": "l2", "port_filter": true} | ACTIVE |
| c2bbb3e0-2c65-45d7-b8f6-573e665dfc6e | infra1 | bridge | normal | | {"connectivity": "l2", "port_filter": true} | ACTIVE |
| c8caf3c7-ac86-4cb5-85eb-12e88f3713eb | compute1 | bridge | normal | | {"connectivity": "l2", "port_filter": true} | ACTIVE |
| cdb9739f-9b11-453e-b1c2-3bfbb8bad187 | infra1 | bridge | normal | | {"connectivity": "l2", "port_filter": true} | ACTIVE |
| cf2644b6-abc4-42e7-bbdb-0e204f261446 | infra2 | bridge | normal | | {"connectivity": "l2", "port_filter": true} | ACTIVE |
| d4478a35-0406-46b9-bab9-17df99e1e44c | infra1 | bridge | normal | | {"connectivity": "l2", "port_filter": true} | ACTIVE |
| d493513f-8b81-4e01-9dfd-89b43f2fa3f5 | infra2 | bridge | normal | | {"connectivity": "l2", "port_filter": true} | ACTIVE |
| e1918430-42ca-40dc-aa59-5c54934e121c | infra1 | bridge | normal | | {"connectivity": "l2", "port_filter": true} | ACTIVE |
| f3e92114-f005-4029-81e3-65f1d60e8862 | infra3 | bridge | normal | | {"connectivity": "l2", "port_filter": true} | ACTIVE |
+--------------------------------------+----------+----------+-----------+---------+---------------------------------------------+--------+
MariaDB [neutron]> update ml2_port_bindings set vif_type='ovs' where vif_type='bridge';
Query OK, 30 rows affected (0.026 sec)
Rows matched: 30 Changed: 30 Warnings: 0
</code></pre></div></div>
<p>Also, according to the OVN <a href="https://www.ovn.org/support/dist-docs/ovn-controller.8.html">manpage</a>, VXLAN networks are only supported for gateway nodes and not traffic between hypervisors:</p>
<div class="language-plaintext highlighter-rouge"><div class="highlight"><pre class="highlight"><code>external_ids:ovn-encap-type
The encapsulation type that a chassis should use to con‐
nect to this node. Multiple encapsulation types may be
specified with a comma-separated list. Each listed encap‐
sulation type will be paired with ovn-encap-ip.
Supported tunnel types for connecting hypervisors are
geneve and stt. Gateways may use geneve, vxlan, or stt.
</code></pre></div></div>
<p>So, the DB can also be munged to make this change, too:</p>
<div class="language-plaintext highlighter-rouge"><div class="highlight"><pre class="highlight"><code>MariaDB [neutron]> select * from networksegments;
+--------------------------------------+--------------------------------------+--------------+------------------+-----------------+------------+---------------+------------------+------+
| id | network_id | network_type | physical_network | segmentation_id | is_dynamic | segment_index | standard_attr_id | name |
+--------------------------------------+--------------------------------------+--------------+------------------+-----------------+------------+---------------+------------------+------+
| 84334795-0a9c-46dc-bb45-abd858a787ae | 282e63e3-5120-4396-a63d-0186e5e96466 | vxlan | NULL | 942 | 0 | 0 | 27 | NULL |
| 8c866571-b041-426c-9ddd-5f126fd694e3 | ab3f0f85-a509-406a-8dca-5db13fbcb48b | vxlan | NULL | 230 | 0 | 0 | 21 | NULL |
| 949f5d71-fd93-45e3-9895-ad2415541e89 | 9e151884-67a5-4905-b157-f08f1b3b0040 | vxlan | NULL | 10 | 0 | 0 | 144 | NULL |
| b4f4131d-f988-49ef-9440-361d747af8eb | 12a0ab09-d130-4e69-9aa2-c28c66509b02 | vxlan | NULL | 665 | 0 | 0 | 33 | NULL |
| ccfefb4d-0da0-4138-ac74-be1934eca9d7 | 3fb2d48e-8c71-4bca-92ce-f64a4c932338 | vlan | vlan | 200 | 0 | 0 | 126 | NULL |
| fc4d896e-9eb8-4a73-a363-223a5dc81ec5 | dddfdce8-a8fd-4802-a01c-261b92043488 | vlan | vlan | 100 | 0 | 0 | 120 | NULL |
+--------------------------------------+--------------------------------------+--------------+------------------+-----------------+------------+---------------+------------------+------+
MariaDB [neutron]> update networksegments set network_type='geneve' where network_type='vxlan';
Query OK, 4 rows affected (0.008 sec)
Rows matched: 4 Changed: 4 Warnings: 0
</code></pre></div></div>
<h2 id="soft-landing">Soft landing</h2>
<p>At this point, all of the tough changes have been made and it’s time to try out our new toy.</p>
<div class="language-plaintext highlighter-rouge"><div class="highlight"><pre class="highlight"><code>root@infra1:~# openstack server start vm-web1
get() takes 1 positional argument but 2 were given
</code></pre></div></div>
<p>Uh oh.</p>
<div class="language-plaintext highlighter-rouge"><div class="highlight"><pre class="highlight"><code>root@infra1:~# openstack server start vm-web1
</code></pre></div></div>
<p>That’s better.</p>
<p>Checking the console of the VM demonstrates proper DHCP and Metadata connectivity:</p>
<div class="language-plaintext highlighter-rouge"><div class="highlight"><pre class="highlight"><code>root@infra1:~# openstack console log show vm-web1
...
Starting network: udhcpc: started, v1.29.3
udhcpc: sending discover
udhcpc: sending select for 10.5.0.121
udhcpc: lease of 10.5.0.121 obtained, lease time 43200
...
checking http://169.254.169.254/2009-04-04/instance-id
successful after 1/20 tries: up 3.04. iid=i-00000009
...
</code></pre></div></div>
<p>Let’s try spinning up the others:</p>
<div class="language-plaintext highlighter-rouge"><div class="highlight"><pre class="highlight"><code>root@infra1:~# openstack server start vm-web2
root@infra1:~# openstack server start vm-app1
get() takes 1 positional argument but 2 were given
root@infra1:~# openstack server start vm-app1
root@infra1:~# openstack server start vm-app2
get() takes 1 positional argument but 2 were given
root@infra1:~# openstack server start vm-app2
root@infra1:~# openstack server start vm-db1
get() takes 1 positional argument but 2 were given
root@infra1:~# openstack server start vm-db1
root@infra1:~# openstack server start vm-db2
Networking client is experiencing an unauthorized exception. (HTTP 400) (Request-ID: req-3a3348c9-39fb-49f2-84b2-f2b3c3e9e466)
root@infra1:~# openstack server start vm-db2
</code></pre></div></div>
<p>It looks like the first VMs of a given network are the only ones to complain, which could be related to stale cache or something else that gets resolved automatically. Without looking at the API logs, it’s hard to say.</p>
<div class="language-plaintext highlighter-rouge"><div class="highlight"><pre class="highlight"><code>root@infra1:~# openstack server list
+--------------------------------------+---------+--------+-----------------------------------+--------------+--------+
| ID | Name | Status | Networks | Image | Flavor |
+--------------------------------------+---------+--------+-----------------------------------+--------------+--------+
| b3a33fb1-98dc-4cf9-99c3-53d5352310e5 | vm-db2 | ACTIVE | db=192.168.55.223 | cirros-0.5.2 | 1-1-1 |
| e2ea6e2a-aa47-4f44-b285-1b727ad4f709 | vm-db1 | ACTIVE | db=192.168.100.215, 192.168.55.21 | cirros-0.5.2 | 1-1-1 |
| 916052d7-a5f7-4e4a-87a0-7249eef45801 | vm-app2 | ACTIVE | app=172.25.0.250 | cirros-0.5.2 | 1-1-1 |
| dd3046a3-128a-4585-8ffd-54c11b516052 | vm-app1 | ACTIVE | app=172.25.0.50 | cirros-0.5.2 | 1-1-1 |
| 7e1af764-a034-4ef2-9695-ca19838812e5 | vm-web1 | ACTIVE | web=10.5.0.121, 192.168.100.90 | cirros-0.5.2 | 1-1-1 |
| dbb98201-52fc-420d-bf6e-5a40fad74327 | vm-web2 | ACTIVE | web=10.5.0.162 | cirros-0.5.2 | 1-1-1 |
+--------------------------------------+---------+--------+-----------------------------------+--------------+--------+
</code></pre></div></div>
<h2 id="inspection">Inspection</h2>
<p>The moment of truth is here, but performing checks from DHCP namespaces that no longer exist will be tricky. Fortunately, an <code class="language-plaintext highlighter-rouge">ovmmeta</code> namespace exists on each node that is connected to their respective network. Unfortunately, the namespace is only connected to the <em>local</em> bridge and cannot communicate across hosts.</p>
<p>The following example demonstrates connectivity from the <code class="language-plaintext highlighter-rouge">ovnmeta</code> namespace to vm-db1, and from within vm-db1 to vm-db2 (across hosts):</p>
<div class="language-plaintext highlighter-rouge"><div class="highlight"><pre class="highlight"><code>root@compute1:~# ip netns exec ovnmeta-12a0ab09-d130-4e69-9aa2-c28c66509b02 ssh cirros@192.168.55.21
cirros@192.168.55.21's password:
$ hostname
vm-db1
$ ping 192.168.55.223 -c2
PING 192.168.55.223 (192.168.55.223): 56 data bytes
64 bytes from 192.168.55.223: seq=0 ttl=64 time=4.595 ms
64 bytes from 192.168.55.223: seq=1 ttl=64 time=2.770 ms
$ ssh cirros@192.168.55.223
Host '192.168.55.223' is not in the trusted hosts file.
(ecdsa-sha2-nistp256 fingerprint sha1!! ae:44:c1:5c:da:13:06:05:56:22:76:0d:0c:82:1e:84:bf:e8:2d:9c)
Do you want to continue connecting? (y/n) y
cirros@192.168.55.223's password:
$ hostname
vm-db2
</code></pre></div></div>
<p>Here we ping from vm-web2 to vm-app1 and vm-app2</p>
<div class="language-plaintext highlighter-rouge"><div class="highlight"><pre class="highlight"><code>$ hostname
vm-web2
$ ping 172.25.0.50 -c2
PING 172.25.0.50 (172.25.0.50): 56 data bytes
64 bytes from 172.25.0.50: seq=0 ttl=63 time=1.578 ms
64 bytes from 172.25.0.50: seq=1 ttl=63 time=1.125 ms
--- 172.25.0.50 ping statistics ---
2 packets transmitted, 2 packets received, 0% packet loss
round-trip min/avg/max = 1.125/1.351/1.578 ms
$ ping 172.25.0.250 -c2
PING 172.25.0.250 (172.25.0.250): 56 data bytes
64 bytes from 172.25.0.250: seq=0 ttl=63 time=5.781 ms
64 bytes from 172.25.0.250: seq=1 ttl=63 time=3.353 ms
--- 172.25.0.250 ping statistics ---
2 packets transmitted, 2 packets received, 0% packet loss
round-trip min/avg/max = 3.353/4.567/5.781 ms
</code></pre></div></div>
<p>Lastly, we can see floating IP traffic between vm-web1 -> vm-db2 works as well:</p>
<div class="language-plaintext highlighter-rouge"><div class="highlight"><pre class="highlight"><code>$ hostname
vm-web1
$ ping 192.168.100.215 -c2
PING 192.168.100.215 (192.168.100.215): 56 data bytes
64 bytes from 192.168.100.215: seq=0 ttl=62 time=14.153 ms
64 bytes from 192.168.100.215: seq=1 ttl=62 time=4.775 ms
--- 192.168.100.215 ping statistics ---
2 packets transmitted, 2 packets received, 0% packet loss
round-trip min/avg/max = 4.775/9.464/14.153 ms
</code></pre></div></div>
<h2 id="summary">Summary</h2>
<p>Being able to perform in-place migrations and upgrades is important, especially when the resources don’t exist to perform a “lift-n-shift” type of migration. When looking to perform an in-place migration, my suggestion is to always <strong><em>TEST TEST TEST</em></strong> in a similarly-configured lab environment to work out all kninks and potential unknowns. Make configuration and database backups, and be prepared to lose instances in a worst-case scenario.</p>
<hr />
<p>If you have some thoughts or comments on this post, I’d love to hear ‘em. Feel free to reach out on Twitter at @jimmdenton or hit me up on LinkedIn.</p>jamesdentonMigrating from one Neutron mechanism driver to another, especially in a production environment, is not a decision one takes on without giving much thought. In many cases, the process involves migrating to a “Greenfield” environment, or a new environment that is stood up running the same or similar operating system and cloud service software but configured in a new way, then migrating entire workloads in a weekend (or more). To say this process is tedious is an understatement.[OVN] ‘Chassis_Private’ object has no attribute ‘hostname’2022-03-25T00:00:00+00:002022-03-25T00:00:00+00:00http://www.jimmdenton.com/neutron-ovn-private-chassis<p>On more than one occasion I have turned to this blog to fix issues that reoccur weeks/months/years after the initial post is born, and this post will serve as one of those reference points in the future, I’m sure. In my OpenStack-Ansible Xena lab running OVN, I’ve twice now come across the following error when performing a <code class="language-plaintext highlighter-rouge">openstack network agent list</code> command:</p>
<div class="language-plaintext highlighter-rouge"><div class="highlight"><pre class="highlight"><code>'Chassis_Private' object has no attribute 'hostname'
</code></pre></div></div>
<p>What does that even mean?!
<!--more--></p>
<p>What <code class="language-plaintext highlighter-rouge">chassis_private</code> is referring to is a table in the OVN Southbound database. Not to be confused with the <code class="language-plaintext highlighter-rouge">chassis</code> table, a row in the <code class="language-plaintext highlighter-rouge">chassis_private</code> table is used by <code class="language-plaintext highlighter-rouge">ovn-northd</code> and the owning chassis to store <em>private</em> data about that chassis, including:</p>
<ul>
<li>uuid</li>
<li>name</li>
<li>chassis</li>
<li>nb_cfg</li>
<li>nb_cfg_timestamp</li>
<li>external_ids</li>
</ul>
<p>The manpage does better service of describing its purpose:</p>
<div class="language-plaintext highlighter-rouge"><div class="highlight"><pre class="highlight"><code>These data are stored in this separate table instead of the Chassis
table for performance considerations:
the rows in this table can be conditionally monitored by chassises
so that each chassis only get update notifications for its own row,
to avoid unnecessary chassis private data update flooding in a large
scale deployment.
</code></pre></div></div>
<p>My environment consists of 3x controller nodes and 3x compute nodes running a variety of services, including OVN, OVN Metadata Agent, Legacy DHCP Agent (for Ironic), and the SR-IOV Agent. The catalyst for this particular post was an error when trying to retrieve a list of those agents:</p>
<div class="language-plaintext highlighter-rouge"><div class="highlight"><pre class="highlight"><code>root@lab-infra01:~# openstack network agent list
HttpException: 500: Server Error for url: http://10.20.0.11:9696/v2.0/agents, Request Failed: internal server error while processing your request.
</code></pre></div></div>
<p>A look at the <code class="language-plaintext highlighter-rouge">neutron-server</code> log revealed the following traceback:</p>
<div class="language-plaintext highlighter-rouge"><div class="highlight"><pre class="highlight"><code>Mar 24 19:37:30 lab-infra03 neutron-server[3148184]:
2022-03-24 19:37:30.625 3148184 ERROR neutron.api.v2.resource [req-82bf64ab-d8d4-4678-abdb-de439c392e71 34f3cf48b24f41c097555c07961f139e 7a8df96a3c6a47118e60e57aa9ecff54 - default default] index failed: No details.: AttributeError: 'Chassis_Private' object has no attribute 'hostname'
2022-03-24 19:37:30.625 3148184 ERROR neutron.api.v2.resource Traceback (most recent call last):
2022-03-24 19:37:30.625 3148184 ERROR neutron.api.v2.resource File "/openstack/venvs/neutron-24.0.1/lib/python3.8/site-packages/neutron/api/v2/resource.py", line 98, in resource
2022-03-24 19:37:30.625 3148184 ERROR neutron.api.v2.resource result = method(request=request, **args)
2022-03-24 19:37:30.625 3148184 ERROR neutron.api.v2.resource File "/openstack/venvs/neutron-24.0.1/lib/python3.8/site-packages/neutron_lib/db/api.py", line 139, in wrapped
2022-03-24 19:37:30.625 3148184 ERROR neutron.api.v2.resource setattr(e, '_RETRY_EXCEEDED', True)
2022-03-24 19:37:30.625 3148184 ERROR neutron.api.v2.resource File "/openstack/venvs/neutron-24.0.1/lib/python3.8/site-packages/oslo_utils/excutils.py", line 227, in __exit__
2022-03-24 19:37:30.625 3148184 ERROR neutron.api.v2.resource self.force_reraise()
2022-03-24 19:37:30.625 3148184 ERROR neutron.api.v2.resource File "/openstack/venvs/neutron-24.0.1/lib/python3.8/site-packages/oslo_utils/excutils.py", line 200, in force_reraise
2022-03-24 19:37:30.625 3148184 ERROR neutron.api.v2.resource raise self.value
2022-03-24 19:37:30.625 3148184 ERROR neutron.api.v2.resource File "/openstack/venvs/neutron-24.0.1/lib/python3.8/site-packages/neutron_lib/db/api.py", line 135, in wrapped
2022-03-24 19:37:30.625 3148184 ERROR neutron.api.v2.resource return f(*args, **kwargs)
2022-03-24 19:37:30.625 3148184 ERROR neutron.api.v2.resource File "/openstack/venvs/neutron-24.0.1/lib/python3.8/site-packages/oslo_db/api.py", line 154, in wrapper
2022-03-24 19:37:30.625 3148184 ERROR neutron.api.v2.resource ectxt.value = e.inner_exc
2022-03-24 19:37:30.625 3148184 ERROR neutron.api.v2.resource File "/openstack/venvs/neutron-24.0.1/lib/python3.8/site-packages/oslo_utils/excutils.py", line 227, in __exit__
2022-03-24 19:37:30.625 3148184 ERROR neutron.api.v2.resource self.force_reraise()
2022-03-24 19:37:30.625 3148184 ERROR neutron.api.v2.resource File "/openstack/venvs/neutron-24.0.1/lib/python3.8/site-packages/oslo_utils/excutils.py", line 200, in force_reraise
2022-03-24 19:37:30.625 3148184 ERROR neutron.api.v2.resource raise self.value
2022-03-24 19:37:30.625 3148184 ERROR neutron.api.v2.resource File "/openstack/venvs/neutron-24.0.1/lib/python3.8/site-packages/oslo_db/api.py", line 142, in wrapper
2022-03-24 19:37:30.625 3148184 ERROR neutron.api.v2.resource return f(*args, **kwargs)
2022-03-24 19:37:30.625 3148184 ERROR neutron.api.v2.resource File "/openstack/venvs/neutron-24.0.1/lib/python3.8/site-packages/neutron_lib/db/api.py", line 183, in wrapped
2022-03-24 19:37:30.625 3148184 ERROR neutron.api.v2.resource LOG.debug("Retry wrapper got retriable exception: %s", e)
2022-03-24 19:37:30.625 3148184 ERROR neutron.api.v2.resource File "/openstack/venvs/neutron-24.0.1/lib/python3.8/site-packages/oslo_utils/excutils.py", line 227, in __exit__
2022-03-24 19:37:30.625 3148184 ERROR neutron.api.v2.resource self.force_reraise()
2022-03-24 19:37:30.625 3148184 ERROR neutron.api.v2.resource File "/openstack/venvs/neutron-24.0.1/lib/python3.8/site-packages/oslo_utils/excutils.py", line 200, in force_reraise
2022-03-24 19:37:30.625 3148184 ERROR neutron.api.v2.resource raise self.value
2022-03-24 19:37:30.625 3148184 ERROR neutron.api.v2.resource File "/openstack/venvs/neutron-24.0.1/lib/python3.8/site-packages/neutron_lib/db/api.py", line 179, in wrapped
2022-03-24 19:37:30.625 3148184 ERROR neutron.api.v2.resource return f(*dup_args, **dup_kwargs)
2022-03-24 19:37:30.625 3148184 ERROR neutron.api.v2.resource File "/openstack/venvs/neutron-24.0.1/lib/python3.8/site-packages/neutron/api/v2/base.py", line 369, in index
2022-03-24 19:37:30.625 3148184 ERROR neutron.api.v2.resource return self._items(request, True, parent_id)
2022-03-24 19:37:30.625 3148184 ERROR neutron.api.v2.resource File "/openstack/venvs/neutron-24.0.1/lib/python3.8/site-packages/neutron/api/v2/base.py", line 304, in _items
2022-03-24 19:37:30.625 3148184 ERROR neutron.api.v2.resource obj_list = obj_getter(request.context, **kwargs)
2022-03-24 19:37:30.625 3148184 ERROR neutron.api.v2.resource File "/openstack/venvs/neutron-24.0.1/lib/python3.8/site-packages/neutron/plugins/ml2/drivers/ovn/mech_driver/mech_driver.py", line 1165, in fn
2022-03-24 19:37:30.625 3148184 ERROR neutron.api.v2.resource return op(results, new_method(*args, _driver=self, **kwargs))
2022-03-24 19:37:30.625 3148184 ERROR neutron.api.v2.resource File "/openstack/venvs/neutron-24.0.1/lib/python3.8/site-packages/neutron/plugins/ml2/drivers/ovn/mech_driver/mech_driver.py", line 1229, in get_agents
2022-03-24 19:37:30.625 3148184 ERROR neutron.api.v2.resource agent_dict = agent.as_dict()
2022-03-24 19:37:30.625 3148184 ERROR neutron.api.v2.resource File "/openstack/venvs/neutron-24.0.1/lib/python3.8/site-packages/neutron/plugins/ml2/drivers/ovn/agent/neutron_agent.py", line 59, in as_dict
2022-03-24 19:37:30.625 3148184 ERROR neutron.api.v2.resource 'host': self.chassis.hostname,
2022-03-24 19:37:30.625 3148184 ERROR neutron.api.v2.resource AttributeError: 'Chassis_Private' object has no attribute 'hostname'
2022-03-24 19:37:30.625 3148184 ERROR neutron.api.v2.resource
</code></pre></div></div>
<p>Most importantly:</p>
<div class="language-plaintext highlighter-rouge"><div class="highlight"><pre class="highlight"><code>AttributeError: 'Chassis_Private' object has no attribute 'hostname'
</code></pre></div></div>
<h2 id="a-look-at-ovn">A Look at OVN</h2>
<p>To understand what the ‘Chassis_Private’ object was and what its structure was expected to be, I took a visit to the Neutron source code; specifically <code class="language-plaintext highlighter-rouge">neutron/plugins/ml2/drivers/ovn/agent/neutron_agent.py</code> line 59:</p>
<p><a href="https://github.com/openstack/neutron/blob/stable/xena/neutron/plugins/ml2/drivers/ovn/agent/neutron_agent.py">https://github.com/openstack/neutron/blob/stable/xena/neutron/plugins/ml2/drivers/ovn/agent/neutron_agent.py</a></p>
<div class="language-plaintext highlighter-rouge"><div class="highlight"><pre class="highlight"><code> def as_dict(self):
return {
'binary': self.binary,
'host': self.chassis.hostname,
'heartbeat_timestamp': timeutils.utcnow(),
'availability_zone': ', '.join(
ovn_utils.get_chassis_availability_zones(self.chassis)),
'topic': 'n/a',
'description': self.description,
'configurations': {
'chassis_name': self.chassis.name,
'bridge-mappings':
self.chassis.external_ids.get('ovn-bridge-mappings', '')},
'start_flag': True,
'agent_type': self.agent_type,
'id': self.agent_id,
'alive': self.alive,
'admin_state_up': True}
</code></pre></div></div>
<p>In the above snippet, we can see in <code class="language-plaintext highlighter-rouge">as_dict</code> that <code class="language-plaintext highlighter-rouge">host</code> references <code class="language-plaintext highlighter-rouge">self.chassis.hostname</code>, and <code class="language-plaintext highlighter-rouge">chassis</code> itself is defined here:</p>
<div class="language-plaintext highlighter-rouge"><div class="highlight"><pre class="highlight"><code>@property
def chassis(self):
return self.chassis_from_private(self.chassis_private)
</code></pre></div></div>
<p>If we take a look at <code class="language-plaintext highlighter-rouge">chassis_from_private</code>, we get this:</p>
<div class="language-plaintext highlighter-rouge"><div class="highlight"><pre class="highlight"><code>@staticmethod
def chassis_from_private(chassis_private):
try:
return chassis_private.chassis[0]
except (AttributeError, IndexError):
# No Chassis_Private support, just use Chassis
return chassis_private
</code></pre></div></div>
<p>I don’t proclaim to be a Python expert, or even a developer for that matter, but in following along I can see that it’s returning the 1st element ([0]) of the list <code class="language-plaintext highlighter-rouge">chassis</code> for this <code class="language-plaintext highlighter-rouge">chassis_private</code> object.</p>
<p>Using some OVN tools, I was able to list both the <code class="language-plaintext highlighter-rouge">chassis_private</code> and <code class="language-plaintext highlighter-rouge">chassis</code> tables from the Southbound DB:</p>
<h4 id="chassis-table">chassis table</h4>
<div class="language-plaintext highlighter-rouge"><div class="highlight"><pre class="highlight"><code>root@lab-infra02:~# ovn-sbctl list chassis
_uuid : 6c90b020-be8e-4b7c-9aa8-0f4a9f826e6d
encaps : [4c1cae4d-36a4-4541-af8c-fc02758fab4e, ac4dd143-10db-48c3-b4dd-8f42d0d6efd0]
external_ids : {datapath-type=system, iface-types="bareudp,erspan,geneve,gre,gtpu,internal,ip6erspan,ip6gre,lisp,patch,stt,system,tap,vxlan", is-interconn="false", ovn-bridge-mappings="physnet1:br-rpn,vlan:br-ex", ovn-chassis-mac-mappings="", ovn-cms-options=enable-chassis-as-gw, ovn-enable-lflow-cache="true", ovn-limit-lflow-cache="", ovn-memlimit-lflow-cache-kb="", ovn-monitor-all="false", ovn-trim-limit-lflow-cache="", ovn-trim-wmark-perc-lflow-cache="", port-up-notif="true"}
hostname : lab-compute01
name : "0c9b25a6-3760-4b57-ba71-49e7091730bb"
nb_cfg : 0
other_config : {datapath-type=system, iface-types="bareudp,erspan,geneve,gre,gtpu,internal,ip6erspan,ip6gre,lisp,patch,stt,system,tap,vxlan", is-interconn="false", ovn-bridge-mappings="physnet1:br-rpn,vlan:br-ex", ovn-chassis-mac-mappings="", ovn-cms-options=enable-chassis-as-gw, ovn-enable-lflow-cache="true", ovn-limit-lflow-cache="", ovn-memlimit-lflow-cache-kb="", ovn-monitor-all="false", ovn-trim-limit-lflow-cache="", ovn-trim-wmark-perc-lflow-cache="", port-up-notif="true"}
transport_zones : []
vtep_logical_switches: []
_uuid : 478e3679-f4af-4a2d-a986-85323c840620
encaps : [1e5060c3-a6ce-41bd-b54a-2ba3907f7092, 3177060c-bcdc-4c02-bf31-ff359c666538]
external_ids : {datapath-type=system, iface-types="bareudp,erspan,geneve,gre,gtpu,internal,ip6erspan,ip6gre,lisp,patch,stt,system,tap,vxlan", is-interconn="false", ovn-bridge-mappings="vlan:br-ex", ovn-chassis-mac-mappings="", ovn-cms-options=enable-chassis-as-gw, ovn-enable-lflow-cache="true", ovn-limit-lflow-cache="", ovn-memlimit-lflow-cache-kb="", ovn-monitor-all="false", ovn-trim-limit-lflow-cache="", ovn-trim-wmark-perc-lflow-cache="", port-up-notif="true"}
hostname : lab-compute03
name : "1f318a3c-f607-4272-814c-b0c4d813daa5"
nb_cfg : 0
other_config : {datapath-type=system, iface-types="bareudp,erspan,geneve,gre,gtpu,internal,ip6erspan,ip6gre,lisp,patch,stt,system,tap,vxlan", is-interconn="false", ovn-bridge-mappings="vlan:br-ex", ovn-chassis-mac-mappings="", ovn-cms-options=enable-chassis-as-gw, ovn-enable-lflow-cache="true", ovn-limit-lflow-cache="", ovn-memlimit-lflow-cache-kb="", ovn-monitor-all="false", ovn-trim-limit-lflow-cache="", ovn-trim-wmark-perc-lflow-cache="", port-up-notif="true"}
transport_zones : []
vtep_logical_switches: []
_uuid : eed64f71-9cd1-4e1a-a891-e8bbb9049c41
encaps : [3932bdff-e3a2-425b-9bf5-8d05fffbd171, a6f63e7b-a59a-41a3-9fdf-a2b6fae892cd]
external_ids : {datapath-type=system, iface-types="bareudp,erspan,geneve,gre,gtpu,internal,ip6erspan,ip6gre,lisp,patch,stt,system,tap,vxlan", is-interconn="false", ovn-bridge-mappings="physnet2:br-rpn,vlan:br-ex", ovn-chassis-mac-mappings="", ovn-cms-options=enable-chassis-as-gw, ovn-enable-lflow-cache="true", ovn-limit-lflow-cache="", ovn-memlimit-lflow-cache-kb="", ovn-monitor-all="false", ovn-trim-limit-lflow-cache="", ovn-trim-wmark-perc-lflow-cache="", port-up-notif="true"}
hostname : lab-compute02
name : "6c2a75b1-482a-40e3-91f8-3e449986f5b6"
nb_cfg : 174
other_config : {datapath-type=system, iface-types="bareudp,erspan,geneve,gre,gtpu,internal,ip6erspan,ip6gre,lisp,patch,stt,system,tap,vxlan", is-interconn="false", ovn-bridge-mappings="physnet2:br-rpn,vlan:br-ex", ovn-chassis-mac-mappings="", ovn-cms-options=enable-chassis-as-gw, ovn-enable-lflow-cache="true", ovn-limit-lflow-cache="", ovn-memlimit-lflow-cache-kb="", ovn-monitor-all="false", ovn-trim-limit-lflow-cache="", ovn-trim-wmark-perc-lflow-cache="", port-up-notif="true"}
transport_zones : []
vtep_logical_switches: []
_uuid : 8a07dfc5-1e52-49aa-aa97-ec0515334fc6
encaps : [63a84cd2-cb93-485e-aaa4-e6701dbb9a7d, a67c8b1c-da4e-4178-b0eb-58315983ca68]
external_ids : {datapath-type=system, iface-types="bareudp,erspan,geneve,gre,gtpu,internal,ip6erspan,ip6gre,lisp,patch,stt,system,tap,vxlan", is-interconn="false", ovn-bridge-mappings="vlan:br-ex", ovn-chassis-mac-mappings="", ovn-cms-options=enable-chassis-as-gw, ovn-enable-lflow-cache="true", ovn-limit-lflow-cache="", ovn-memlimit-lflow-cache-kb="", ovn-monitor-all="false", ovn-trim-limit-lflow-cache="", ovn-trim-wmark-perc-lflow-cache="", port-up-notif="true"}
hostname : lab-infra01
name : "900595a5-a02a-4566-b6dc-0c1e0e2cb392"
nb_cfg : 0
other_config : {datapath-type=system, iface-types="bareudp,erspan,geneve,gre,gtpu,internal,ip6erspan,ip6gre,lisp,patch,stt,system,tap,vxlan", is-interconn="false", ovn-bridge-mappings="vlan:br-ex", ovn-chassis-mac-mappings="", ovn-cms-options=enable-chassis-as-gw, ovn-enable-lflow-cache="true", ovn-limit-lflow-cache="", ovn-memlimit-lflow-cache-kb="", ovn-monitor-all="false", ovn-trim-limit-lflow-cache="", ovn-trim-wmark-perc-lflow-cache="", port-up-notif="true"}
transport_zones : []
vtep_logical_switches: []
_uuid : 8f4829ad-746d-4125-8561-363adbbc4dce
encaps : [ce7a5ab6-534a-4667-a7c0-5f112b0f4507, fcaf8226-fa90-4848-8c1d-d3c975276e05]
external_ids : {datapath-type=system, iface-types="bareudp,erspan,geneve,gre,gtpu,internal,ip6erspan,ip6gre,lisp,patch,stt,system,tap,vxlan", is-interconn="false", "neutron:ovn-metadata-id"="344341e0-8e69-5e00-979c-d59fee1b9b27", "neutron:ovn-metadata-sb-cfg"="173", ovn-bridge-mappings="vlan:br-ex", ovn-chassis-mac-mappings="", ovn-cms-options=enable-chassis-as-gw, ovn-enable-lflow-cache="true", ovn-limit-lflow-cache="", ovn-memlimit-lflow-cache-kb="", ovn-monitor-all="false", ovn-trim-limit-lflow-cache="", ovn-trim-wmark-perc-lflow-cache="", port-up-notif="true"}
hostname : lab-infra03
name : "d50d391d-910f-40d6-8aa7-24fbfda018ff"
nb_cfg : 171
other_config : {datapath-type=system, iface-types="bareudp,erspan,geneve,gre,gtpu,internal,ip6erspan,ip6gre,lisp,patch,stt,system,tap,vxlan", is-interconn="false", ovn-bridge-mappings="vlan:br-ex", ovn-chassis-mac-mappings="", ovn-cms-options=enable-chassis-as-gw, ovn-enable-lflow-cache="true", ovn-limit-lflow-cache="", ovn-memlimit-lflow-cache-kb="", ovn-monitor-all="false", ovn-trim-limit-lflow-cache="", ovn-trim-wmark-perc-lflow-cache="", port-up-notif="true"}
transport_zones : []
vtep_logical_switches: []
_uuid : ada8b169-bd60-490b-8520-7e621cbbb84e
encaps : [072fa878-8849-4b06-acfd-4e889ff308b0, 8b6e5992-a4bf-46e3-b1c2-d5494765ca62]
external_ids : {datapath-type=system, iface-types="bareudp,erspan,geneve,gre,gtpu,internal,ip6erspan,ip6gre,lisp,patch,stt,system,tap,vxlan", is-interconn="false", "neutron:ovn-metadata-id"="83641d9c-6244-564c-b67c-d5b3298adc85", "neutron:ovn-metadata-sb-cfg"="574", ovn-bridge-mappings="vlan:br-ex", ovn-chassis-mac-mappings="", ovn-cms-options=enable-chassis-as-gw, ovn-enable-lflow-cache="true", ovn-limit-lflow-cache="", ovn-memlimit-lflow-cache-kb="", ovn-monitor-all="false", ovn-trim-limit-lflow-cache="", ovn-trim-wmark-perc-lflow-cache="", port-up-notif="true"}
hostname : lab-infra02
name : "30757b96-cb1b-4512-bfdd-df6df50f2f4c"
nb_cfg : 171
other_config : {datapath-type=system, iface-types="bareudp,erspan,geneve,gre,gtpu,internal,ip6erspan,ip6gre,lisp,patch,stt,system,tap,vxlan", is-interconn="false", ovn-bridge-mappings="vlan:br-ex", ovn-chassis-mac-mappings="", ovn-cms-options=enable-chassis-as-gw, ovn-enable-lflow-cache="true", ovn-limit-lflow-cache="", ovn-memlimit-lflow-cache-kb="", ovn-monitor-all="false", ovn-trim-limit-lflow-cache="", ovn-trim-wmark-perc-lflow-cache="", port-up-notif="true"}
transport_zones : []
vtep_logical_switches: []
</code></pre></div></div>
<p>There I see 6 chassis defined in the Southbound DB, which is to be expected.</p>
<h4 id="chassis_private-table">chassis_private table</h4>
<div class="language-plaintext highlighter-rouge"><div class="highlight"><pre class="highlight"><code>root@lab-infra02:~# ovn-sbctl list chassis_private
_uuid : 38940279-b953-4ec8-9069-9fc2e7b7fe3d
chassis : eed64f71-9cd1-4e1a-a891-e8bbb9049c41
external_ids : {"neutron:ovn-metadata-id"="6645f143-2dc0-5f03-b7bb-681bc3e8b969", "neutron:ovn-metadata-sb-cfg"="662"}
name : "6c2a75b1-482a-40e3-91f8-3e449986f5b6"
nb_cfg : 662
nb_cfg_timestamp : 1648150649984
_uuid : 521bfe75-5a10-4928-8158-b15df2cb0c5d
chassis : ada8b169-bd60-490b-8520-7e621cbbb84e
external_ids : {"neutron:ovn-metadata-id"="83641d9c-6244-564c-b67c-d5b3298adc85", "neutron:ovn-metadata-sb-cfg"="662"}
name : "30757b96-cb1b-4512-bfdd-df6df50f2f4c"
nb_cfg : 662
nb_cfg_timestamp : 1648150649989
_uuid : 4c614b3d-1e26-40d7-8d92-00d1a1e77243
chassis : 8f4829ad-746d-4125-8561-363adbbc4dce
external_ids : {"neutron:ovn-metadata-id"="344341e0-8e69-5e00-979c-d59fee1b9b27", "neutron:ovn-metadata-sb-cfg"="662"}
name : "d50d391d-910f-40d6-8aa7-24fbfda018ff"
nb_cfg : 662
nb_cfg_timestamp : 1648150649988
_uuid : 73b1096a-b38f-4e6a-960c-4a99e93735d6
chassis : 6c90b020-be8e-4b7c-9aa8-0f4a9f826e6d
external_ids : {"neutron:ovn-metadata-id"="2864488c-c9a8-5cf1-b1c0-184c295493b6", "neutron:ovn-metadata-sb-cfg"="662"}
name : "0c9b25a6-3760-4b57-ba71-49e7091730bb"
nb_cfg : 662
nb_cfg_timestamp : 1648150649984
_uuid : 3b580d16-2896-489f-8f1a-10d2cd13e1ae
chassis : []
external_ids : {"neutron:ovn-metadata-id"="bdc50d9c-42b1-5f20-8737-baba108b2f67", "neutron:ovn-metadata-sb-cfg"="425"}
name : "5236f154-4a73-44ab-a588-b602a0b56bd5"
nb_cfg : 425
nb_cfg_timestamp : 1643778233179
_uuid : a65846ba-67dc-49eb-9558-17ca0db09e0f
chassis : 478e3679-f4af-4a2d-a986-85323c840620
external_ids : {"neutron:ovn-metadata-id"="4d9e06dc-69c0-5ea7-8a6d-e750d11ebb9f", "neutron:ovn-metadata-sb-cfg"="662"}
name : "1f318a3c-f607-4272-814c-b0c4d813daa5"
nb_cfg : 662
nb_cfg_timestamp : 1648150649985
_uuid : cb281eea-a02c-44c7-81e9-19aab7637c12
chassis : 8a07dfc5-1e52-49aa-aa97-ec0515334fc6
external_ids : {"neutron:ovn-metadata-id"="64b68ff2-b068-5e64-a1cd-9c95afadd0b7", "neutron:ovn-metadata-sb-cfg"="662"}
name : "900595a5-a02a-4566-b6dc-0c1e0e2cb392"
nb_cfg : 662
nb_cfg_timestamp : 1648150649986
</code></pre></div></div>
<p>In listing the <code class="language-plaintext highlighter-rouge">chassis_private</code> table, however, I see 7 entries. And wouldn’t you know, <strong>one</strong> of those entries has an empty <code class="language-plaintext highlighter-rouge">chassis</code> list:</p>
<div class="language-plaintext highlighter-rouge"><div class="highlight"><pre class="highlight"><code>_uuid : 3b580d16-2896-489f-8f1a-10d2cd13e1ae
chassis : []
external_ids : {"neutron:ovn-metadata-id"="bdc50d9c-42b1-5f20-8737-baba108b2f67", "neutron:ovn-metadata-sb-cfg"="425"}
name : "5236f154-4a73-44ab-a588-b602a0b56bd5"
nb_cfg : 425
nb_cfg_timestamp : 1643778233179
</code></pre></div></div>
<p>That could explain, then, that as the agent code attempted to reference the <code class="language-plaintext highlighter-rouge">hostname</code> of a <em>null</em> chassis, a traceback would be encountered:</p>
<p><code class="language-plaintext highlighter-rouge">AttributeError: 'Chassis_Private' object has no attribute 'hostname'</code></p>
<p>On a whim, I deleted the errant row:</p>
<div class="language-plaintext highlighter-rouge"><div class="highlight"><pre class="highlight"><code>ovn-sbctl destroy chassis_private 3b580d16-2896-489f-8f1a-10d2cd13e1ae
</code></pre></div></div>
<p>Running the command again, I confirmed there were only six entries and that they lined up to corresponding chassis:</p>
<div class="language-plaintext highlighter-rouge"><div class="highlight"><pre class="highlight"><code>root@lab-infra02:~# ovn-sbctl list chassis
_uuid : 6c90b020-be8e-4b7c-9aa8-0f4a9f826e6d
encaps : [4c1cae4d-36a4-4541-af8c-fc02758fab4e, ac4dd143-10db-48c3-b4dd-8f42d0d6efd0]
external_ids : {datapath-type=system, iface-types="bareudp,erspan,geneve,gre,gtpu,internal,ip6erspan,ip6gre,lisp,patch,stt,system,tap,vxlan", is-interconn="false", ovn-bridge-mappings="physnet1:br-rpn,vlan:br-ex", ovn-chassis-mac-mappings="", ovn-cms-options=enable-chassis-as-gw, ovn-enable-lflow-cache="true", ovn-limit-lflow-cache="", ovn-memlimit-lflow-cache-kb="", ovn-monitor-all="false", ovn-trim-limit-lflow-cache="", ovn-trim-wmark-perc-lflow-cache="", port-up-notif="true"}
hostname : lab-compute01
name : "0c9b25a6-3760-4b57-ba71-49e7091730bb"
nb_cfg : 0
other_config : {datapath-type=system, iface-types="bareudp,erspan,geneve,gre,gtpu,internal,ip6erspan,ip6gre,lisp,patch,stt,system,tap,vxlan", is-interconn="false", ovn-bridge-mappings="physnet1:br-rpn,vlan:br-ex", ovn-chassis-mac-mappings="", ovn-cms-options=enable-chassis-as-gw, ovn-enable-lflow-cache="true", ovn-limit-lflow-cache="", ovn-memlimit-lflow-cache-kb="", ovn-monitor-all="false", ovn-trim-limit-lflow-cache="", ovn-trim-wmark-perc-lflow-cache="", port-up-notif="true"}
transport_zones : []
vtep_logical_switches: []
_uuid : 478e3679-f4af-4a2d-a986-85323c840620
encaps : [1e5060c3-a6ce-41bd-b54a-2ba3907f7092, 3177060c-bcdc-4c02-bf31-ff359c666538]
external_ids : {datapath-type=system, iface-types="bareudp,erspan,geneve,gre,gtpu,internal,ip6erspan,ip6gre,lisp,patch,stt,system,tap,vxlan", is-interconn="false", ovn-bridge-mappings="vlan:br-ex", ovn-chassis-mac-mappings="", ovn-cms-options=enable-chassis-as-gw, ovn-enable-lflow-cache="true", ovn-limit-lflow-cache="", ovn-memlimit-lflow-cache-kb="", ovn-monitor-all="false", ovn-trim-limit-lflow-cache="", ovn-trim-wmark-perc-lflow-cache="", port-up-notif="true"}
hostname : lab-compute03
name : "1f318a3c-f607-4272-814c-b0c4d813daa5"
nb_cfg : 0
other_config : {datapath-type=system, iface-types="bareudp,erspan,geneve,gre,gtpu,internal,ip6erspan,ip6gre,lisp,patch,stt,system,tap,vxlan", is-interconn="false", ovn-bridge-mappings="vlan:br-ex", ovn-chassis-mac-mappings="", ovn-cms-options=enable-chassis-as-gw, ovn-enable-lflow-cache="true", ovn-limit-lflow-cache="", ovn-memlimit-lflow-cache-kb="", ovn-monitor-all="false", ovn-trim-limit-lflow-cache="", ovn-trim-wmark-perc-lflow-cache="", port-up-notif="true"}
transport_zones : []
vtep_logical_switches: []
_uuid : eed64f71-9cd1-4e1a-a891-e8bbb9049c41
encaps : [3932bdff-e3a2-425b-9bf5-8d05fffbd171, a6f63e7b-a59a-41a3-9fdf-a2b6fae892cd]
external_ids : {datapath-type=system, iface-types="bareudp,erspan,geneve,gre,gtpu,internal,ip6erspan,ip6gre,lisp,patch,stt,system,tap,vxlan", is-interconn="false", ovn-bridge-mappings="physnet2:br-rpn,vlan:br-ex", ovn-chassis-mac-mappings="", ovn-cms-options=enable-chassis-as-gw, ovn-enable-lflow-cache="true", ovn-limit-lflow-cache="", ovn-memlimit-lflow-cache-kb="", ovn-monitor-all="false", ovn-trim-limit-lflow-cache="", ovn-trim-wmark-perc-lflow-cache="", port-up-notif="true"}
hostname : lab-compute02
name : "6c2a75b1-482a-40e3-91f8-3e449986f5b6"
nb_cfg : 174
other_config : {datapath-type=system, iface-types="bareudp,erspan,geneve,gre,gtpu,internal,ip6erspan,ip6gre,lisp,patch,stt,system,tap,vxlan", is-interconn="false", ovn-bridge-mappings="physnet2:br-rpn,vlan:br-ex", ovn-chassis-mac-mappings="", ovn-cms-options=enable-chassis-as-gw, ovn-enable-lflow-cache="true", ovn-limit-lflow-cache="", ovn-memlimit-lflow-cache-kb="", ovn-monitor-all="false", ovn-trim-limit-lflow-cache="", ovn-trim-wmark-perc-lflow-cache="", port-up-notif="true"}
transport_zones : []
vtep_logical_switches: []
_uuid : 8a07dfc5-1e52-49aa-aa97-ec0515334fc6
encaps : [63a84cd2-cb93-485e-aaa4-e6701dbb9a7d, a67c8b1c-da4e-4178-b0eb-58315983ca68]
external_ids : {datapath-type=system, iface-types="bareudp,erspan,geneve,gre,gtpu,internal,ip6erspan,ip6gre,lisp,patch,stt,system,tap,vxlan", is-interconn="false", ovn-bridge-mappings="vlan:br-ex", ovn-chassis-mac-mappings="", ovn-cms-options=enable-chassis-as-gw, ovn-enable-lflow-cache="true", ovn-limit-lflow-cache="", ovn-memlimit-lflow-cache-kb="", ovn-monitor-all="false", ovn-trim-limit-lflow-cache="", ovn-trim-wmark-perc-lflow-cache="", port-up-notif="true"}
hostname : lab-infra01
name : "900595a5-a02a-4566-b6dc-0c1e0e2cb392"
nb_cfg : 0
other_config : {datapath-type=system, iface-types="bareudp,erspan,geneve,gre,gtpu,internal,ip6erspan,ip6gre,lisp,patch,stt,system,tap,vxlan", is-interconn="false", ovn-bridge-mappings="vlan:br-ex", ovn-chassis-mac-mappings="", ovn-cms-options=enable-chassis-as-gw, ovn-enable-lflow-cache="true", ovn-limit-lflow-cache="", ovn-memlimit-lflow-cache-kb="", ovn-monitor-all="false", ovn-trim-limit-lflow-cache="", ovn-trim-wmark-perc-lflow-cache="", port-up-notif="true"}
transport_zones : []
vtep_logical_switches: []
_uuid : 8f4829ad-746d-4125-8561-363adbbc4dce
encaps : [ce7a5ab6-534a-4667-a7c0-5f112b0f4507, fcaf8226-fa90-4848-8c1d-d3c975276e05]
external_ids : {datapath-type=system, iface-types="bareudp,erspan,geneve,gre,gtpu,internal,ip6erspan,ip6gre,lisp,patch,stt,system,tap,vxlan", is-interconn="false", "neutron:ovn-metadata-id"="344341e0-8e69-5e00-979c-d59fee1b9b27", "neutron:ovn-metadata-sb-cfg"="173", ovn-bridge-mappings="vlan:br-ex", ovn-chassis-mac-mappings="", ovn-cms-options=enable-chassis-as-gw, ovn-enable-lflow-cache="true", ovn-limit-lflow-cache="", ovn-memlimit-lflow-cache-kb="", ovn-monitor-all="false", ovn-trim-limit-lflow-cache="", ovn-trim-wmark-perc-lflow-cache="", port-up-notif="true"}
hostname : lab-infra03
name : "d50d391d-910f-40d6-8aa7-24fbfda018ff"
nb_cfg : 171
other_config : {datapath-type=system, iface-types="bareudp,erspan,geneve,gre,gtpu,internal,ip6erspan,ip6gre,lisp,patch,stt,system,tap,vxlan", is-interconn="false", ovn-bridge-mappings="vlan:br-ex", ovn-chassis-mac-mappings="", ovn-cms-options=enable-chassis-as-gw, ovn-enable-lflow-cache="true", ovn-limit-lflow-cache="", ovn-memlimit-lflow-cache-kb="", ovn-monitor-all="false", ovn-trim-limit-lflow-cache="", ovn-trim-wmark-perc-lflow-cache="", port-up-notif="true"}
transport_zones : []
vtep_logical_switches: []
_uuid : ada8b169-bd60-490b-8520-7e621cbbb84e
encaps : [072fa878-8849-4b06-acfd-4e889ff308b0, 8b6e5992-a4bf-46e3-b1c2-d5494765ca62]
external_ids : {datapath-type=system, iface-types="bareudp,erspan,geneve,gre,gtpu,internal,ip6erspan,ip6gre,lisp,patch,stt,system,tap,vxlan", is-interconn="false", "neutron:ovn-metadata-id"="83641d9c-6244-564c-b67c-d5b3298adc85", "neutron:ovn-metadata-sb-cfg"="574", ovn-bridge-mappings="vlan:br-ex", ovn-chassis-mac-mappings="", ovn-cms-options=enable-chassis-as-gw, ovn-enable-lflow-cache="true", ovn-limit-lflow-cache="", ovn-memlimit-lflow-cache-kb="", ovn-monitor-all="false", ovn-trim-limit-lflow-cache="", ovn-trim-wmark-perc-lflow-cache="", port-up-notif="true"}
hostname : lab-infra02
name : "30757b96-cb1b-4512-bfdd-df6df50f2f4c"
nb_cfg : 171
other_config : {datapath-type=system, iface-types="bareudp,erspan,geneve,gre,gtpu,internal,ip6erspan,ip6gre,lisp,patch,stt,system,tap,vxlan", is-interconn="false", ovn-bridge-mappings="vlan:br-ex", ovn-chassis-mac-mappings="", ovn-cms-options=enable-chassis-as-gw, ovn-enable-lflow-cache="true", ovn-limit-lflow-cache="", ovn-memlimit-lflow-cache-kb="", ovn-monitor-all="false", ovn-trim-limit-lflow-cache="", ovn-trim-wmark-perc-lflow-cache="", port-up-notif="true"}
transport_zones : []
vtep_logical_switches: []
</code></pre></div></div>
<h2 id="testing">Testing</h2>
<p>So now, the moment of truth!</p>
<div class="language-plaintext highlighter-rouge"><div class="highlight"><pre class="highlight"><code>root@lab-infra01:~# openstack network agent list
HttpException: 500: Server Error for url: http://10.20.0.11:9696/v2.0/agents, Request Failed: internal server error while processing your request.
</code></pre></div></div>
<p>Dang.</p>
<p>I spent another few minutes mulling this over before considering a restart of the <code class="language-plaintext highlighter-rouge">neutron-server</code> service might be warranted. After restarting <code class="language-plaintext highlighter-rouge">neutron-server</code> across the three controller nodes, the following attempt worked:</p>
<div class="language-plaintext highlighter-rouge"><div class="highlight"><pre class="highlight"><code>root@lab-infra01:~# openstack network agent list
+--------------------------------------+------------------------------+--------------------------------------+-------------------+-------+-------+----------------------------+
| ID | Agent Type | Host | Availability Zone | Alive | State | Binary |
+--------------------------------------+------------------------------+--------------------------------------+-------------------+-------+-------+----------------------------+
| 1591b8ad-8a59-47f8-b1cf-53c4375eea5c | NIC Switch agent | lab-infra03 | None | :-) | UP | neutron-sriov-nic-agent |
| 16355a23-b872-4ec2-995e-208094f2057c | Baremetal Node | 8919cf4d-a9dd-4985-ae70-835ba024e7b7 | None | :-) | UP | ironic-neutron-agent |
| 258a10ff-1090-4e90-a32c-4c6f8d01c938 | DHCP agent | lab-infra01 | nova | :-) | UP | neutron-dhcp-agent |
| 29d9376e-dee5-41a1-9e86-e3d9607f4a59 | NIC Switch agent | lab-infra02 | None | :-) | UP | neutron-sriov-nic-agent |
| 346ba9ea-1c2d-4dc8-ba61-4cde37bbeaf9 | Metering agent | lab-infra03 | None | :-) | UP | neutron-metering-agent |
| 416d7511-3ef2-4bda-9b5c-157d2bef182a | Baremetal Node | f7945b37-f43f-4b69-b987-1277d0a5777f | None | :-) | UP | ironic-neutron-agent |
| 467885c9-539e-4b9b-8bde-69405bf0597d | Baremetal Node | 97c9e327-9b72-4566-a345-ca0544e28d14 | None | :-) | UP | ironic-neutron-agent |
| 57175ad2-02be-4d05-a9ee-08643a6393c8 | NIC Switch agent | lab-infra01 | None | :-) | UP | neutron-sriov-nic-agent |
| 594fdaab-d0be-4c69-8081-b293009b4808 | Metering agent | lab-infra01 | None | :-) | UP | neutron-metering-agent |
| 8533ec17-f8f5-4240-a085-98f158a981df | NIC Switch agent | lab-compute03 | None | :-) | UP | neutron-sriov-nic-agent |
| 868a1ae9-3f3b-4574-9fce-0ff1762df160 | Metering agent | lab-infra02 | None | :-) | UP | neutron-metering-agent |
| 8bc8691c-064b-4661-b4d0-f2ca778012ee | DHCP agent | lab-infra02 | nova | :-) | UP | neutron-dhcp-agent |
| b126376b-e253-47f8-b22e-fce5ffb87f94 | Baremetal Node | 1ff24bbc-6058-41f9-aad5-7d4e78c81695 | None | :-) | UP | ironic-neutron-agent |
| b589a112-0877-4968-a6f5-04a3e3a383b6 | NIC Switch agent | lab-compute01 | None | :-) | UP | neutron-sriov-nic-agent |
| b5c326c6-cbe3-42b2-a78c-bf3008272dc1 | NIC Switch agent | lab-compute02 | None | :-) | UP | neutron-sriov-nic-agent |
| c2b0c5e4-9499-4d97-8ecf-f09c7496b0bd | DHCP agent | lab-infra03 | nova | :-) | UP | neutron-dhcp-agent |
| da06498a-fc06-45a0-bbba-1568f700cca6 | Baremetal Node | eac40a3f-3854-426c-b232-7ae7df4ab549 | None | :-) | UP | ironic-neutron-agent |
| 900595a5-a02a-4566-b6dc-0c1e0e2cb392 | OVN Controller Gateway agent | lab-infra01 | | :-) | UP | ovn-controller |
| 64b68ff2-b068-5e64-a1cd-9c95afadd0b7 | OVN Metadata agent | lab-infra01 | | :-) | UP | neutron-ovn-metadata-agent |
| 1f318a3c-f607-4272-814c-b0c4d813daa5 | OVN Controller Gateway agent | lab-compute03 | | :-) | UP | ovn-controller |
| 4d9e06dc-69c0-5ea7-8a6d-e750d11ebb9f | OVN Metadata agent | lab-compute03 | | :-) | UP | neutron-ovn-metadata-agent |
| d50d391d-910f-40d6-8aa7-24fbfda018ff | OVN Controller Gateway agent | lab-infra03 | | :-) | UP | ovn-controller |
| 344341e0-8e69-5e00-979c-d59fee1b9b27 | OVN Metadata agent | lab-infra03 | | :-) | UP | neutron-ovn-metadata-agent |
| 0c9b25a6-3760-4b57-ba71-49e7091730bb | OVN Controller Gateway agent | lab-compute01 | | :-) | UP | ovn-controller |
| 2864488c-c9a8-5cf1-b1c0-184c295493b6 | OVN Metadata agent | lab-compute01 | | :-) | UP | neutron-ovn-metadata-agent |
| 6c2a75b1-482a-40e3-91f8-3e449986f5b6 | OVN Controller Gateway agent | lab-compute02 | | :-) | UP | ovn-controller |
| 6645f143-2dc0-5f03-b7bb-681bc3e8b969 | OVN Metadata agent | lab-compute02 | | :-) | UP | neutron-ovn-metadata-agent |
| 30757b96-cb1b-4512-bfdd-df6df50f2f4c | OVN Controller Gateway agent | lab-infra02 | | :-) | UP | ovn-controller |
| 83641d9c-6244-564c-b67c-d5b3298adc85 | OVN Metadata agent | lab-infra02 | | :-) | UP | neutron-ovn-metadata-agent |
+--------------------------------------+------------------------------+--------------------------------------+-------------------+-------+-------+----------------------------+
</code></pre></div></div>
<h2 id="summary">Summary</h2>
<p>This was not the first time I’d come across this issue, and unfortunately, can neither understand <em>why</em> it happens and what I did last time to fix it. It’s probably obvious I did something similar, but I’ve slept since then and don’t recall.</p>
<p>The following links were helpful in gaining a better understanding of what is/was happening and upstream changes being put in place to either keep it from happening in the future or more gracefully recover:</p>
<ul>
<li><a href="https://review.opendev.org/c/openstack/neutron/+/797796/">https://review.opendev.org/c/openstack/neutron/+/797796/</a></li>
<li><a href="https://bugzilla.redhat.com/show_bug.cgi?id=1975264">https://bugzilla.redhat.com/show_bug.cgi?id=1975264</a></li>
<li><a href="https://review.opendev.org/c/openstack/neutron/+/818132">https://review.opendev.org/c/openstack/neutron/+/818132</a></li>
</ul>
<hr />
<p>If you have some thoughts or comments on this post, I’d love to hear ‘em. Feel free to reach out on Twitter at @jimmdenton or hit me up on LinkedIn.</p>jamesdentonOn more than one occasion I have turned to this blog to fix issues that reoccur weeks/months/years after the initial post is born, and this post will serve as one of those reference points in the future, I’m sure. In my OpenStack-Ansible Xena lab running OVN, I’ve twice now come across the following error when performing a openstack network agent list command: 'Chassis_Private' object has no attribute 'hostname' What does that even mean?!Using Minio as S3 Backend for OpenStack Glance2021-12-25T00:00:00+00:002021-12-25T00:00:00+00:00http://www.jimmdenton.com/using-minio-as-s3-backend-glance<p>My homelab consists of a few random devices, including a Synology NAS that doubles as a home backup system. I use NFS to provide shared storage for Glance images and Cinder volumes, and Synology even has Cinder drivers that leverage iSCSI. All-in-all, it’s a pretty useful setup to test a myriad of OpenStack functionality.</p>
<p>I recently discovered Minio, which is an open-source object storage solution that provides S3 compatibility. Installable with Docker, I thought I’d give it a go and test OpenStack’s <em>reintroduced</em> support for S3 backends in Glance.
<!--more--></p>
<h2 id="configuring-minio">Configuring Minio</h2>
<p>To install Minio in Docker in DSM, I followed a <a href="https://jonaharagon.me/installing-minio-on-synology-diskstation-4823caf600c3">guide</a> that, while a little old, worked out well enough. In my environment, using <code class="language-plaintext highlighter-rouge">host</code> networking vs <code class="language-plaintext highlighter-rouge">bridge</code> worked out better.</p>
<p>Once installed, it requires a minimal amount of configuration to work with Glance. You will need:</p>
<ul>
<li>a user with r/w permissions</li>
<li>a region defined</li>
</ul>
<p>To create the user, navigate to <strong>Users</strong> -> <strong>Create User</strong> and provide an ACCESS KEY and SECRET KEY and appropriate permissions:</p>
<div class="language-plaintext highlighter-rouge"><div class="highlight"><pre class="highlight"><code>ACCESS_KEY: openstack
SECRET_KEY: 0p3nstack
POLICY: readwrite
</code></pre></div></div>
<p>To define a region, navigate to <strong>Settings</strong> -> <strong>Region</strong> and set the region name in the <strong>Server Location</strong> field. I originally set <code class="language-plaintext highlighter-rouge">us-south-lab</code>, but due to some pre-configured assumptions in the <code class="language-plaintext highlighter-rouge">boto3</code> python client, I had to change this to <code class="language-plaintext highlighter-rouge">us-east-1</code> for things to work properly.</p>
<h2 id="configuring-openstack">Configuring OpenStack</h2>
<p>There are some overides on the OpenStack-Ansible side that must be configured to allow the playbooks to properly configure Glance for the additional backend. Use the <code class="language-plaintext highlighter-rouge">glance_additional_stores</code> variable, taking care to ensure that any defaults are also specified (since you’re overriding the default variable).</p>
<p>The value for <code class="language-plaintext highlighter-rouge">name</code> is arbitrary, and used as an identifier for specific settings that will also be defined, while <code class="language-plaintext highlighter-rouge">type</code> is a specific type of Glance backend.</p>
<div class="language-plaintext highlighter-rouge"><div class="highlight"><pre class="highlight"><code>glance_additional_stores:
- http
- cinder
- name: minio
type: s3
</code></pre></div></div>
<p>Addition to <code class="language-plaintext highlighter-rouge">glance_additional_stores</code>, you must define a new configuration block that maps to the new backend definition. For OpenStack-Ansible, this can be done as a config override:</p>
<div class="language-plaintext highlighter-rouge"><div class="highlight"><pre class="highlight"><code>glance_glance_api_conf_overrides:
minio:
s3_store_host: http://172.22.0.4:9000
s3_store_access_key: openstack
s3_store_secret_key: 0p3nstack
s3_store_bucket: glance
s3_store_create_bucket_on_put: True
s3_store_bucket_url_format: auto
</code></pre></div></div>
<p>In <code class="language-plaintext highlighter-rouge">glance-api.conf</code>, the override above will be written as this:</p>
<div class="language-plaintext highlighter-rouge"><div class="highlight"><pre class="highlight"><code>[minio]
s3_store_host = http://172.22.0.4:9000
s3_store_access_key = openstack
s3_store_secret_key = 0p3nstack
s3_store_bucket = glance
s3_store_create_bucket_on_put = True
s3_store_bucket_url_format = auto
</code></pre></div></div>
<h2 id="testing-the-backend">Testing the Backend</h2>
<p>If the default Glance backend (file) has not been changed, it is still possible to upload individual images to the new S3 backend using the <code class="language-plaintext highlighter-rouge">glance</code> client.</p>
<p>In this example, a Cirros image will be uploaded to the <code class="language-plaintext highlighter-rouge">minio</code> store:</p>
<div class="language-plaintext highlighter-rouge"><div class="highlight"><pre class="highlight"><code>root@lab-infra01:~/images# glance image-create --file cirros-0.5.1-x86_64-disk.img --disk-format raw --container-format bare --name cirros3 --store minio --progress
[=============================>] 100%
+------------------+----------------------------------------------------------------------------------+
| Property | Value |
+------------------+----------------------------------------------------------------------------------+
| checksum | 1d3062cd89af34e419f7100277f38b2b |
| container_format | bare |
| created_at | 2021-12-24T04:23:19Z |
| disk_format | raw |
| id | 53627724-da3e-4b81-9910-55598d9393d4 |
| locations | [{"url": "s3://openstack:0p3nstack@172.22.0.4:9000/glance/53627724-da3e-4b81-991 |
| | 0-55598d9393d4", "metadata": {"store": "minio"}}] |
| min_disk | 0 |
| min_ram | 0 |
| name | cirros3 |
| os_hash_algo | sha512 |
| os_hash_value | 553d220ed58cfee7dafe003c446a9f197ab5edf8ffc09396c74187cf83873c877e7ae041cb80f3b9 |
| | 1489acf687183adcd689b53b38e3ddd22e627e7f98a09c46 |
| os_hidden | False |
| owner | 7a8df96a3c6a47118e60e57aa9ecff54 |
| protected | False |
| size | 16338944 |
| status | active |
| stores | minio |
| tags | [] |
| updated_at | 2021-12-24T04:23:21Z |
| virtual_size | 16338944 |
| visibility | shared |
+------------------+----------------------------------------------------------------------------------+
</code></pre></div></div>
<p>Once uploaded, an instance can be created by specifying the new image name or UUID.</p>
<h2 id="benchmarking-minio">Benchmarking Minio</h2>
<p>The Minio team provides a benchmarking utility named Warp, which is available on <a href="https://github.com/minio/warp">Github</a> as source code of pre-compiled binaries.</p>
<p>To test, you’ll need the Minio endpoint along with the access and secret keys:</p>
<div class="language-plaintext highlighter-rouge"><div class="highlight"><pre class="highlight"><code># warp mixed --host=172.22.0.4:9000 --access-key=openstack --secret-key=0p3nstack --autoterm
Throughput 7.3 objects/s within 7.500000% for 25.802s. Assuming stability. Terminating benchmark.
warp: Benchmark data written to "warp-mixed-2021-12-24[050521]-hCzP.csv.zst"
Mixed operations.
Operation: DELETE, 10%, Concurrency: 20, Ran 1m33s.
* Throughput: 2.39 obj/s
Operation: GET, 44%, Concurrency: 20, Ran 1m33s.
* Throughput: 104.80 MiB/s, 10.48 obj/s
Operation: PUT, 15%, Concurrency: 20, Ran 1m32s.
* Throughput: 36.17 MiB/s, 3.62 obj/s
Operation: STAT, 30%, Concurrency: 20, Ran 1m33s.
* Throughput: 7.00 obj/s
Cluster Total: 139.94 MiB/s, 23.35 obj/s over 1m34s.
</code></pre></div></div>
<p>The NAS hosting this instance of Minio is a DS1815+ with 4x 6TB 6Gbps SATA disks and 1Gbps networking. Things look considerably better with a different NAS (DS1621+) using NVMe and 10Gbps networking:</p>
<div class="language-plaintext highlighter-rouge"><div class="highlight"><pre class="highlight"><code># warp mixed --host=10.22.0.4:9000 --access-key=openstack --secret-key=0p3nstack --autoterm
Throughput 51.6 objects/s within 7.500000% for 13.489s. Assuming stability. Terminating benchmark.
warp: Benchmark data written to "warp-mixed-2021-12-27[153057]-mzH0.csv.zst"
Mixed operations.
Operation: DELETE, 10%, Concurrency: 20, Ran 48s.
* Throughput: 16.51 obj/s
Operation: GET, 45%, Concurrency: 20, Ran 48s.
* Throughput: 742.10 MiB/s, 74.21 obj/s
Operation: PUT, 15%, Concurrency: 20, Ran 48s.
* Throughput: 248.44 MiB/s, 24.84 obj/s
Operation: STAT, 30%, Concurrency: 20, Ran 48s.
* Throughput: 49.47 obj/s
Cluster Total: 986.46 MiB/s, 164.60 obj/s over 48s.
</code></pre></div></div>
<h2 id="summary">Summary</h2>
<p>I was glad to see that the S3 backend had been re-introduced in Ussuri after being deprecated around the Mitaka timeframe, and having some local object storage options is nice for testing and for eventually setting up Cinder volume backups. Using something like Ceph (for object) is a bit overkill for my usecases, and another administrative headache I don’t want to deal with. I might try to implement a Swift proxy to translate Swift -> S3 for Ironic, but will leave that for another day.</p>
<hr />
<p>If you have some thoughts or comments on this article, I’d love to hear ‘em. Feel free to reach out on Twitter at @jimmdenton or hit me up on LinkedIn.</p>jamesdentonMy homelab consists of a few random devices, including a Synology NAS that doubles as a home backup system. I use NFS to provide shared storage for Glance images and Cinder volumes, and Synology even has Cinder drivers that leverage iSCSI. All-in-all, it’s a pretty useful setup to test a myriad of OpenStack functionality. I recently discovered Minio, which is an open-source object storage solution that provides S3 compatibility. Installable with Docker, I thought I’d give it a go and test OpenStack’s reintroduced support for S3 backends in Glance.Mounting Virtual Media Using Redfish on iDRAC 82021-12-19T00:00:00+00:002021-12-19T00:00:00+00:00http://www.jimmdenton.com/mounting-virtual-media-drac8<p>Using HP iLO 4 for the last few years, you could say I’ve been a bit <em>spoiled</em> with some of the conveniences provided within.</p>
<p>So, imagine my surprise when firing up my recently-acquired Dell R630 for the first time, only to find that HTTP-based virtual media was not an option in the UI!
<!--more-->
Some time later I came to find out that mounting virtual media requires the use of the API. No big deal, except that I had not found an obvious guide to using the included API (which I later found out was Redfish v1). It took some time to find a good, working example <a href="https://github.com/dell/iDRAC-Redfish-Scripting/issues/24">here</a>.</p>
<p>And now, I’ll save you some time and trouble by demonstrating a mount and eject operation via curl.</p>
<h2 id="mounting-virtual-media-via-https">Mounting Virtual Media via HTTP/S</h2>
<p>To attach virtual media, one must use the following format:</p>
<div class="language-plaintext highlighter-rouge"><div class="highlight"><pre class="highlight"><code>POST
URI: https://<drac_ip_address>/redfish/v1/Managers/iDRAC.Embedded.1/VirtualMedia/CD/Actions/VirtualMedia.InsertMedia
BODY:
{
"Image": "http://<web_server>/<image_name>.iso"
}
</code></pre></div></div>
<p>The following example will <strong><em>mount</em></strong> an ISO using curl:</p>
<div class="language-plaintext highlighter-rouge"><div class="highlight"><pre class="highlight"><code>curl -v -k -X POST https://172.19.0.25/redfish/v1/Managers/iDRAC.Embedded.1/VirtualMedia/CD/Actions/VirtualMedia.InsertMedia \
-u root \
-H 'Content-Type: application/json' \
-d '{"Image": "http://172.22.0.5/VMware-VMvisor-Installer-7.0U2-17630552.x86_64.iso"}'
</code></pre></div></div>
<p>A successful operation will result in an HTTP <code class="language-plaintext highlighter-rouge">204</code> status code:</p>
<div class="language-plaintext highlighter-rouge"><div class="highlight"><pre class="highlight"><code>> POST /redfish/v1/Managers/iDRAC.Embedded.1/VirtualMedia/CD/Actions/VirtualMedia.InsertMedia HTTP/1.1
> Host: 172.19.0.25
> Authorization: Basic cm9vdDpjYWx2aW5jYWx2aW4=
> User-Agent: curl/7.77.0
> Accept: */*
> Content-Type: application/json
> Content-Length: 81
>
* Mark bundle as not supporting multiuse
< HTTP/1.1 204 No Content
< Strict-Transport-Security: max-age=63072000
< Vary: Accept-Encoding
< Keep-Alive: timeout=60, max=199
< X-Frame-Options: SAMEORIGIN
< Content-Type: application/json; charset=utf-8
< Server: iDRAC/8
< Date: Mon, 20 Dec 2021 07:24:06 GMT
< Cache-Control: no-cache
< Content-Length: 0
< Connection: Keep-Alive
< Accept-Ranges: bytes
<
* Connection #0 to host 172.19.0.25 left intact
</code></pre></div></div>
<p>Attempting to mount an ISO with something already attached will result in a <code class="language-plaintext highlighter-rouge">500</code> error:</p>
<div class="language-plaintext highlighter-rouge"><div class="highlight"><pre class="highlight"><code>> POST /redfish/v1/Managers/iDRAC.Embedded.1/VirtualMedia/CD/Actions/VirtualMedia.InsertMedia HTTP/1.1
> Host: 172.19.0.25
> Authorization: Basic cm9vdDpjYWx2aW5jYWx2aW4=
> User-Agent: curl/7.77.0
> Accept: */*
> Content-Type: application/json
> Content-Length: 81
>
* Mark bundle as not supporting multiuse
< HTTP/1.1 500 Internal Server Error
< Strict-Transport-Security: max-age=63072000
< OData-Version: 4.0
< Vary: Accept-Encoding
< Keep-Alive: timeout=60, max=199
< X-Frame-Options: SAMEORIGIN
< Content-Type: application/json;odata.metadata=minimal;charset=utf-8
< Server: iDRAC/8
< Date: Mon, 20 Dec 2021 07:22:56 GMT
< Cache-Control: no-cache
< Content-Length: 424
< Connection: Keep-Alive
< Access-Control-Allow-Origin: *
< Accept-Ranges: bytes
<
{"error":{"@Message.ExtendedInfo":[{"Message":"The Virtual Media image server is already connected.","MessageArgs":[],"MessageArgs@odata.count":0,"MessageId":"IDRAC.1.6.VRM0012","RelatedProperties":[],"RelatedProperties@odata.count":0,"Resolution":"No response action is required.","Severity":"Informational"}],"code":"Base.1.2.GeneralError","message":"A general error has occurred. See ExtendedInfo for more information"}}
</code></pre></div></div>
<h2 id="ejecting-virtual-media">Ejecting Virtual Media</h2>
<p>To eject virtual media, one must use the following format:</p>
<div class="language-plaintext highlighter-rouge"><div class="highlight"><pre class="highlight"><code>Method: POST
URI: https://<idrac_ip_address>/redfish/v1/Managers/iDRAC.Embedded.1/VirtualMedia/CD/Actions/VirtualMedia.EjectMedia
BODY:
{}
</code></pre></div></div>
<p>The following example will <strong><em>eject</em></strong> an ISO using curl:</p>
<div class="language-plaintext highlighter-rouge"><div class="highlight"><pre class="highlight"><code>curl -v -k -X POST https://drac_ip_address>/redfish/v1/Managers/iDRAC.Embedded.1/VirtualMedia/CD/Actions/VirtualMedia.EjectMedia \
-u root \
-H 'Content-Type: application/json' \
-d '{}'
</code></pre></div></div>
<p>And, yes, the payload is required (and empty) on an eject operation.</p>
<p>A successful operation will result in an HTTP <code class="language-plaintext highlighter-rouge">204</code> status code:</p>
<div class="language-plaintext highlighter-rouge"><div class="highlight"><pre class="highlight"><code>> POST /redfish/v1/Managers/iDRAC.Embedded.1/VirtualMedia/CD/Actions/VirtualMedia.EjectMedia HTTP/1.1
> Host: 172.19.0.25
> Authorization: Basic cm9vdDpjYWx2aW5jYWx2aW4=
> User-Agent: curl/7.77.0
> Accept: */*
> Content-Type: application/json
> Content-Length: 2
>
* Mark bundle as not supporting multiuse
< HTTP/1.1 204 No Content
< Strict-Transport-Security: max-age=63072000
< Vary: Accept-Encoding
< Keep-Alive: timeout=60, max=199
< X-Frame-Options: SAMEORIGIN
< Content-Type: application/json; charset=utf-8
< Server: iDRAC/8
< Date: Mon, 20 Dec 2021 07:23:29 GMT
< Cache-Control: no-cache
< Connection: Keep-Alive
< Transfer-Encoding: chunked
< Accept-Ranges: bytes
<
* Excess found: excess = 5 url = /redfish/v1/Managers/iDRAC.Embedded.1/VirtualMedia/CD/Actions/VirtualMedia.EjectMedia (zero-length body)
</code></pre></div></div>
<p>Attempting to eject an ISO that is not attached will result in a <code class="language-plaintext highlighter-rouge">500</code> error:</p>
<div class="language-plaintext highlighter-rouge"><div class="highlight"><pre class="highlight"><code>> POST /redfish/v1/Managers/iDRAC.Embedded.1/VirtualMedia/CD/Actions/VirtualMedia.EjectMedia HTTP/1.1
> Host: 172.19.0.25
> Authorization: Basic cm9vdDpjYWx2aW5jYWx2aW4=
> User-Agent: curl/7.77.0
> Accept: */*
> Content-Type: application/json
> Content-Length: 2
>
* Mark bundle as not supporting multiuse
< HTTP/1.1 500 Internal Server Error
< Strict-Transport-Security: max-age=63072000
< OData-Version: 4.0
< Vary: Accept-Encoding
< Keep-Alive: timeout=60, max=199
< X-Frame-Options: SAMEORIGIN
< Content-Type: application/json;odata.metadata=minimal;charset=utf-8
< Server: iDRAC/8
< Date: Mon, 20 Dec 2021 07:20:35 GMT
< Cache-Control: no-cache
< Content-Length: 774
< Connection: Keep-Alive
< Access-Control-Allow-Origin: *
< Accept-Ranges: bytes
<
{"error":{"@Message.ExtendedInfo":[{"Message":"No Virtual Media devices are currently connected.","MessageArgs":[],"MessageArgs@odata.count":0,"MessageId":"IDRAC.1.6.VRM0009","RelatedProperties":[],"RelatedProperties@odata.count":0,"Resolution":"No response action is required.","Severity":"Critical"},{"Message":"The request failed due to an internal service error. The service is still operational.","MessageArgs":[],"MessageArgs@odata.count":0,"MessageId":"Base.1.2.InternalError","RelatedProperties":[],"RelatedProperties@odata.count":0,"Resolution":"Resubmit the request. If the problem persists, consider resetting the service.","Severity":"Critical"}],"code":"Base.1.2.GeneralError","message":"A general error has occurred. See ExtendedInfo for more information"}}
</code></pre></div></div>
<h2 id="summary">Summary</h2>
<p>Now that I know what to do, using the API can be faster (and more flexible) that the UI. However, getting there was a bit of a challenge. Hopefully this helps you on your journey.</p>
<hr />
<p>If you have some thoughts or comments on this article, I’d love to hear ‘em. Feel free to reach out on Twitter at @jimmdenton or hit me up on LinkedIn.</p>jamesdentonUsing HP iLO 4 for the last few years, you could say I’ve been a bit spoiled with some of the conveniences provided within. So, imagine my surprise when firing up my recently-acquired Dell R630 for the first time, only to find that HTTP-based virtual media was not an option in the UI!Updating from 1024-bit to 2048-bit SSL Keys on HPE iLO 42021-12-16T00:00:00+00:002021-12-16T00:00:00+00:00http://www.jimmdenton.com/updating-from-1024-2048-ssl-ilo4<p>A recent attempt to move away from IPMI to the native HPE iLO 4 driver in my OpenStack Ironic lab showed just how wrong I was to believe it would be a seamless change. What I found was that while ironic-conductor could communicate with iLO, apparently, it didn’t like what it saw:</p>
<div class="language-plaintext highlighter-rouge"><div class="highlight"><pre class="highlight"><code>[SSL: CERTIFICATE_VERIFY_FAILED] certificate verify failed: EE certificate key too weak
</code></pre></div></div>
<!--more-->
<p>No big deal, right? There should be something obvious in the iLO page to alert me to this weakness, and a check and a click and I’d be back in business.</p>
<p>Wrong.</p>
<p>Even moving from the <code class="language-plaintext highlighter-rouge">ECDHE-RSA-DES-CBC3-SHA</code> cipher to <code class="language-plaintext highlighter-rouge">ECDHE-RSA-AES256-GCM-SHA384</code> by enabling AES in iLO wasn’t enough to get things moving. I had to dig <em>deeper</em>.</p>
<h2 id="unnamed-internet-hero">Unnamed Internet Hero</h2>
<p>A little bit of Googling and I came across something <a href="https://itsjustbytes.wordpress.com/2020/04/22/hp-ilo-4-certificate-upgrade-from-1024-bit-to-2048-bit/">interesting</a>:</p>
<blockquote>
<p>There is an update for ILO 4 that incorporates a new 2048 bit certificate</p>
</blockquote>
<p>My new friend <strong>roadglide03</strong> gave me the hint I needed, along with an upgrade script and some RPMs. A cursory glance at the Perl didn’t reveal anything suspicious, so off I went.</p>
<h2 id="getting-started">Getting Started</h2>
<p>To follow the process to the letter, one would download HPE’s <a href="https://support.hpe.com/hpesc/public/swd/detail?swItemId=MTX_640d4499d8c64ee79f546d439f">Lights-Out Online Configuration Utility for Linux</a> <a href="https://downloads.hpe.com/pub/softlib2/software1/pubsw-linux/p215998034/v182899/hponcfg-5.6.0-0.x86_64.rpm">here</a>. This link provides an RPM that may need to be extracted with <code class="language-plaintext highlighter-rouge">rpm2cpio</code>:</p>
<div class="language-plaintext highlighter-rouge"><div class="highlight"><pre class="highlight"><code># rpm2cpio hponcfg-5.6.0-0.x86_64.rpm | cpio -id
</code></pre></div></div>
<p>Or, for the Ubuntu folks, the deb works just as well:</p>
<div class="language-plaintext highlighter-rouge"><div class="highlight"><pre class="highlight"><code># curl https://downloads.linux.hpe.com/SDR/hpPublicKey2048.pub | apt-key add -
# curl https://downloads.linux.hpe.com/SDR/hpPublicKey2048_key1.pub | apt-key add -
# curl https://downloads.linux.hpe.com/SDR/hpePublicKey2048_key1.pub | apt-key add -
# add-apt-repository 'deb http://downloads.linux.hpe.com/SDR/repo/mcp focal/current non-free'
# add-apt-repository 'deb http://downloads.linux.hpe.com/SDR/repo/mcp focal/12.20 non-free'
# apt-get update
# apt-get install hponcfg
</code></pre></div></div>
<p>The thing to know about <code class="language-plaintext highlighter-rouge">hponcfg</code> is that it allows one to modify the <strong>local</strong> iLO only. Fine if you have an OS on your machine and have a handful to manage. Not fine if you have a fleet and/or no operating system (more on that later).</p>
<h2 id="using-replacesslcertpl">Using replaceSSLcert.pl</h2>
<p>The <code class="language-plaintext highlighter-rouge">replaceSSLcert.pl</code> works with the following switches:</p>
<ul>
<li>–check</li>
<li>–update</li>
</ul>
<p>Using <code class="language-plaintext highlighter-rouge">--check</code>, you ought to end up with a message like this:</p>
<div class="language-plaintext highlighter-rouge"><div class="highlight"><pre class="highlight"><code># perl replaceSSLcert.pl --check
Here's the output:
Pre Check/Update Info Gathering
Gathering info from the local iLO
ILO IP: 172.19.0.27
ILO DNS NAME: lab-infra01-ilo
ILO DOMAIN NAME: shands.local
!!!!!!!!!!!!!!!!!!!!!!!!!!!!!!!!!!!!!!!!!!!!!!!!!
WARNING: ILO DNS Domain name does not match local domain
!!!!!!!!!!!!!!!!!!!!!!!!!!!!!!!!!!!!!!!!!!!!!!!!!
!!!!!!!!!!!!!!!!!!!!!!!!!!!!!!!!!!!!!!!!!!!!!!!!!
WARNING: ILO IP (172.19.0.27) resolves to
which does not match configured ILO DNS Name
lab-infra01-ilo
!!!!!!!!!!!!!!!!!!!!!!!!!!!!!!!!!!!!!!!!!!!!!!!!!
Checking certificate for lab-infra01-ilo
CERTIFICATE UPDATE NEEDED
lab-infra01-ilo(172.19.0.27) certificate is only 1024 bits long
Which is less than the minimum length of 2048 bits.
</code></pre></div></div>
<p>Which is to say, there are a lot of complaints here about the state of iLO on this machine. Whatever, I don’t really care, I just want a 2048-bit key:</p>
<div class="language-plaintext highlighter-rouge"><div class="highlight"><pre class="highlight"><code>lab-infra01-ilo(172.19.0.27) certificate is only 1024 bits long
Which is less than the minimum length of 2048 bits.
</code></pre></div></div>
<p>The process of updating the key is handled by the script, and it will work through the following:</p>
<ul>
<li>Generate CSR</li>
<li>Create a CA</li>
<li>Generate a ‘signed’ key</li>
<li>Upload PEM to iLO</li>
</ul>
<p>To help generate a CSR with at least some accurate information, the following blocks in the <code class="language-plaintext highlighter-rouge">replaceSSLcert.pl</code> should be updated to reflect the proper values:</p>
<div class="language-plaintext highlighter-rouge"><div class="highlight"><pre class="highlight"><code><CSR_STATE VALUE ="TX"/>
<CSR_COUNTRY VALUE ="US"/>
<CSR_LOCALITY VALUE ="San Antonio"/>
<CSR_ORGANIZATION VALUE ="jimmdenton"/>
<CSR_ORGANIZATIONAL_UNIT VALUE ="lab"/>
<CSR_COMMON_NAME VALUE ="lab-infra01-ilo.jimmdenton.com"/>
</code></pre></div></div>
<p>In addition, you should update <code class="language-plaintext highlighter-rouge">/etc/hosts</code> on the machine running <code class="language-plaintext highlighter-rouge">replaceSSLcert.pl</code> with an entry for iLo and the short <em>and</em> common name:</p>
<div class="language-plaintext highlighter-rouge"><div class="highlight"><pre class="highlight"><code>172.19.0.27 lab-infra01-ilo lab-infra01-ilo.jimmdenton.com
</code></pre></div></div>
<p>To verify things work as expected, you can run <code class="language-plaintext highlighter-rouge">openssl</code> to verify the key size before and after the change:</p>
<div class="language-plaintext highlighter-rouge"><div class="highlight"><pre class="highlight"><code># echo | openssl s_client -connect 172.19.0.27:443 2>/dev/null | openssl x509 -text -noout | grep "Public-Key"
RSA Public-Key: (1024 bit)
</code></pre></div></div>
<p>Now you can run the script with <code class="language-plaintext highlighter-rouge">--update</code>:</p>
<div class="language-plaintext highlighter-rouge"><div class="highlight"><pre class="highlight"><code># perl replaceSSLcert.pl --update
Pre Check/Update Info Gathering
Gathering info from the local iLO
ILO IP: 172.19.0.27
ILO DNS NAME: lab-infra01-ilo
ILO DOMAIN NAME: shands.local
!!!!!!!!!!!!!!!!!!!!!!!!!!!!!!!!!!!!!!!!!!!!!!!!!
WARNING: ILO DNS Domain name does not match local domain
!!!!!!!!!!!!!!!!!!!!!!!!!!!!!!!!!!!!!!!!!!!!!!!!!
ILO DNS Name matches ILO IP DNS Lookup (lab-infra01-ilo)
Checking certificate for lab-infra01-ilo
lab-infra01-ilo(172.19.0.27) certificate is only 1024 bits long
Which is less than the minimum length of 2048 bits.
Issuing openssl genrsa command
Issuing openssl req command
!!!!!!!!!!!!!!!!!!!!!!!!!!!!!!!!!!!!!!!!!!!!!!!!!
WARNING: ILO DNS Domain:
arcanebyte.com
DOES NOT MATCH LOCAL DOMAIN:
openstack.local
THIS NEEDS TO BE FIXED ON THE LOCAL ILO
!!!!!!!!!!!!!!!!!!!!!!!!!!!!!!!!!!!!!!!!!!!!!!!!!
About to update the local iLO certificate with:
FQDN: lab-infra01-ilo
ARE YOU SURE YOU WANT TO CONTINUE?
PLEASE ANSWER 'YES' or 'NO':
</code></pre></div></div>
<p>Answering <code class="language-plaintext highlighter-rouge">YES</code> will allow the script to proceed with the aforementioned steps. The process takes about 30 seconds, give or take, and will result in iLO being reset - so you you can expect to lose access if you’re already logged in.</p>
<p>To verify, run <code class="language-plaintext highlighter-rouge">openssl</code> again:</p>
<div class="language-plaintext highlighter-rouge"><div class="highlight"><pre class="highlight"><code># echo | openssl s_client -connect 172.19.0.27:443 2>/dev/null | openssl x509 -text -noout | grep "Public-Key"
RSA Public-Key: (2048 bit)
</code></pre></div></div>
<p>Sweet! This should rid me of the pesky <code class="language-plaintext highlighter-rouge">certificate key too weak</code> error. Now, how to scale this operation.</p>
<h2 id="remote-ilo-or-using-locfgpl">Remote iLO (or using locfg.pl)</h2>
<p>To scale this out across the lab (about 9 nodes) I wanted to find a way to hit iLO over the network rather than locally. More Googling and a Little Bit of Luck™ let me to the <a href="https://support.hpe.com/hpesc/public/swd/detail?swItemId=MTX_ac3efba097b84fe8acfcbdd5d5">HPE Lights-Out XML PERL Scripting Sample for Linux</a> which provides (yet another) Perl script for managing iLO remotely: <code class="language-plaintext highlighter-rouge">locfg.pl</code>.</p>
<p>The download provides a ton of XML files along with the Perl script itself, which we will use to verify it actually works. But first, you may need to install a pre-requisite:</p>
<div class="language-plaintext highlighter-rouge"><div class="highlight"><pre class="highlight"><code># apt install libsocket6-perl
</code></pre></div></div>
<p>Running the script, we can see what’s necessary to make it go:</p>
<div class="language-plaintext highlighter-rouge"><div class="highlight"><pre class="highlight"><code># ./locfg.pl
Usage: perl locfg.pl -s server -f inputfile [options]
perl locfg.pl -s ipV4Address -f inputfile [options]
perl locfg.pl -s ipV4Address:portNumber -f inputfile [options]
perl locfg.pl -s ipV6Address -f inputfile [options]
perl locfg.pl -s [ipV6Address] -f inputfile [options]
perl locfg.pl -s [ipV6Address]:portNumber -f inputfile [options]
perl locfg.pl -s DnsName:portnumber -f inputfile [options]
-l logfile log file
-v enable verbose mode
-t substitute variables with values specified(ab=xy,c=z)
-i entering username and password interactively
-u username username
-p password password
-ilo3|-ilo4|-ilo5 target is iLO 3, iLO 4 or iLO 5
Note: Use -u and -p with caution as command line options are
visible on Linux. The '-i' option is for entering the
username and password interactively.
</code></pre></div></div>
<p>To test, I’ll try to get all users using <code class="language-plaintext highlighter-rouge">Get_All_Users.xml</code>:</p>
<div class="language-plaintext highlighter-rouge"><div class="highlight"><pre class="highlight"><code><RIBCL VERSION="2.0">
<LOGIN USER_LOGIN="adminname" PASSWORD="password">
<USER_INFO MODE="read">
<GET_ALL_USERS/>
</USER_INFO>
</LOGIN>
</RIBCL>
</code></pre></div></div>
<p>To execute looks like this:</p>
<div class="language-plaintext highlighter-rouge"><div class="highlight"><pre class="highlight"><code># perl locfg.pl -s 172.19.0.24 -u root -p <password> -ilo4 -f Get_All_Users.xml
<?xml version="1.0"?>
<RIBCL VERSION="2.23">
<RESPONSE
STATUS="0x0000"
MESSAGE='No error'
/>
</RIBCL>
<?xml version="1.0"?>
<RIBCL VERSION="2.23">
<RESPONSE
STATUS="0x0000"
MESSAGE='No error'
/>
</RIBCL>
<?xml version="1.0"?>
<RIBCL VERSION="2.23">
<RESPONSE
STATUS="0x0000"
MESSAGE='No error'
/>
</RIBCL>
<?xml version="1.0"?>
<RIBCL VERSION="2.23">
<RESPONSE
STATUS="0x0000"
MESSAGE='No error'
/>
<GET_ALL_USERS>
<USER_LOGIN VALUE="Administrator"/>
<USER_LOGIN VALUE="maas"/>
<USER_LOGIN VALUE="root"/>
</GET_ALL_USERS>
</RIBCL>
<?xml version="1.0"?>
<RIBCL VERSION="2.23">
<RESPONSE
STATUS="0x0000"
MESSAGE='No error'
/>
</RIBCL>
<?xml version="1.0"?>
<RIBCL VERSION="2.23">
<RESPONSE
STATUS="0x0000"
MESSAGE='No error'
/>
</RIBCL>
...Script Succeeded...
</code></pre></div></div>
<p>Looks good! Now comes the fun part of constructing everything that <code class="language-plaintext highlighter-rouge">replaceSSLcert.pl</code> did for us.</p>
<h3 id="generating-things">Generating Things</h3>
<p>The server I hope to attack first is <strong>texas04</strong>, a baremetal node used with Ironic that does not have an operating system installed.</p>
<p>The first step is to generate an RSA key that will be used for the CA used to sign the new 2048-bit certificate/key generated for iLO on <strong>texas04</strong>:</p>
<p>From <strong>lab-infra01</strong>:</p>
<div class="language-plaintext highlighter-rouge"><div class="highlight"><pre class="highlight"><code># mkdir /tmp/texas04/
# /usr/bin/openssl genrsa -out /tmp/texas04/myCA.key 2048 2>/dev/null
</code></pre></div></div>
<p>Then, generate a CA:</p>
<div class="language-plaintext highlighter-rouge"><div class="highlight"><pre class="highlight"><code># /usr/bin/openssl req -x509 -new -nodes -key /tmp/texas04/myCA.key -sha256 -days 3650 -out /tmp/texas04/myCA.pem -subj "/C=US/ST=TX/L=San Antonio/O=jimmdenton/OU=lab/CN=US ORG" 2>/dev/null
</code></pre></div></div>
<p>Next, we want iLO on <strong>texas04</strong> to generate a CSR using attributes we’ve defined here (which you should change). The <code class="language-plaintext highlighter-rouge">locfg.pl</code> script will be used to trigger iLO to do the needful:</p>
<div class="language-plaintext highlighter-rouge"><div class="highlight"><pre class="highlight"><code># cat <<EOF >> /tmp/texas04/csr.xml
<RIBCL VERSION="2.0">
<LOGIN USER_LOGIN = "USERID" PASSWORD = "PASSW0RD">
<RIB_INFO MODE="write">
<!-- Default -->
<!-- <CERTIFICATE_SIGNING_REQUEST/> -->
<!-- Custom CSR -->
<CERTIFICATE_SIGNING_REQUEST>
<!-- Change the following to match your needs -->
<CSR_STATE VALUE ="TX"/>
<CSR_COUNTRY VALUE ="US"/>
<CSR_LOCALITY VALUE ="San Antonio"/>
<CSR_ORGANIZATION VALUE ="jimmdenton"/>
<CSR_ORGANIZATIONAL_UNIT VALUE ="lab"/>
<CSR_COMMON_NAME VALUE ="texas04-ilo.jimmdenton.com"/>
</CERTIFICATE_SIGNING_REQUEST>
</RIB_INFO>
</LOGIN>
</RIBCL>
EOF
</code></pre></div></div>
<p>Running this:</p>
<div class="language-plaintext highlighter-rouge"><div class="highlight"><pre class="highlight"><code># perl locfg.pl -s 172.19.0.24 -u root -p <password> -ilo4 -f /tmp/texas04/csr.xml
</code></pre></div></div>
<p>Results in this:</p>
<div class="language-plaintext highlighter-rouge"><div class="highlight"><pre class="highlight"><code>The iLO subsystem is currently generating a Certificate Signing Request(CSR), run script after 10 minutes or more to receive the CSR.
</code></pre></div></div>
<p>I waited maybe 2 minutes before proceeding, but you can check the status with this command:</p>
<div class="language-plaintext highlighter-rouge"><div class="highlight"><pre class="highlight"><code># perl locfg.pl -s 172.19.0.24 -u root -p <password> -ilo4 -f /tmp/texas04/csr.xml -l /tmp/texas04/csr.out
</code></pre></div></div>
<p>When the CSR is ready, it will be reflected in <code class="language-plaintext highlighter-rouge">/tmp/texas04/csr.out</code>:</p>
<div class="language-plaintext highlighter-rouge"><div class="highlight"><pre class="highlight"><code># cat /tmp/texas04/csr.out
<?xml version="1.0"?>
<RIBCL VERSION="2.23">
<RESPONSE
STATUS="0x0000"
MESSAGE='No error'
/>
</RIBCL>
<?xml version="1.0"?>
<RIBCL VERSION="2.23">
<RESPONSE
STATUS="0x0000"
MESSAGE='No error'
/>
</RIBCL>
<?xml version="1.0"?>
<RIBCL VERSION="2.23">
<RESPONSE
STATUS="0x0000"
MESSAGE='No error'
/>
</RIBCL>
<?xml version="1.0"?>
<RIBCL VERSION="2.23">
<RESPONSE
STATUS="0x0000"
MESSAGE='No error'
/>
</RIBCL>
<?xml version="1.0"?>
<RIBCL VERSION="2.23">
<RESPONSE
STATUS="0x0000"
MESSAGE='No error'
/>
</RIBCL>
<?xml version="1.0"?>
<RIBCL VERSION="2.23">
<RESPONSE
STATUS="0x0000"
MESSAGE='No error'
/>
</RIBCL>
<?xml version="1.0"?>
<RIBCL VERSION="2.23">
<RESPONSE
STATUS="0x0000"
MESSAGE='No error'
/>
</RIBCL>
<?xml version="1.0"?>
<RIBCL VERSION="2.23">
<RESPONSE
STATUS="0x0000"
MESSAGE='No error'
/>
</RIBCL>
<?xml version="1.0"?>
<RIBCL VERSION="2.23">
<RESPONSE
STATUS="0x0000"
MESSAGE='No error'
/>
</RIBCL>
<?xml version="1.0"?>
<RIBCL VERSION="2.23">
<RESPONSE
STATUS="0x0000"
MESSAGE='No error'
/>
<CERTIFICATE_SIGNING_REQUEST>
-----BEGIN CERTIFICATE REQUEST-----
MIIC7TCCAdUCAQAwdDEfMB0GA1UEAwwWdGV4YXMwNC5hcmNhbmVieXRlLmNvbTEM
MAoGA1UECwwDTGFiMRMwEQYDVQQKDApBcmNhbmVCeXRlMRQwEgYDVQQHDAtTYW4g
QW50b25pbzELMAkGA1UECAwCVFgxCzAJBgNVBAYTAlVTMIIBIjANBgkqhkiG9w0B
AQEFAAOCAQ8AMIIBCgKCAQEAuQUaPlY4LdIEecqYWEy6WHk4p/J5WyNyJ9o01l/R
dtrfquYsBgNWMZqVRJt8FgCbbLqTUBH+C+aB1E34BPxcKFBvIG2bYQuFf+aokPNc
RuXR8/0pOodQtMJQYrpCZwJMnU6CrDQ5aIl0NCiSOxU6HSxnS/Bkly2PR64JjgWq
bv5794MQQUXtP4bxhOodlJaIVagCenklSIm8xN+/dfjkZdtjo/yVSF79a/DokbNb
iiX+zLCQO11OjCFTJMBC2aub4F2Q9D6fqaAKgp8mdykGLM2GJBvKYEMzqv5/RrcE
qc2I8Uc6CjreDYApYDgsNrEuNG1XhnaeE8P1jBeqhExKvwIDAQABoDQwMgYJKoZI
hvcNAQkOMSUwIzAhBgNVHREEGjAYghZ0ZXhhczA0LmFyY2FuZWJ5dGUuY29tMA0G
CSqGSIb3DQEBCwUAA4IBAQBd7Zxy8Suo48csSDkoLxLnG3Z6zeqNvjAlnENVUfHg
IkKGctpPbzVSvZUJj+uaXGDsjJeg/Qwptab2PU/E2j/QPqt/9bNtl7eEdlqXaGHJ
qJoSL+wi4mO2/wczdax7QLvSvCtJ+HvDKIXwq1ra7cuThlosWjQhUzhKJCrK6PAH
xNcOhJxIGld41To+kH98YPJoWDq4GsD9Fl48OIpjr0ItDo3htGahKOMsinqgDfjc
GFsxEKDrVkDf8iD+7gHgs+VHtslkG5Bz+pIFeza9M4MmKPGaitlUR6K+j7ZiAs/L
N3EP5Ti6I6iUd8SA79i1wFhUzoyqDTk7UURatLu07XyX
-----END CERTIFICATE REQUEST-----
</CERTIFICATE_SIGNING_REQUEST>
</RIBCL>
<?xml version="1.0"?>
<RIBCL VERSION="2.23">
<RESPONSE
STATUS="0x0000"
MESSAGE='No error'
/>
</RIBCL>
<?xml version="1.0"?>
<RIBCL VERSION="2.23">
<RESPONSE
STATUS="0x0000"
MESSAGE='No error'
/>
</RIBCL>
...Script Succeeded...
</code></pre></div></div>
<p>The important bits lie between the brackets:</p>
<div class="language-plaintext highlighter-rouge"><div class="highlight"><pre class="highlight"><code>-----BEGIN CERTIFICATE REQUEST-----
MIIC7TCCAdUCAQAwdDEfMB0GA1UEAwwWdGV4YXMwNC5hcmNhbmVieXRlLmNvbTEM
MAoGA1UECwwDTGFiMRMwEQYDVQQKDApBcmNhbmVCeXRlMRQwEgYDVQQHDAtTYW4g
QW50b25pbzELMAkGA1UECAwCVFgxCzAJBgNVBAYTAlVTMIIBIjANBgkqhkiG9w0B
AQEFAAOCAQ8AMIIBCgKCAQEAuQUaPlY4LdIEecqYWEy6WHk4p/J5WyNyJ9o01l/R
dtrfquYsBgNWMZqVRJt8FgCbbLqTUBH+C+aB1E34BPxcKFBvIG2bYQuFf+aokPNc
RuXR8/0pOodQtMJQYrpCZwJMnU6CrDQ5aIl0NCiSOxU6HSxnS/Bkly2PR64JjgWq
bv5794MQQUXtP4bxhOodlJaIVagCenklSIm8xN+/dfjkZdtjo/yVSF79a/DokbNb
iiX+zLCQO11OjCFTJMBC2aub4F2Q9D6fqaAKgp8mdykGLM2GJBvKYEMzqv5/RrcE
qc2I8Uc6CjreDYApYDgsNrEuNG1XhnaeE8P1jBeqhExKvwIDAQABoDQwMgYJKoZI
hvcNAQkOMSUwIzAhBgNVHREEGjAYghZ0ZXhhczA0LmFyY2FuZWJ5dGUuY29tMA0G
CSqGSIb3DQEBCwUAA4IBAQBd7Zxy8Suo48csSDkoLxLnG3Z6zeqNvjAlnENVUfHg
IkKGctpPbzVSvZUJj+uaXGDsjJeg/Qwptab2PU/E2j/QPqt/9bNtl7eEdlqXaGHJ
qJoSL+wi4mO2/wczdax7QLvSvCtJ+HvDKIXwq1ra7cuThlosWjQhUzhKJCrK6PAH
xNcOhJxIGld41To+kH98YPJoWDq4GsD9Fl48OIpjr0ItDo3htGahKOMsinqgDfjc
GFsxEKDrVkDf8iD+7gHgs+VHtslkG5Bz+pIFeza9M4MmKPGaitlUR6K+j7ZiAs/L
N3EP5Ti6I6iUd8SA79i1wFhUzoyqDTk7UURatLu07XyX
-----END CERTIFICATE REQUEST-----
</code></pre></div></div>
<p>That CSR should get saved in it’s own file:</p>
<div class="language-plaintext highlighter-rouge"><div class="highlight"><pre class="highlight"><code>cat <<EOF >> /tmp/texas04/real-csr.out
-----BEGIN CERTIFICATE REQUEST-----
MIIC7TCCAdUCAQAwdDEfMB0GA1UEAwwWdGV4YXMwNC5hcmNhbmVieXRlLmNvbTEM
MAoGA1UECwwDTGFiMRMwEQYDVQQKDApBcmNhbmVCeXRlMRQwEgYDVQQHDAtTYW4g
QW50b25pbzELMAkGA1UECAwCVFgxCzAJBgNVBAYTAlVTMIIBIjANBgkqhkiG9w0B
AQEFAAOCAQ8AMIIBCgKCAQEAuQUaPlY4LdIEecqYWEy6WHk4p/J5WyNyJ9o01l/R
dtrfquYsBgNWMZqVRJt8FgCbbLqTUBH+C+aB1E34BPxcKFBvIG2bYQuFf+aokPNc
RuXR8/0pOodQtMJQYrpCZwJMnU6CrDQ5aIl0NCiSOxU6HSxnS/Bkly2PR64JjgWq
bv5794MQQUXtP4bxhOodlJaIVagCenklSIm8xN+/dfjkZdtjo/yVSF79a/DokbNb
iiX+zLCQO11OjCFTJMBC2aub4F2Q9D6fqaAKgp8mdykGLM2GJBvKYEMzqv5/RrcE
qc2I8Uc6CjreDYApYDgsNrEuNG1XhnaeE8P1jBeqhExKvwIDAQABoDQwMgYJKoZI
hvcNAQkOMSUwIzAhBgNVHREEGjAYghZ0ZXhhczA0LmFyY2FuZWJ5dGUuY29tMA0G
CSqGSIb3DQEBCwUAA4IBAQBd7Zxy8Suo48csSDkoLxLnG3Z6zeqNvjAlnENVUfHg
IkKGctpPbzVSvZUJj+uaXGDsjJeg/Qwptab2PU/E2j/QPqt/9bNtl7eEdlqXaGHJ
qJoSL+wi4mO2/wczdax7QLvSvCtJ+HvDKIXwq1ra7cuThlosWjQhUzhKJCrK6PAH
xNcOhJxIGld41To+kH98YPJoWDq4GsD9Fl48OIpjr0ItDo3htGahKOMsinqgDfjc
GFsxEKDrVkDf8iD+7gHgs+VHtslkG5Bz+pIFeza9M4MmKPGaitlUR6K+j7ZiAs/L
N3EP5Ti6I6iUd8SA79i1wFhUzoyqDTk7UURatLu07XyX
-----END CERTIFICATE REQUEST-----
EOF
</code></pre></div></div>
<p>Now, we generate the PEM:</p>
<div class="language-plaintext highlighter-rouge"><div class="highlight"><pre class="highlight"><code># /usr/bin/openssl x509 -req -in /tmp/texas04/real-csr.out -CA /tmp/texas04/myCA.pem -CAkey /tmp/texas04/myCA.key -CAcreateserial -out /tmp/texas04/CRT.pem -days 3650 -sha256"
</code></pre></div></div>
<p>Output:</p>
<div class="language-plaintext highlighter-rouge"><div class="highlight"><pre class="highlight"><code>Signature ok
subject=CN = texas04.arcanebyte.com, OU = lab, O = jimmdenton, L = San Antonio, ST = TX, C = US
Getting CA Private Key
</code></pre></div></div>
<p>Verify:</p>
<div class="language-plaintext highlighter-rouge"><div class="highlight"><pre class="highlight"><code># cat /tmp/texas04/CRT.pem
-----BEGIN CERTIFICATE-----
MIIDXzCCAkcCFFJKSKj/1ixZEyQEWKTbFs9DOQ66MA0GCSqGSIb3DQEBCwUAMGQx
CzAJBgNVBAYTAlVTMQswCQYDVQQIDAJUWDEUMBIGA1UEBwwLU2FuIEFudG9uaW8x
EzARBgNVBAoMCkFyY2FuZUJ5dGUxDDAKBgNVBAsMA0xhYjEPMA0GA1UEAwwGVVMg
T1JHMB4XDTIxMTIxNjA0MzQwNloXDTMxMTIxNDA0MzQwNlowdDEfMB0GA1UEAwwW
dGV4YXMwNC5hcmNhbmVieXRlLmNvbTEMMAoGA1UECwwDTGFiMRMwEQYDVQQKDApB
cmNhbmVCeXRlMRQwEgYDVQQHDAtTYW4gQW50b25pbzELMAkGA1UECAwCVFgxCzAJ
BgNVBAYTAlVTMIIBIjANBgkqhkiG9w0BAQEFAAOCAQ8AMIIBCgKCAQEAuQUaPlY4
LdIEecqYWEy6WHk4p/J5WyNyJ9o01l/RdtrfquYsBgNWMZqVRJt8FgCbbLqTUBH+
C+aB1E34BPxcKFBvIG2bYQuFf+aokPNcRuXR8/0pOodQtMJQYrpCZwJMnU6CrDQ5
aIl0NCiSOxU6HSxnS/Bkly2PR64JjgWqbv5794MQQUXtP4bxhOodlJaIVagCenkl
SIm8xN+/dfjkZdtjo/yVSF79a/DokbNbiiX+zLCQO11OjCFTJMBC2aub4F2Q9D6f
qaAKgp8mdykGLM2GJBvKYEMzqv5/RrcEqc2I8Uc6CjreDYApYDgsNrEuNG1Xhnae
E8P1jBeqhExKvwIDAQABMA0GCSqGSIb3DQEBCwUAA4IBAQCXPFYDn69ceirgt5TR
i6iBgIsVDEcuFmSj72krf+dTrlt1JYtUVFyRYdLw3MaWy186JF3emq2lvPEyU6SA
fnOSM2lBrxF0LDZ9QpkOb+PWZE1JRthzE5Xxg6q5oUPbR/XJuFLljkg9hz60v5Xd
pGNXcV/Hh4S6EBELfQ94ju73rvuRK149VYSp9TMpzja5GEyKH9xHDgfG+GK/siDB
JlyLlmSwr3PeNZwtwB+rZmkjzxzBvsp9CQSuNiLN6B12OeD946MuvJcQ6hhXkImY
WwURDSE8sII4XYeLT9+4D1gPWbBDAkx5kUCgVqE4jtn232MCGd3Md+4ek23S+Stz
wW0O
-----END CERTIFICATE-----
</code></pre></div></div>
<p>Now, we can tuck the certificate into an XML file for upload:</p>
<div class="language-plaintext highlighter-rouge"><div class="highlight"><pre class="highlight"><code>cat <<EOF >> /tmp/texas04/2048cert.xml
<RIBCL VERSION="2.0">
<LOGIN USER_LOGIN = "USERID" PASSWORD = "PASSW0RD">
<RIB_INFO MODE = "write">
<IMPORT_CERTIFICATE>
-----BEGIN CERTIFICATE-----
MIIDXzCCAkcCFFJKSKj/1ixZEyQEWKTbFs9DOQ66MA0GCSqGSIb3DQEBCwUAMGQx
CzAJBgNVBAYTAlVTMQswCQYDVQQIDAJUWDEUMBIGA1UEBwwLU2FuIEFudG9uaW8x
EzARBgNVBAoMCkFyY2FuZUJ5dGUxDDAKBgNVBAsMA0xhYjEPMA0GA1UEAwwGVVMg
T1JHMB4XDTIxMTIxNjA0MzQwNloXDTMxMTIxNDA0MzQwNlowdDEfMB0GA1UEAwwW
dGV4YXMwNC5hcmNhbmVieXRlLmNvbTEMMAoGA1UECwwDTGFiMRMwEQYDVQQKDApB
cmNhbmVCeXRlMRQwEgYDVQQHDAtTYW4gQW50b25pbzELMAkGA1UECAwCVFgxCzAJ
BgNVBAYTAlVTMIIBIjANBgkqhkiG9w0BAQEFAAOCAQ8AMIIBCgKCAQEAuQUaPlY4
LdIEecqYWEy6WHk4p/J5WyNyJ9o01l/RdtrfquYsBgNWMZqVRJt8FgCbbLqTUBH+
C+aB1E34BPxcKFBvIG2bYQuFf+aokPNcRuXR8/0pOodQtMJQYrpCZwJMnU6CrDQ5
aIl0NCiSOxU6HSxnS/Bkly2PR64JjgWqbv5794MQQUXtP4bxhOodlJaIVagCenkl
SIm8xN+/dfjkZdtjo/yVSF79a/DokbNbiiX+zLCQO11OjCFTJMBC2aub4F2Q9D6f
qaAKgp8mdykGLM2GJBvKYEMzqv5/RrcEqc2I8Uc6CjreDYApYDgsNrEuNG1Xhnae
E8P1jBeqhExKvwIDAQABMA0GCSqGSIb3DQEBCwUAA4IBAQCXPFYDn69ceirgt5TR
i6iBgIsVDEcuFmSj72krf+dTrlt1JYtUVFyRYdLw3MaWy186JF3emq2lvPEyU6SA
fnOSM2lBrxF0LDZ9QpkOb+PWZE1JRthzE5Xxg6q5oUPbR/XJuFLljkg9hz60v5Xd
pGNXcV/Hh4S6EBELfQ94ju73rvuRK149VYSp9TMpzja5GEyKH9xHDgfG+GK/siDB
JlyLlmSwr3PeNZwtwB+rZmkjzxzBvsp9CQSuNiLN6B12OeD946MuvJcQ6hhXkImY
WwURDSE8sII4XYeLT9+4D1gPWbBDAkx5kUCgVqE4jtn232MCGd3Md+4ek23S+Stz
wW0O
-----END CERTIFICATE-----
</IMPORT_CERTIFICATE>
<!-- The iLO will be reset after the certificate has been imported. -->
<MOD_GLOBAL_SETTINGS>
<ENFORCE_AES VALUE="Y"/>
<IPMI_DCMI_OVER_LAN_ENABLED VALUE="N"/>
</MOD_GLOBAL_SETTINGS>
<RESET_RIB/>
</RIB_INFO>
</LOGIN>
</RIBCL>
EOF
</code></pre></div></div>
<p>Before the upload commences, check the current state:</p>
<div class="language-plaintext highlighter-rouge"><div class="highlight"><pre class="highlight"><code># echo | openssl s_client -connect 172.19.0.24:443 2>/dev/null | openssl x509 -text -noout | grep "Public-Key"
RSA Public-Key: (1024 bit)
</code></pre></div></div>
<p>Then, run <code class="language-plaintext highlighter-rouge">locfg.pl</code> with the new XML:</p>
<div class="language-plaintext highlighter-rouge"><div class="highlight"><pre class="highlight"><code># perl locfg.pl -s 172.19.0.24 -u root -p <password> -ilo4 -f /tmp/texas04/2048cert.xml
</code></pre></div></div>
<p>Output:</p>
<div class="language-plaintext highlighter-rouge"><div class="highlight"><pre class="highlight"><code>root@lab-infra01:~/hp# perl locfg.pl -s 172.19.0.24 -u root -p <password> -ilo4 -f /tmp/texas04/2048cert.xml
<?xml version="1.0"?>
<RIBCL VERSION="2.23">
<RESPONSE
STATUS="0x0000"
MESSAGE='No error'
/>
</RIBCL>
<?xml version="1.0"?>
<RIBCL VERSION="2.23">
<RESPONSE
STATUS="0x0000"
MESSAGE='No error'
/>
</RIBCL>
<?xml version="1.0"?>
<RIBCL VERSION="2.23">
<RESPONSE
STATUS="0x0000"
MESSAGE='No error'
/>
</RIBCL>
<?xml version="1.0"?>
<RIBCL VERSION="2.23">
<RESPONSE
STATUS="0x0000"
MESSAGE='No error'
/>
<INFORM>Integrated Lights-Out will reset at the end of the script.</INFORM>
</RIBCL>
<?xml version="1.0"?>
<RIBCL VERSION="2.23">
<RESPONSE
STATUS="0x0000"
MESSAGE='No error'
/>
</RIBCL>
<?xml version="1.0"?>
<RIBCL VERSION="2.23">
<RESPONSE
STATUS="0x0000"
MESSAGE='No error'
/>
</RIBCL>
<?xml version="1.0"?>
<RIBCL VERSION="2.23">
<RESPONSE
STATUS="0x0000"
MESSAGE='No error'
/>
</RIBCL>
<?xml version="1.0"?>
<RIBCL VERSION="2.23">
<RESPONSE
STATUS="0x0000"
MESSAGE='No error'
/>
</RIBCL>
<?xml version="1.0"?>
<RIBCL VERSION="2.23">
<RESPONSE
STATUS="0x0000"
MESSAGE='AES is already Enabled.'
/>
</RIBCL>
<?xml version="1.0"?>
<RIBCL VERSION="2.23">
<RESPONSE
STATUS="0x0000"
MESSAGE='No error'
/>
<INFORM>Integrated Lights-Out will reset at the end of the script.</INFORM>
</RIBCL>
<?xml version="1.0"?>
<RIBCL VERSION="2.23">
<RESPONSE
STATUS="0x0000"
MESSAGE='No error'
/>
</RIBCL>
<?xml version="1.0"?>
<RIBCL VERSION="2.23">
<RESPONSE
STATUS="0x0000"
MESSAGE='No error'
/>
</RIBCL>
<?xml version="1.0"?>
<RIBCL VERSION="2.23">
<RESPONSE
STATUS="0x0000"
MESSAGE='No error'
/>
</RIBCL>
<?xml version="1.0"?>
<RIBCL VERSION="2.23">
<RESPONSE
STATUS="0x0000"
MESSAGE='No error'
/>
</RIBCL>
...Script Succeeded...
</code></pre></div></div>
<p>After iLO resets, another look shows the change is successful:</p>
<div class="language-plaintext highlighter-rouge"><div class="highlight"><pre class="highlight"><code># echo | openssl s_client -connect 172.19.0.24:443 2>/dev/null | openssl x509 -text -noout | grep "Public-Key"
RSA Public-Key: (2048 bit)
</code></pre></div></div>
<h2 id="summary">Summary</h2>
<p>Like everything I do, it is usually preceded by a day’s worth of unexpected, yet related, tasks to get things to a state where I can actually get done what I wanted to get done. And then, that is followed up by new errors that allow the process to repeat ad-nauseum. I’m sure you can all relate.</p>
<p>I don’t think it would take much to update the <code class="language-plaintext highlighter-rouge">replaceSSLcert.pl</code> script to use <code class="language-plaintext highlighter-rouge">locfg.pl</code> to interface with remote iLO, since it handles the bulk of the generation of SSL-related bits and would really save time. Better yet, Ansible could be used to make it a pretty quick process. I’ve made both available Perl scripts on my <a href="https://github.com/busterswt/hp_tooling">GitHub</a> for anyone that needs them.</p>
<hr />
<p>If you have some thoughts or comments on this article, I’d love to hear ‘em. Feel free to reach out on Twitter at @jimmdenton or hit me up on LinkedIn.</p>jamesdentonA recent attempt to move away from IPMI to the native HPE iLO 4 driver in my OpenStack Ironic lab showed just how wrong I was to believe it would be a seamless change. What I found was that while ironic-conductor could communicate with iLO, apparently, it didn’t like what it saw: [SSL: CERTIFICATE_VERIFY_FAILED] certificate verify failed: EE certificate key too weakConfiguring Masakari (Instance HA) on OpenStack-Ansible2021-12-01T00:00:00+00:002021-12-01T00:00:00+00:00http://www.jimmdenton.com/configuring-masakari-on-openstack-ansible<p>Providing high availability of cloud resources, whether it be networking or virtual machines, is a topic that comes up often in my corner of the world. I’d heard of Instance-HA in some Red Hat circles, and only recently learned the OpenStack Masakari project was the one to provide that functionality.<!--more--></p>
<p>That said, I’d like to kick the tires on it, and what better place to start than my own OpenStack-based lab running OpenStack-Ansible (Xena).</p>
<h2 id="getting-started">Getting Started</h2>
<p>OpenStack Masakari provides high availability of instances by performing the following actions:</p>
<ul>
<li>Host evacuation</li>
<li>Instance restart</li>
</ul>
<p><strong>Host evacuation</strong> is a feature provided by a monitor known as <strong>masakari-hostmonitor</strong>. With this feature, all instances are evacuated from a node that is considered <em>DOWN</em>. There are some requirements for this feature, such as shared storage, and some other considerations that must be made, including the need to fence offline hosts to ensure the evacuation is successful.</p>
<p><strong>Instance restart</strong> is provided by a monitor known as <strong>masakari-instancemonitor</strong>. With this feature, an instance is restarted should its process on the compute node die.</p>
<p>There are additional monitors provided by Masakari, including:</p>
<ul>
<li>masakari-processmonitor</li>
<li>masakari-introspectivemonitor</li>
</ul>
<p>The <strong>masakari-processmonitor</strong> monitor can be used to monitor other processes and services on the host to ensure they are running consistently. Processes and services can be added to the <code class="language-plaintext highlighter-rouge">process_list.yaml</code> file found at <code class="language-plaintext highlighter-rouge">/etc/masakarimonitors/process_list.yaml</code> on <strong><em>compute</em></strong> nodes or other nodes running monitoring agents. Monitored services can be modified using the <code class="language-plaintext highlighter-rouge">masakari_monitors_process_overrides</code> override in OpenStack-Ansible.</p>
<p>Lastly, the <strong>masakari-introspectivemonitor</strong> monitor can be used to detect system-level failure events via the qemu-qa protocol. Not much has been written about this particular monitor as of yet.</p>
<h3 id="host-evacuation">Host Evacuation</h3>
<p>With Masakari, compute nodes are grouped into <strong><em>failover segments</em></strong>. In the event of a compute node failure, that node’s instances are moved onto another compute node within the <em>same</em> segment. Failover segments are not to be confused with other logical groups of computes, such as availability zones or aggregates, but represent a similar concept.</p>
<p>The destination node is determined by the recovery method configured for the affected segment. There are four methods:</p>
<ul>
<li>reserved_host</li>
<li>auto</li>
<li>rh_priority</li>
<li>auto_priority</li>
</ul>
<p>The <strong>reserved_host</strong> recovery method relocates instances to a subset of <em>non-active</em> nodes. Because these nodes are not active and are typically resourced adequately for failover duty of similarly-equipped active nodes, there is a guarantee that sufficient resources will exist on a reserved node to accommodate migrated instances.</p>
<p>The <strong>auto</strong> recovery method relocates instances to <strong><em>any</em></strong> available node in the same segment. Because all the nodes are active, however, there is no guarantee that sufficient resources will exist on the destination node to accommodate migrated instances.</p>
<p>The <strong>rh_priority</strong> recovery method attempts to evacuate instances using the reserved_host method first, and falls back to the auto method should the reserved_host method fail.</p>
<p>The <strong>auto_priority</strong> recovery method attempts to evacuate instances using the auto method first, and falls back to the reserved_host method should the auto method fail.</p>
<p>Host evacuation requires shared storage and some method of fencing nodes, likely provided by Pacemaker/STONITH and access to the OOB management network. Given these requirements and an incomplete implementation within OpenStack-Ansible at this time, I’ll skip this demonstration.</p>
<h3 id="instance-restart">Instance Restart</h3>
<p>The enabling of the instance restart feature is done on a <em>per-instance</em> basis using the <code class="language-plaintext highlighter-rouge">HA_Enabled=True</code> property. Once Masakari has been deployed, an agent on the compute node will detect instance failure and (hopefully) restart the instance according to policy.</p>
<h2 id="configuring-and-deploying">Configuring and Deploying</h2>
<p>In an OpenStack-Ansible environment, managing the inventory and group membership is key to deploying.</p>
<p>To enable Masakari, simply add the following to the <code class="language-plaintext highlighter-rouge">openstack_user_config.yml</code> file:</p>
<div class="language-plaintext highlighter-rouge"><div class="highlight"><pre class="highlight"><code>masakari-infra_hosts: *infrastructure_hosts
masakari-monitor_hosts: *compute_hosts
</code></pre></div></div>
<p>Keep in mind, those aliases will only work if you’ve defined them in your environment, like so:</p>
<div class="language-plaintext highlighter-rouge"><div class="highlight"><pre class="highlight"><code>infrastructure_hosts: &infrastructure_hosts
lab-infra01:
ip: 10.20.0.30
no_containers: true
lab-infra02:
ip: 10.20.0.22
no_containers: true
lab-infra03:
ip: 10.20.0.23
no_containers: true
compute_hosts: &compute_hosts
lab-compute01:
ip: 10.20.0.31
lab-compute02:
ip: 10.20.0.32
</code></pre></div></div>
<p>Then, execute the following playbooks:</p>
<ul>
<li>haproxy-install.yml</li>
<li>os-masakari-install.yml</li>
</ul>
<p>Once installed, you should notice a few new services across your infrastructure and compute nodes, including:</p>
<h4 id="infra">Infra:</h4>
<ul>
<li>masakari-api.service</li>
<li>masakari-engine.service</li>
</ul>
<h4 id="compute">Compute:</h4>
<ul>
<li>masakari-hostmonitor.service</li>
<li>masakari-instancemonitor.service</li>
<li>masakari-introspectiveinstancemonitor.service</li>
<li>masakari-processmonitor.service</li>
</ul>
<h2 id="testing-instance-restart">Testing Instance Restart</h2>
<p>To test automatic instance restart, I first spun up an instance with the following command:</p>
<div class="language-plaintext highlighter-rouge"><div class="highlight"><pre class="highlight"><code>openstack server create --image "Ubuntu Server 20.04 Focal" --boot-from-volume 20 --flavor m1.small --network LAN --security-group SSH --key-name imac-rsa masakari-vm1
+--------------------------------------+---------------+---------+--------------------+--------------------------+-----------+
| ID | Name | Status | Networks | Image | Flavor |
+--------------------------------------+---------------+---------+--------------------+--------------------------+-----------+
| 5101ed69-00c9-4956-b7fd-7f2256c23474 | masakari-vm1 | ACTIVE | LAN=192.168.2.188 | N/A (booted from volume) | m1.small |
+--------------------------------------+---------------+---------+--------------------+--------------------------+-----------+
</code></pre></div></div>
<p>Then, I set the <code class="language-plaintext highlighter-rouge">HA_Enabled</code> property to <code class="language-plaintext highlighter-rouge">True</code>:</p>
<div class="language-plaintext highlighter-rouge"><div class="highlight"><pre class="highlight"><code>openstack server set --property HA_Enabled=True masakari-vm1
</code></pre></div></div>
<p>To simulate an unexpected failure, I killed the instance on the compute node:</p>
<div class="language-plaintext highlighter-rouge"><div class="highlight"><pre class="highlight"><code>root@lab-compute01:~# pgrep -f guest=instance-00000450
154259
root@lab-compute01:~# pkill -f -9 guest=instance-00000450
</code></pre></div></div>
<p>At the same time, we can see the following events taking place in the log:</p>
<div class="language-plaintext highlighter-rouge"><div class="highlight"><pre class="highlight"><code>Dec 1 16:36:28 lab-compute01 masakari-instancemonitor[151091]: 2021-12-01 16:36:28.660 151091 INFO masakarimonitors.instancemonitor.libvirt_handler.callback [-] Libvirt Event: type=VM, hostname=lab-compute01, uuid=5101ed69-00c9-4956-b7fd-7f2256c23474, time=2021-12-01 16:36:28.660446, event_id=LIFECYCLE, detail=STOPPED_FAILED)
Dec 1 16:36:28 lab-compute01 masakari-instancemonitor[151091]: 2021-12-01 16:36:28.661 151091 INFO masakarimonitors.ha.masakari [-] Send a notification. {'notification': {'type': 'VM', 'hostname': 'lab-compute01', 'generated_time': datetime.datetime(2021, 12, 1, 16, 36, 28, 660446), 'payload': {'event': 'LIFECYCLE', 'instance_uuid': '5101ed69-00c9-4956-b7fd-7f2256c23474', 'vir_domain_event': 'STOPPED_FAILED'}}}
Dec 1 16:36:29 lab-compute01 masakari-instancemonitor[151091]: 2021-12-01 16:36:29.910 151091 INFO masakarimonitors.ha.masakari [-] Response: openstack.instance_ha.v1.notification.Notification(type=VM, hostname=lab-compute01, generated_time=2021-12-01T16:36:28.660446, payload={'event': 'LIFECYCLE', 'instance_uuid': '5101ed69-00c9-4956-b7fd-7f2256c23474', 'vir_domain_event': 'STOPPED_FAILED'}, id=15, notification_uuid=bc7eb253-b5fc-4feb-92fd-46e494772f0d, source_host_uuid=6d39c8c7-9d8f-4faf-a7e7-bbcd7dd5d79d, status=new, created_at=2021-12-01T16:36:29.000000, updated_at=None, location=Munch({'cloud': '10.20.0.11', 'region_name': 'RegionOne', 'zone': None, 'project': Munch({'id': '36de0c24e456401d8df6ffaff42224d0', 'name': None, 'domain_id': None, 'domain_name': None})}))
Dec 1 16:36:43 lab-compute01 masakari-instancemonitor[151091]: 2021-12-01 16:36:43.372 151091 INFO masakarimonitors.instancemonitor.libvirt_handler.callback [-] Libvirt Event: type=VM, hostname=lab-compute01, uuid=5101ed69-00c9-4956-b7fd-7f2256c23474, time=2021-12-01 16:36:43.371886, event_id=REBOOT, detail=UNKNOWN)
Dec 1 16:36:43 lab-compute01 masakari-instancemonitor[151091]: 2021-12-01 16:36:43.373 151091 INFO masakarimonitors.ha.masakari [-] Send a notification. {'notification': {'type': 'VM', 'hostname': 'lab-compute01', 'generated_time': datetime.datetime(2021, 12, 1, 16, 36, 43, 371886), 'payload': {'event': 'REBOOT', 'instance_uuid': '5101ed69-00c9-4956-b7fd-7f2256c23474', 'vir_domain_event': 'UNKNOWN'}}}
Dec 1 16:36:43 lab-compute01 masakari-instancemonitor[151091]: 2021-12-01 16:36:43.383 151091 INFO masakarimonitors.instancemonitor.libvirt_handler.callback [-] Libvirt Event: type=VM, hostname=lab-compute01, uuid=5101ed69-00c9-4956-b7fd-7f2256c23474, time=2021-12-01 16:36:43.383194, event_id=REBOOT, detail=UNKNOWN)
Dec 1 16:36:43 lab-compute01 masakari-instancemonitor[151091]: 2021-12-01 16:36:43.384 151091 INFO masakarimonitors.ha.masakari [-] Send a notification. {'notification': {'type': 'VM', 'hostname': 'lab-compute01', 'generated_time': datetime.datetime(2021, 12, 1, 16, 36, 43, 383194), 'payload': {'event': 'REBOOT', 'instance_uuid': '5101ed69-00c9-4956-b7fd-7f2256c23474', 'vir_domain_event': 'UNKNOWN'}}}
Dec 1 16:36:44 lab-compute01 masakari-instancemonitor[151091]: 2021-12-01 16:36:44.818 151091 INFO masakarimonitors.ha.masakari [-] Response: openstack.instance_ha.v1.notification.Notification(type=VM, hostname=lab-compute01, generated_time=2021-12-01T16:36:43.371886, payload={'event': 'REBOOT', 'instance_uuid': '5101ed69-00c9-4956-b7fd-7f2256c23474', 'vir_domain_event': 'UNKNOWN'}, id=18, notification_uuid=7a08ef3c-ce4a-48a3-ba1a-05d8890c4b9f, source_host_uuid=6d39c8c7-9d8f-4faf-a7e7-bbcd7dd5d79d, status=new, created_at=2021-12-01T16:36:44.000000, updated_at=None, location=Munch({'cloud': '10.20.0.11', 'region_name': 'RegionOne', 'zone': None, 'project': Munch({'id': '36de0c24e456401d8df6ffaff42224d0', 'name': None, 'domain_id': None, 'domain_name': None})}))
Dec 1 16:36:44 lab-compute01 masakari-instancemonitor[151091]: 2021-12-01 16:36:44.918 151091 INFO masakarimonitors.ha.masakari [-] Stop retrying to send a notification because same notification have been already sent.
</code></pre></div></div>
<p>A look at the process list shows a new PID:</p>
<div class="language-plaintext highlighter-rouge"><div class="highlight"><pre class="highlight"><code>root@lab-compute01:~# pgrep -f guest=instance-00000450
168720
</code></pre></div></div>
<p>Finally, a simultaneous ping test shows the ping fail and subseqeuently recover once the instance has been restarted:</p>
<div class="language-plaintext highlighter-rouge"><div class="highlight"><pre class="highlight"><code>root@lab-infra01:~# ping 192.168.2.188
PING 192.168.2.188 (192.168.2.188) 56(84) bytes of data.
64 bytes from 192.168.2.188: icmp_seq=1 ttl=64 time=2.22 ms
64 bytes from 192.168.2.188: icmp_seq=2 ttl=64 time=1.06 ms
64 bytes from 192.168.2.188: icmp_seq=3 ttl=64 time=0.891 ms
64 bytes from 192.168.2.188: icmp_seq=4 ttl=64 time=0.909 ms
64 bytes from 192.168.2.188: icmp_seq=5 ttl=64 time=0.933 ms
64 bytes from 192.168.2.188: icmp_seq=6 ttl=64 time=0.813 ms
64 bytes from 192.168.2.188: icmp_seq=7 ttl=64 time=0.978 ms
64 bytes from 192.168.2.188: icmp_seq=8 ttl=64 time=0.967 ms
64 bytes from 192.168.2.188: icmp_seq=9 ttl=64 time=0.884 ms
64 bytes from 192.168.2.188: icmp_seq=10 ttl=64 time=0.969 ms
64 bytes from 192.168.2.188: icmp_seq=11 ttl=64 time=0.937 ms
64 bytes from 192.168.2.188: icmp_seq=12 ttl=64 time=0.876 ms
...
64 bytes from 192.168.2.188: icmp_seq=40 ttl=64 time=1.97 ms
64 bytes from 192.168.2.188: icmp_seq=41 ttl=64 time=0.886 ms
64 bytes from 192.168.2.188: icmp_seq=42 ttl=64 time=1.70 ms
64 bytes from 192.168.2.188: icmp_seq=43 ttl=64 time=0.728 ms
</code></pre></div></div>
<h2 id="testing-service-restart">Testing Service Restart</h2>
<p>A similar test can be used to verify the automatic restart of crucial services, such as libvirtd, nova-compute, and others.</p>
<p>Here, I ungracefully kill the libvirtd process:</p>
<div class="language-plaintext highlighter-rouge"><div class="highlight"><pre class="highlight"><code>root@lab-compute01:~# pgrep -f libvirtd
183773
183807
root@lab-compute01:~# killall libvirtd
</code></pre></div></div>
<p>Masakari gets to work restarting the service:</p>
<div class="language-plaintext highlighter-rouge"><div class="highlight"><pre class="highlight"><code>Dec 1 20:21:56 lab-compute01 masakari-instancemonitor[151091]: 2021-12-01 20:21:56.399 151091 WARNING masakarimonitors.instancemonitor.instance [-] Libvirt Connection Closed Unexpectedly.
Dec 1 20:21:56 lab-compute01 masakari-instancemonitor[151091]: 2021-12-01 20:21:56.400 151091 WARNING masakarimonitors.instancemonitor.instance [-] Error from libvirt : internal error: client socket is closed
Dec 1 20:21:56 lab-compute01 masakari-instancemonitor[151091]: 2021-12-01 20:21:56.401 151091 WARNING masakarimonitors.instancemonitor.instance [-] Error from libvirt : internal error: client socket is closed
Dec 1 20:21:56 lab-compute01 masakari-instancemonitor[151091]: message repeated 2 times: [ 2021-12-01 20:21:56.401 151091 WARNING masakarimonitors.instancemonitor.instance [-] Error from libvirt : internal error: client socket is closed]
Dec 1 20:21:56 lab-compute01 masakari-instancemonitor[151091]: 2021-12-01 20:21:56.402 151091 WARNING masakarimonitors.instancemonitor.instance [-] Error from libvirt : internal error: client socket is closed
Dec 1 20:21:56 lab-compute01 masakari-instancemonitor[151091]: message repeated 2 times: [ 2021-12-01 20:21:56.402 151091 WARNING masakarimonitors.instancemonitor.instance [-] Error from libvirt : internal error: client socket is closed]
Dec 1 20:21:56 lab-compute01 masakari-instancemonitor[151091]: 2021-12-01 20:21:56.403 151091 WARNING masakarimonitors.instancemonitor.instance [-] Error from libvirt : internal error: client socket is closed
Dec 1 20:21:56 lab-compute01 masakari-introspectiveinstancemonitor[151131]: 2021-12-01 20:21:56.460 151131 WARNING masakarimonitors.introspectiveinstancemonitor.instance [-] Libvirt Connection Closed Unexpectedly.
Dec 1 20:21:56 lab-compute01 masakari-introspectiveinstancemonitor[151131]: 2021-12-01 20:21:56.461 151131 WARNING masakarimonitors.introspectiveinstancemonitor.instance [-] Error from libvirt : internal error: client socket is closed
Dec 1 20:21:56 lab-compute01 masakari-processmonitor[184385]: 2021-12-01 20:21:56.937 184385 WARNING masakarimonitors.processmonitor.process_handler.handle_process [-] Process '/usr/sbin/libvirtd' is not found.
Dec 1 20:21:57 lab-compute01 masakari-processmonitor[184385]: 2021-12-01 20:21:57.046 184385 INFO masakarimonitors.processmonitor.process_handler.handle_process [-] Restart of process with executing command: systemctl restart libvirtd
</code></pre></div></div>
<p>A look at the process list shows a new PID:</p>
<div class="language-plaintext highlighter-rouge"><div class="highlight"><pre class="highlight"><code>root@lab-compute01:~# pgrep -f libvirtd
184026
184063
</code></pre></div></div>
<h2 id="summary">Summary</h2>
<p>Automated <em>anything</em> can be a delicate balance of risk and reward. I’m glad to have had some time looking at OpenStack Masakari, and while the instance restart functionality is great, I’m really looking forward to helping implement the host evacation capabilities within OpenStack-Ansible in the coming <del>weeks</del> <del>months</del> <del>years</del> <em>sometime</em>.</p>
<hr />
<p>If you have some thoughts or comments on this article, I’d love to hear ‘em. Feel free to reach out on Twitter at @jimmdenton or hit me up on LinkedIn.</p>jamesdentonProviding high availability of cloud resources, whether it be networking or virtual machines, is a topic that comes up often in my corner of the world. I’d heard of Instance-HA in some Red Hat circles, and only recently learned the OpenStack Masakari project was the one to provide that functionality.[NSX] Installing VMware vCenter Server Appliance on OpenStack2021-04-09T00:00:00+00:002021-04-09T00:00:00+00:00http://www.jimmdenton.com/installing-vcenter-on-openstack<p>While working through the installation process of installing VMware NSX-T, I have not yet determined whether it is a standalone product or requires the use of vCenter (vSphere Client). I know NSX-T supports both ESXi and KVM hypervisors, so I will have to clear up this confusion later. However, I no longer have ESX anywhere in my home lab to host a vCenter appliance, so my mission has been to install NSX-T and supporting resources on my existing OpenStack cloud running OpenStack-Ansible (Ussuri). <!--more--></p>
<p>vCenter ships as an ISO that would ordinarily be installed on a virtual machine running on ESX. Join me while I attempt (and succeed) in deploying vCenter on top of OpenStack.</p>
<p>This post is Part 2 of a series of posts about installing NSX-T and supporting resources onto an OpenStack cloud to be used with a separate OpenStack cloud. If you haven’t read it yet, check out <a href="https://www.jimmdenton.com/installing-nsxt-manager-on-openstack/">Installing VMware NSX-T Manager on OpenStack</a>, the first post in this series.</p>
<h2 id="getting-started">Getting Started</h2>
<p>This isn’t my first rodeo in shoehorning operating systems onto (cloud) platforms they weren’t meant to run on, and for things that usually run on ESX, that means making a KVM-based environment look a lot like a VMware-based environment. For a VM, that may mean using <strong>sata</strong> disks instead of <strong>virtio</strong> disks, or <strong>e1000</strong> instead of <strong>virtio</strong> nics. Not much is different here.</p>
<p>I found a few <a href="https://github.com/jeffmcutter/vcsa_on_kvm/blob/master/vcenter-install.yaml">repos</a> on GitHub where folks have deployed VCSA 6.0 and 6.5/6.7 using KVM, and those were super helpful starting points. For this NSX lab, vCenter 7.0 will be used.</p>
<h3 id="procuring-vcenter">Procuring vCenter</h3>
<p>I have an active VMUG membership which allows access to NSX and vCenter, along with ESX and all sorts of other stuff. To start, I downloaded the latest VCSA image, VMware-VCSA-all-7.0.2-17694817.iso, and corresponding license key.</p>
<h3 id="extracting-files">Extracting Files</h3>
<p>The following packages are needed to peek inside the VCSA ISO and grab the components we need to make them compatible with OpenStack (KVM):</p>
<ul>
<li>bsdtar</li>
<li>qemu-utils</li>
<li>virtinst</li>
</ul>
<p>Install the packages with the following command:</p>
<div class="language-plaintext highlighter-rouge"><div class="highlight"><pre class="highlight"><code># apt install bsdtar qemu-utils virtinst
</code></pre></div></div>
<p>Extract the iso to stdout and untar the ova directly into <code class="language-plaintext highlighter-rouge">/tmp</code>:</p>
<div class="language-plaintext highlighter-rouge"><div class="highlight"><pre class="highlight"><code># bsdtar -xvOf VMware-VCSA-all-7.0.2-17694817.iso vcsa/VMware-vCenter-Server-Appliance-7.0.2.00000-17694817_OVF10.ova | tar xv -C /tmp/ -xvf -
</code></pre></div></div>
<p>The <code class="language-plaintext highlighter-rouge">/tmp</code> directory will end up with all sorts of files needed to make the magic happen:</p>
<div class="language-plaintext highlighter-rouge"><div class="highlight"><pre class="highlight"><code>-rw-r--r-- 1 64 64 102400 Mar 2 23:01 VMware-vCenter-Server-Appliance-7.0.2.00000-17694817_OVF10.cert
-rw-r--r-- 1 64 64 735812096 Mar 2 23:01 VMware-vCenter-Server-Appliance-7.0.2.00000-17694817_OVF10-disk1.vmdk
-rw-r--r-- 1 64 64 5571473920 Mar 2 23:02 VMware-vCenter-Server-Appliance-7.0.2.00000-17694817_OVF10-disk2.vmdk
-rw-r--r-- 1 64 64 72704 Mar 2 23:02 VMware-vCenter-Server-Appliance-7.0.2.00000-17694817_OVF10-disk3.vmdk
-rw-r--r-- 1 64 64 14578 Mar 2 23:01 VMware-vCenter-Server-Appliance-7.0.2.00000-17694817_OVF10-file1.json
-rw-r--r-- 1 64 64 89613741 Mar 2 23:01 VMware-vCenter-Server-Appliance-7.0.2.00000-17694817_OVF10-file2.rpm
-rw-r--r-- 1 64 64 856 Mar 2 23:01 VMware-vCenter-Server-Appliance-7.0.2.00000-17694817_OVF10.mf
-rw-r--r-- 1 64 64 182520 Mar 2 23:01 VMware-vCenter-Server-Appliance-7.0.2.00000-17694817_OVF10.ovf
</code></pre></div></div>
<p>Convert the disks from <code class="language-plaintext highlighter-rouge">vmdk</code> to <code class="language-plaintext highlighter-rouge">qcow2</code>:</p>
<div class="language-plaintext highlighter-rouge"><div class="highlight"><pre class="highlight"><code># qemu-img convert -O qcow2 /tmp/VMware-vCenter-Server-Appliance-7.0.2.00000-17694817_OVF10-disk1.vmdk /tmp/vcenter70-disk1.qcow2
# qemu-img convert -O qcow2 /tmp/VMware-vCenter-Server-Appliance-7.0.2.00000-17694817_OVF10-disk2.vmdk /tmp/vcenter70-disk2.qcow2
# qemu-img convert -O qcow2 /tmp/VMware-vCenter-Server-Appliance-7.0.2.00000-17694817_OVF10-disk3.vmdk /tmp/vcenter70-disk3.qcow2
</code></pre></div></div>
<p>When attaching multiple disks to an OpenStack instance, the disks will be volumes hosted by Cinder. To create a volume from image, you must know the size of the disk needed. Using the <code class="language-plaintext highlighter-rouge">VMware-vCenter-Server-Appliance-7.0.2.00000-17694817_OVF10-file1.json</code> file, I was able to determine the vCPU, RAM, and size of each disk (there are 16) needed to attach to the VCSA appliance:</p>
<div class="language-plaintext highlighter-rouge"><div class="highlight"><pre class="highlight"><code>system disk1: 48GB
cloudcomponents disk2: 6GB
swap disk3: 25GB
core disk4: 25GB
log disk5: 10GB
db disk6: 10GB
dblog disk7: 15GB
seat disk8: 10GB
netdump disk9: 1GB
autodeploy disk10: 10GB
imagebuilder disk11: 10GB
updatemgr disk12: 100GB
archive disk13: 50GB
vtsdb disk14: 10GB
vtsdblog disk15: 5GB
disk-lifecycle disk16: 100GB
</code></pre></div></div>
<p>The plan, then, was to pre-create a volume for disk2-16, with disk2-3 being based on the <code class="language-plaintext highlighter-rouge">vmdk</code> (now <code class="language-plaintext highlighter-rouge">qcow2</code>) included with the ISO. The other disks would be blank but sized accordingly.</p>
<h2 id="upload-images">Upload images</h2>
<p>Using the <code class="language-plaintext highlighter-rouge">openstack</code> command, upload the <code class="language-plaintext highlighter-rouge">qcow2</code> images:</p>
<div class="language-plaintext highlighter-rouge"><div class="highlight"><pre class="highlight"><code>for i in {1..3}; do
openstack image create --disk-format qcow2 --container-format bare --file /tmp/vcenter70-disk$i.qcow2 vcenter70-disk$i
done
</code></pre></div></div>
<p>Verify:</p>
<div class="language-plaintext highlighter-rouge"><div class="highlight"><pre class="highlight"><code>root@lab-infra01:/home/jdenton/vcsa# openstack image list | grep vcenter
| b2e45a89-0d77-400e-8a46-8183d8926382 | vcenter70-disk1 | active |
| 176329d8-cdbe-4724-9202-a6e5f03484c4 | vcenter70-disk2 | active |
| d2a01904-7ab0-4786-8219-41f3a11465f1 | vcenter70-disk3 | active |
</code></pre></div></div>
<p>As mentioned earlier, certain hardware needs to be present for the VCSA appliance to work properly. Notably, a SATA bus and e1000 NIC. The <code class="language-plaintext highlighter-rouge">disk1</code> image is the system, or root, disk for the appliance, so it can be modified with some property adjustments to support the needed hardware:</p>
<div class="language-plaintext highlighter-rouge"><div class="highlight"><pre class="highlight"><code>openstack image set \
--property hw_disk_bus=sata \
--property hw_vif_model=e1000 \
vcenter70-disk1
</code></pre></div></div>
<h2 id="create-volumes">Create volumes</h2>
<p>Using the <code class="language-plaintext highlighter-rouge">openstack</code> command, create two volumes for <code class="language-plaintext highlighter-rouge">disk2</code> and <code class="language-plaintext highlighter-rouge">disk3</code>:</p>
<div class="language-plaintext highlighter-rouge"><div class="highlight"><pre class="highlight"><code>openstack volume create \
--image vcenter70-disk2 \
--size 6 \
--desc cloudcomponents \
vcenter70-disk2
openstack volume create \
--image vcenter70-disk3 \
--size 26 \
--desc swap \
vcenter70-disk3
</code></pre></div></div>
<p>The size may have to be adjusted higher to ensure the volume is created successfully.</p>
<p>Verify:</p>
<div class="language-plaintext highlighter-rouge"><div class="highlight"><pre class="highlight"><code>root@lab-infra01:/home/jdenton/vcsa# openstack volume list | grep vcenter
| 2528e324-b293-49b6-ab54-7fbe0c732e2e | vcenter70-disk3 | downloading | 26 |
| 41380794-e410-4f0f-8ae3-0fd0a110fb9c | vcenter70-disk2 | downloading | 6 |
</code></pre></div></div>
<p>Create empty volumes for the remainder:</p>
<div class="language-plaintext highlighter-rouge"><div class="highlight"><pre class="highlight"><code>openstack volume create --size 25 vcenter70-disk4 --desc core
openstack volume create --size 10 vcenter70-disk5 --desc log
openstack volume create --size 10 vcenter70-disk6 --desc db
openstack volume create --size 15 vcenter70-disk7 --desc dblog
openstack volume create --size 10 vcenter70-disk8 --desc seat
openstack volume create --size 1 vcenter70-disk9 --desc netdump
openstack volume create --size 10 vcenter70-disk10 --desc autodeploy
openstack volume create --size 10 vcenter70-disk11 --desc imagebuilder
openstack volume create --size 100 vcenter70-disk12 --desc updatemgr
openstack volume create --size 50 vcenter70-disk13 --desc archive
openstack volume create --size 10 vcenter70-disk14 --desc vtsdb
openstack volume create --size 5 vcenter70-disk15 --desc vtsdblog
openstack volume create --size 100 vcenter70-disk16 --desc disk-lifecycle
</code></pre></div></div>
<p>After a few minutes, all of the volumes should be listed:</p>
<div class="language-plaintext highlighter-rouge"><div class="highlight"><pre class="highlight"><code>root@lab-infra01:/home/jdenton/vcsa# openstack volume list | grep vcenter
| 5e443e77-f0cb-4ca9-a741-330ea215d4f1 | vcenter70-disk16 | available | 100 |
| 145f4c56-5565-41f7-a150-bc81aa50c519 | vcenter70-disk15 | available | 5 |
| 03b209ea-ad83-40a5-9cd4-60e4de1395b7 | vcenter70-disk14 | available | 10 |
| 467608e0-85b4-44da-92f2-375c8d4d2c25 | vcenter70-disk13 | available | 50 |
| 56a03176-ea36-4ad6-861e-565571ce9d12 | vcenter70-disk12 | available | 100 |
| 25000084-0c20-4dbd-949a-20065a64c143 | vcenter70-disk11 | available | 10 |
| e37ca38d-28c1-41cd-a1ac-fd13d48825dc | vcenter70-disk10 | available | 10 |
| cc7cf024-1bfb-4c75-8c9a-51b3f256079b | vcenter70-disk9 | available | 1 |
| 10afd11d-0d7a-4797-9b5f-bdb1ff42695f | vcenter70-disk8 | available | 10 |
| 07dcf745-510c-48a1-91d4-11aef9f7cc96 | vcenter70-disk7 | available | 15 |
| 9f95acd1-0131-4adc-9e93-a71a73ac57c3 | vcenter70-disk6 | available | 10 |
| 99ac0727-555a-4047-a1ec-4936ed9f9963 | vcenter70-disk5 | available | 10 |
| b27ffa4e-aa41-4481-83b4-d629e6e3dadf | vcenter70-disk4 | available | 25 |
| 2528e324-b293-49b6-ab54-7fbe0c732e2e | vcenter70-disk3 | available | 26 |
| 41380794-e410-4f0f-8ae3-0fd0a110fb9c | vcenter70-disk2 | available | 6 |
</code></pre></div></div>
<h2 id="create-a-flavor">Create a flavor</h2>
<p>Based on the information presented in the json file, I found there are different sizes of vCenter deployments that support tens or hundreds of nodes. For this environment, a <strong>tiny</strong> sizing will work well:</p>
<ul>
<li>vCPU: 2</li>
<li>RAM: 12GB</li>
</ul>
<div class="language-plaintext highlighter-rouge"><div class="highlight"><pre class="highlight"><code>openstack flavor create \
--vcpu 2 \
--ram 12288 \
vcsa-tiny
</code></pre></div></div>
<h2 id="do-the-networking">Do the networking</h2>
<p>vCenter has port/traffic requirements that can be found <a href="https://ports.vmware.com/home/vSphere-7">here</a>. The following command(s) create a new security group and rules that can be applied to the VCSA:</p>
<div class="language-plaintext highlighter-rouge"><div class="highlight"><pre class="highlight"><code>openstack security group create vcsa
openstack security group rule create vcsa --protocol icmp
openstack security group rule create vcsa --protocol tcp --dst-port 443
openstack security group rule create vcsa --protocol tcp --dst-port 80
openstack security group rule create vcsa --protocol tcp --dst-port 22
openstack security group rule create vcsa --protocol tcp --dst-port 5480
</code></pre></div></div>
<p>The appliance needs at least one (1) interface for management. It supports DHCP, so I’ve pre-created a Neutron port with the security group applied:</p>
<div class="language-plaintext highlighter-rouge"><div class="highlight"><pre class="highlight"><code>openstack port create --network LAN --security-group vcsa VCSA1
...
| fixed_ips | ip_address='192.168.2.190', subnet_id='1d500a35-ff27-4aa2-9201-82159ce1b2f5' |
</code></pre></div></div>
<h3 id="dns">DNS</h3>
<p>My experience with vCenter tells me that functioning forward/reverse DNS is extremely important for a functioning deployment. I have an Unbound DNS service running in my environment, which makes it super simple to implement forward and reverse entries for any FQDN/IP. Here’s a working example for my vCenter host:</p>
<p>Hostname: vcsa1.jimmdenton.com
IP: 192.168.2.190</p>
<div class="language-plaintext highlighter-rouge"><div class="highlight"><pre class="highlight"><code>local-data: "vcsa1.jimmdenton.com. A 192.168.2.190"
local-data-ptr: "192.168.2.190 vcsa1.jimmdenton.com."
</code></pre></div></div>
<p>Once DNS is in place, it’s time to boot a server.</p>
<h2 id="boot-the-appliance">Boot the appliance</h2>
<p>Using the <code class="language-plaintext highlighter-rouge">nova</code> command, boot the appliance with the first disk using <code class="language-plaintext highlighter-rouge">source=image</code> and <code class="language-plaintext highlighter-rouge">bootindex=0</code>. Additional disks should be attached, in order, using the <code class="language-plaintext highlighter-rouge">sata</code> bus:</p>
<div class="language-plaintext highlighter-rouge"><div class="highlight"><pre class="highlight"><code>nova boot --flavor vcsa-tiny \
--block-device source=image,id=b2e45a89-0d77-400e-8a46-8183d8926382,dest=volume,size=49,shutdown=preserve,bootindex=0 \
--nic port-id=35aff7fb-2c39-4041-bd52-d24e4a264ad8 \
--block-device source=volume,dest=volume,id=41380794-e410-4f0f-8ae3-0fd0a110fb9c,bus=sata,shutdown=preserve,bootindex=1 \
--block-device source=volume,dest=volume,id=2528e324-b293-49b6-ab54-7fbe0c732e2e,bus=sata,shutdown=preserve,bootindex=2 \
--block-device source=volume,dest=volume,id=b27ffa4e-aa41-4481-83b4-d629e6e3dadf,bus=sata,shutdown=preserve,bootindex=3 \
--block-device source=volume,dest=volume,id=99ac0727-555a-4047-a1ec-4936ed9f9963,bus=sata,shutdown=preserve,bootindex=4 \
--block-device source=volume,dest=volume,id=9f95acd1-0131-4adc-9e93-a71a73ac57c3,bus=sata,shutdown=preserve,bootindex=5 \
--block-device source=volume,dest=volume,id=07dcf745-510c-48a1-91d4-11aef9f7cc96,bus=sata,shutdown=preserve,bootindex=6 \
--block-device source=volume,dest=volume,id=10afd11d-0d7a-4797-9b5f-bdb1ff42695f,bus=sata,shutdown=preserve,bootindex=7 \
--block-device source=volume,dest=volume,id=cc7cf024-1bfb-4c75-8c9a-51b3f256079b,bus=sata,shutdown=preserve,bootindex=8 \
--block-device source=volume,dest=volume,id=e37ca38d-28c1-41cd-a1ac-fd13d48825dc,bus=sata,shutdown=preserve,bootindex=9 \
--block-device source=volume,dest=volume,id=25000084-0c20-4dbd-949a-20065a64c143,bus=sata,shutdown=preserve,bootindex=10 \
--block-device source=volume,dest=volume,id=56a03176-ea36-4ad6-861e-565571ce9d12,bus=sata,shutdown=preserve,bootindex=11 \
--block-device source=volume,dest=volume,id=467608e0-85b4-44da-92f2-375c8d4d2c25,bus=sata,shutdown=preserve,bootindex=12 \
--block-device source=volume,dest=volume,id=03b209ea-ad83-40a5-9cd4-60e4de1395b7,bus=sata,shutdown=preserve,bootindex=13 \
--block-device source=volume,dest=volume,id=145f4c56-5565-41f7-a150-bc81aa50c519,bus=sata,shutdown=preserve,bootindex=14 \
--block-device source=volume,dest=volume,id=5e443e77-f0cb-4ca9-a741-330ea215d4f1,bus=sata,shutdown=preserve,bootindex=15 \
vcsa1
</code></pre></div></div>
<p>Depending on the speed of your network and storage device, it may be a few minutes before the instance becomes <code class="language-plaintext highlighter-rouge">ACTIVE</code>. Once active, check out the console.</p>
<div class="language-plaintext highlighter-rouge"><div class="highlight"><pre class="highlight"><code>root@lab-infra01:/home/jdenton/vcsa# openstack console url show vcsa1
+-------+--------------------------------------------------------------------------------------------+
| Field | Value |
+-------+--------------------------------------------------------------------------------------------+
| type | novnc |
| url | https://10.20.0.10:6080/vnc_lite.html?path=%3Ftoken%3Dc3b68bb1-c1b3-4771-ba4a-5d4a49f98a42 |
+-------+--------------------------------------------------------------------------------------------+
</code></pre></div></div>
<p>The device may go through a series of reboots and/or service restarts before settling on the familiar VMware console dashboard:</p>
<p><img src="../assets/images/2021-04-09-installing-vcenter-on-openstack/console_dash.png" alt="" /></p>
<p>The good news is that DHCP worked and the appliance picked up it’s IP address and other network configurations.</p>
<p>Before you can login, a <code class="language-plaintext highlighter-rouge">root</code> password must be set. Hit <strong>F2</strong> and change the password. For this exercise, I set the password to <code class="language-plaintext highlighter-rouge">0p3nst@ck$$NSX</code>.</p>
<h2 id="keep-going">Keep going</h2>
<p>At this point, the installation process is really just getting started. The remainder of the process occurs within vCenter Server dashboard in a browser. The dashboard can be reached on port 5480:</p>
<p><a href="https://vcsa1.jimmdenton.com:5480">https://vcsa1.jimmdenton.com:5480</a></p>
<p>Login as the <code class="language-plaintext highlighter-rouge">root</code> user and newly-minted password:</p>
<p><img src="../assets/images/2021-04-09-installing-vcenter-on-openstack/getting_started.png" alt="" /></p>
<p>Once logged in, click <strong>Setup</strong>, then <strong>Next</strong> to begin Stage 2.</p>
<p>Leave the network configuration alone (rather, leave it set to DHCP), but set the following:</p>
<ul>
<li>Time synchronization mode: Synchronize time with NTP Servers</li>
<li>SSH Access: Enabled</li>
</ul>
<p>My NTP server is <code class="language-plaintext highlighter-rouge">172.22.0.5</code>, but use what’s right for you. Hit <strong>Next</strong>.</p>
<p>On the SSO Configuration screen, enter what’s appropriate for your environment. In this environment, I will build a new SSO domain.</p>
<ul>
<li>SSO Domain Name: <code class="language-plaintext highlighter-rouge">jimmdenton.com</code></li>
<li>Username: <code class="language-plaintext highlighter-rouge">administrator</code></li>
<li>Password: <code class="language-plaintext highlighter-rouge">0p3nst@ck$$NSX</code></li>
</ul>
<p><img src="../assets/images/2021-04-09-installing-vcenter-on-openstack/sso_config.png" alt="" /></p>
<p>Hit <strong>Next</strong>.</p>
<p>On the following screen, accept (or not) the CEIP agreement, then hit <strong>Next</strong>. Once details are confirmed, hit <strong>Finish</strong>.</p>
<p><img src="../assets/images/2021-04-09-installing-vcenter-on-openstack/finish.png" alt="" /></p>
<p>Once the installation process has started you will not be able to stop it. The install process may require you to log back in to the GUI after 10-15 minutes as services are (re)started. Login back in as <code class="language-plaintext highlighter-rouge">root</code>, then wait some more. For me, the entire process took approximately 20 minutes.</p>
<p><img src="../assets/images/2021-04-09-installing-vcenter-on-openstack/complete.png" alt="" /></p>
<p>Finally, log back in as <code class="language-plaintext highlighter-rouge">root</code> to view the <strong>vCenter Server Management</strong> dashboard.</p>
<p><img src="../assets/images/2021-04-09-installing-vcenter-on-openstack/vcsa_dashboard.png" alt="" /></p>
<h2 id="vcenter-client">vCenter Client</h2>
<p>To open to the <strong>vSphere Client</strong> dashboard, navigate to <a href="https://vcsa1.jimmdenton.com">https://vcsa1.jimmdenton.com</a> and hit the <strong>Launch vSphere Client (HTML5)</strong> button.</p>
<p><img src="../assets/images/2021-04-09-installing-vcenter-on-openstack/vsphere_login.png" alt="" /></p>
<p>Here, you will login with the credentials set during the SSO creation process:</p>
<ul>
<li>username: <code class="language-plaintext highlighter-rouge">administrator@jimmdenton.com</code></li>
<li>password: <code class="language-plaintext highlighter-rouge">0p3nst@ck$$NSX</code></li>
</ul>
<p>Once successfully logged in, you will see the vSphere Client dashboard in all its glory:</p>
<p><img src="../assets/images/2021-04-09-installing-vcenter-on-openstack/vsphere_main.png" alt="" /></p>
<p>Where you go from here is up to you!</p>
<hr />
<p>If you have some thoughts or comments on this process, I’d love to hear ‘em. Feel free to reach out on Twitter at @jimmdenton or hit me up on LinkedIn.</p>jamesdentonWhile working through the installation process of installing VMware NSX-T, I have not yet determined whether it is a standalone product or requires the use of vCenter (vSphere Client). I know NSX-T supports both ESXi and KVM hypervisors, so I will have to clear up this confusion later. However, I no longer have ESX anywhere in my home lab to host a vCenter appliance, so my mission has been to install NSX-T and supporting resources on my existing OpenStack cloud running OpenStack-Ansible (Ussuri).[NSX] Installing VMware NSX-T Manager on OpenStack2021-04-07T00:00:00+00:002021-04-07T00:00:00+00:00http://www.jimmdenton.com/installing-nsxt-manager-on-openstack<p>For a long time now I’ve been interested in better understanding alternatives to a ‘vanilla’ Neutron deployment, but other than demonstrations and some hacking on OpenContrail a few years ago and Plumgrid years before that, I’ve really kept it simple by sticking to the upstream components and features.</p>
<p>VMware’s <strong>NSX-T</strong> product has been on my roadmap since it was first introduced as “compatible with All The Clouds™”, and I’m hoping to deploy the NSX-T Manager and other components on my OpenStack cloud as virtual machine instances that in turn manage networking for a yet-to-be-deployed OpenStack-Ansible based OpenStack cloud in the home lab.<!--more--></p>
<p>This post demonstrates the steps involved in prepping an OpenStack cloud to host the NSX-T Manager appliance. Future posts will cover additional requirements.</p>
<p>First off, you’ll need the following:</p>
<ul>
<li>An OpenStack cloud!</li>
<li>Cinder volume support</li>
<li>At least one (1) network for management</li>
<li>NSX-T software</li>
</ul>
<p>I loosely followed the guide <a href="https://docs.vmware.com/en/VMware-NSX-T-Data-Center/3.1/installation/GUID-4200878F-DC59-4BE1-967C-374E5C985B9A.html">here</a> and modified the KVM-based installation accordingly.</p>
<h2 id="obtaining-software">Obtaining Software</h2>
<p>I can’t really help much when it comes to obtaining the NSX-T software and licenses, other than to say you may want to speak to your VMware representative. Don’t have one? The VMware Users Group (VMUG) provides a subscription to a host of VMware products for a reasonable yearly subscription fee. <a href="https://www.vmug.com/home">Check it out!</a>.</p>
<p>When downloading the software, you’ll want to grab the following two <em>qcow2</em> images:</p>
<ul>
<li><code class="language-plaintext highlighter-rouge">nsx-unified-appliance-3.1.0.0.0.17107212-le.qcow2</code></li>
<li><code class="language-plaintext highlighter-rouge">nsx-unified-appliance-secondary-3.1.0.0.0.17107212-le.qcow2</code></li>
</ul>
<p>Versioning may change, but you need both the (unmarked) primary and secondary unified appliance images.</p>
<h2 id="prep-work">Prep Work</h2>
<p>Before starting, we need to create some resources in the OpenStack cloud hosting the NSX Manager, including security group rules and port(s) for the manager instance itself.</p>
<h3 id="create-security-groups-and-rules">Create security group(s) and rules</h3>
<p>VMware does a great job of listing protocols and ports needed for their software products <a href="https://ports.vmware.com/home/NSX-T-Data-Center">here</a>. I created the following group and rules based on their requirements:</p>
<div class="language-plaintext highlighter-rouge"><div class="highlight"><pre class="highlight"><code>openstack security group create nsx
openstack security group rule create nsx --protocol icmp
openstack security group rule create nsx --protocol tcp --dst-port 443
openstack security group rule create nsx --protocol tcp --dst-port 6081
openstack security group rule create nsx --protocol tcp --dst-port 9000
openstack security group rule create nsx --protocol tcp --dst-port 5671
openstack security group rule create nsx --protocol tcp --dst-port 1234
openstack security group rule create nsx --protocol tcp --dst-port 8080
openstack security group rule create nsx --protocol tcp --dst-port 1235
openstack security group rule create nsx --protocol udp --dst-port 6081
openstack security group rule create nsx --protocol tcp --dst-port 22
</code></pre></div></div>
<h3 id="create-a-neutron-port">Create a Neutron port</h3>
<p>The NSX Manager appliance is bootstrapped with a configuration that is injected into the image using the <code class="language-plaintext highlighter-rouge">guestfish</code> utility. Part of the configuration defines the IP address, netmask, and gateway for the Manager appliance. That said, now is a good time to create a Neutron port on the management network in order to know what the fixed IP will be so the configuration can be created accordingly.</p>
<div class="language-plaintext highlighter-rouge"><div class="highlight"><pre class="highlight"><code># openstack port create --network LAN --security-group nsx NSX_MANAGER_MGMT --description 'NSX Manager'
</code></pre></div></div>
<p>The port details are as follows:</p>
<div class="language-plaintext highlighter-rouge"><div class="highlight"><pre class="highlight"><code>IP: 192.168.2.168
Netmask: 255.255.255.0
Gateway: 192.168.2.1
DNS: 172.22.0.5
NTP: 172.22.0.5
</code></pre></div></div>
<h3 id="create-the-bootstrap-config-file">Create the bootstrap config file</h3>
<p>There are a handful of <a href="https://docs.vmware.com/en/VMware-NSX-T-Data-Center/3.1/installation/GUID-5229A83D-1B97-4203-BA30-F52716F68F7F.html#GUID-5229A83D-1B97-4203-BA30-F52716F68F7F">properties</a> that must be defined in the configuration file to properly bootstrap the NSX-T Manager:</p>
<div class="language-plaintext highlighter-rouge"><div class="highlight"><pre class="highlight"><code>nsx_cli_passwd_0
nsx_cli_audit_passwd_0
nsx_passwd_0
nsx_hostname
nsx_role
nsx_isSSHEnabled
nsx_allowSSHRootLogin
nsx_dns1_0
nsx_ntp_0
nsx_domain_0
nsx_gateway_0
nsx_netmask_0
nsx_ip_0
</code></pre></div></div>
<p>The following values are intentionally insecure for demonstration purposes only:</p>
<div class="language-plaintext highlighter-rouge"><div class="highlight"><pre class="highlight"><code>nsx_cli_passwd_0 = 0p3nst@ck$$NSX
nsx_cli_audit_passwd_0 = 0p3nst@ck$$NSX
nsx_passwd_0 = 0p3nst@ck$$NSX
nsx_hostname = nsx-manager1
nsx_role = "NSX Manager"
nsx_isSSHEnabled
nsx_allowSSHRootLogin = yes
nsx_dns1_0 = 172.22.0.5
nsx_ntp_0 = 172.22.0.5
nsx_domain_0 = jimmdenton.com
nsx_gateway_0 = 192.168.2.1
nsx_netmask_0 = 255.255.255.0
nsx_ip_0 = 192.168.2.168
</code></pre></div></div>
<p>Create a file named <code class="language-plaintext highlighter-rouge">guestinfo-manager.xml</code> with the corresponding values, as shown here:</p>
<div class="language-plaintext highlighter-rouge"><div class="highlight"><pre class="highlight"><code><?xml version="1.0" encoding="UTF-8"?>
<Environment
xmlns="http://schemas.dmtf.org/ovf/environment/1"
xmlns:xsi="http://www.w3.org/2001/XMLSchema-instance"
xmlns:oe="http://schemas.dmtf.org/ovf/environment/1">
<PropertySection>
<Property oe:key="nsx_cli_passwd_0" oe:value="0p3nst@ck$$NSX"/>
<Property oe:key="nsx_cli_audit_passwd_0" oe:value="0p3nst@ck$$NSX"/>
<Property oe:key="nsx_passwd_0" oe:value="0p3nst@ck$$NSX"/>
<Property oe:key="nsx_hostname" oe:value="nsx-manager1"/>
<Property oe:key="nsx_role" oe:value="NSX Manager"/>
<Property oe:key="nsx_isSSHEnabled" oe:value="True"/>
<Property oe:key="nsx_allowSSHRootLogin" oe:value="True"/>
<Property oe:key="nsx_dns1_0" oe:value="172.22.0.5"/>
<Property oe:key="nsx_ntp_0" oe:value="172.22.0.5"/>
<Property oe:key="nsx_domain_0" oe:value="jimmdenton.com"/>
<Property oe:key="nsx_gateway_0" oe:value="192.168.2.1"/>
<Property oe:key="nsx_netmask_0" oe:value="255.255.255.0"/>
<Property oe:key="nsx_ip_0" oe:value="192.168.2.168"/>
</PropertySection>
</Environment>
</code></pre></div></div>
<h3 id="create-a-flavor">Create a flavor</h3>
<p>VMware lists requirements for the virtualized Manager based on environment size. Here, in a small environment, the CPU and RAM requirements are somewhat reasonable:</p>
<ul>
<li>CPUs: 4</li>
<li>RAM: 16 GB</li>
</ul>
<p>Create the flavor:</p>
<div class="language-plaintext highlighter-rouge"><div class="highlight"><pre class="highlight"><code>openstack flavor create \
--vcpu 4 \
--ram 16384 \
nsx-manager-extra-small
</code></pre></div></div>
<p>You might have noticed a disk size was not set. Because we will be attaching volumes to the instance, no size is required in the flavor definition.</p>
<h3 id="upload-the-images">Upload the images</h3>
<p>Both the primary and secondary unified appliance images must be uploaded to Glance. However, the primary image needs to be modified to include the <code class="language-plaintext highlighter-rouge">guestinfo</code> file created earlier.</p>
<p>Because the unified appliance image may be used to create other appliances in future posts, now is a good time to create a duplicate:</p>
<div class="language-plaintext highlighter-rouge"><div class="highlight"><pre class="highlight"><code># cp nsx-unified-appliance-3.1.0.0.0.17107212-le.qcow2 nsx-unified-appliance-manager-3.1.0.0.0.17107212-le.qcow2
</code></pre></div></div>
<p>Use the <code class="language-plaintext highlighter-rouge">guestfish</code> utility to inject the xml file as <code class="language-plaintext highlighter-rouge">/config/guestinfo</code>:</p>
<div class="language-plaintext highlighter-rouge"><div class="highlight"><pre class="highlight"><code># apt install libguestfs-tools
# guestfish --rw -i -a nsx-unified-appliance-manager-3.1.0.0.0.17107212-le.qcow2 upload guestinfo-manager.xml /config/guestinfo
</code></pre></div></div>
<p>After a brief moment, and with no feedback, the image will be modified. To verify, perform the following command:</p>
<div class="language-plaintext highlighter-rouge"><div class="highlight"><pre class="highlight"><code># guestfish --ro -a nsx-unified-appliance-manager-3.1.0.0.0.17107212-le.qcow2 -i
</code></pre></div></div>
<p>The image will be opened, and a <code class="language-plaintext highlighter-rouge">cat</code> of the file should reveal the proper contents:</p>
<div class="language-plaintext highlighter-rouge"><div class="highlight"><pre class="highlight"><code>Welcome to guestfish, the guest filesystem shell for
editing virtual machine filesystems and disk images.
Type: 'help' for help on commands
'man' to read the manual
'quit' to quit the shell
Operating system: Ubuntu 18.04.4 LTS
/dev/sda2 mounted on /
/dev/sda1 mounted on /boot
/dev/nsx/config mounted on /config
/dev/nsx/config__bak mounted on /config_bak
/dev/nsx/image mounted on /image
/dev/sda3 mounted on /os_bak
/dev/nsx/repository mounted on /repository
/dev/nsx/tmp mounted on /tmp
/dev/nsx/var+dump mounted on /var/dump
/dev/nsx/var+log mounted on /var/log
><fs> cat /config/guestinfo
<?xml version="1.0" encoding="UTF-8"?>
<Environment
xmlns="http://schemas.dmtf.org/ovf/environment/1"
xmlns:xsi="http://www.w3.org/2001/XMLSchema-instance"
xmlns:oe="http://schemas.dmtf.org/ovf/environment/1">
<PropertySection>
<Property oe:key="nsx_cli_passwd_0" oe:value="0p3nst@ck$$NSX"/>
<Property oe:key="nsx_cli_audit_passwd_0" oe:value="0p3nst@ck$$NSX"/>
<Property oe:key="nsx_passwd_0" oe:value="0p3nst@ck$$NSX"/>
<Property oe:key="nsx_hostname" oe:value="nsx-manager1"/>
<Property oe:key="nsx_role" oe:value="NSX Manager"/>
<Property oe:key="nsx_isSSHEnabled" oe:value="True"/>
<Property oe:key="nsx_allowSSHRootLogin" oe:value="True"/>
<Property oe:key="nsx_dns1_0" oe:value="172.22.0.5"/>
<Property oe:key="nsx_ntp_0" oe:value="172.22.0.5"/>
<Property oe:key="nsx_domain_0" oe:value="jimmdenton.com"/>
<Property oe:key="nsx_gateway_0" oe:value="192.168.2.1"/>
<Property oe:key="nsx_netmask_0" oe:value="255.255.255.0"/>
<Property oe:key="nsx_ip_0" oe:value="192.168.2.168"/>
</PropertySection>
</Environment>
><fs> quit
</code></pre></div></div>
<p>Now, upload the images:</p>
<div class="language-plaintext highlighter-rouge"><div class="highlight"><pre class="highlight"><code>openstack image create \
--disk-format qcow2 \
--container-format bare \
--file nsx-unified-appliance-3.1.0.0.0.17107212-le.qcow2 \
nsx-unified-appliance-manager
openstack image create \
--disk-format qcow2 \
--container-format bare \
--file nsx-unified-appliance-secondary-3.1.0.0.0.17107212-le.qcow2 \
nsx-unified-appliance-secondary-manager
</code></pre></div></div>
<h3 id="create-the-volumes">Create the volumes</h3>
<p>Because we need to mount a secondary disk at boot, I found it easier to boot the instance with both images attached as volumes:</p>
<ul>
<li>primary image as <code class="language-plaintext highlighter-rouge">sda</code></li>
<li>secondary image as <code class="language-plaintext highlighter-rouge">sdb</code></li>
</ul>
<p>To create the volumes from image, you must first determine what size the volume needs to be. Using <code class="language-plaintext highlighter-rouge">qemu-img</code>, find the real size as shown here:</p>
<div class="language-plaintext highlighter-rouge"><div class="highlight"><pre class="highlight"><code># qemu-img info nsx-unified-appliance-manager-3.1.0.0.0.17107212-le.qcow2
image: nsx-unified-appliance-3.1.0.0.0.17107212-le.qcow2
file format: qcow2
virtual size: 200 GiB (214748364800 bytes)
disk size: 10.2 GiB
cluster_size: 65536
Format specific information:
compat: 1.1
lazy refcounts: false
refcount bits: 16
corrupt: false
# qemu-img info nsx-unified-appliance-secondary-manager-3.1.0.0.0.17107212-le.qcow2
image: nsx-unified-appliance-secondary-3.1.0.0.0.17107212-le.qcow2
file format: qcow2
virtual size: 100 GiB (107374182400 bytes)
disk size: 196 KiB
cluster_size: 65536
Format specific information:
compat: 1.1
lazy refcounts: false
refcount bits: 16
corrupt: false
</code></pre></div></div>
<p>Turns out, the primary image has a size of 200GB while the secondary ends up as 100GB.</p>
<p>Knowing that, the volumes can now be created:</p>
<div class="language-plaintext highlighter-rouge"><div class="highlight"><pre class="highlight"><code>openstack volume create \
--image nsx-unified-appliance-manager \
--size 200 \
nsx-unified-appliance-manager
openstack volume create \
--image nsx-unified-appliance-secondary \
--size 100 \
nsx-unified-appliance-secondary-manager
</code></pre></div></div>
<p>After a while (depending on the speed of your network), the volumes should show as <code class="language-plaintext highlighter-rouge">available</code>:</p>
<div class="language-plaintext highlighter-rouge"><div class="highlight"><pre class="highlight"><code>root@lab-infra01:/home/jdenton# openstack volume list
+--------------------------------------+-----------------------------------------+----------------+------+-------------+
| ID | Name | Status | Size | Attached to |
+--------------------------------------+-----------------------------------------+----------------+------+-------------+
| 15a3daff-b06e-4a3c-9a00-7ef4639a56da | nsx-unified-appliance-secondary-manager | available | 100 | |
| 327999a1-8901-4273-be43-d1151f388195 | nsx-unified-appliance-manager | available | 200 | |
+--------------------------------------+-----------------------------------------+----------------+------+-------------+
</code></pre></div></div>
<h2 id="deploy-an-nsx-t-manager-instance">Deploy an NSX-T Manager Instance</h2>
<p>With the required resources in place, it’s time to create the instance:</p>
<div class="language-plaintext highlighter-rouge"><div class="highlight"><pre class="highlight"><code>openstack server create \
--port NSX_MANAGER_MGMT \
--flavor nsx-manager-extra-small \
--volume nsx-unified-appliance-manager \
--block-device-mapping vdb=nsx-unified-appliance-secondary-manager \
nsx-manager1
</code></pre></div></div>
<p>After a brief moment, the instance should go <code class="language-plaintext highlighter-rouge">ACTIVE</code>:</p>
<div class="language-plaintext highlighter-rouge"><div class="highlight"><pre class="highlight"><code># openstack server show nsx-manager1
+-------------------------------------+----------------------------------------------------------------+
| Field | Value |
+-------------------------------------+----------------------------------------------------------------+
| OS-DCF:diskConfig | MANUAL |
| OS-EXT-AZ:availability_zone | nova |
| OS-EXT-SRV-ATTR:host | lab-compute02 |
| OS-EXT-SRV-ATTR:hypervisor_hostname | lab-compute02.openstack.local |
| OS-EXT-SRV-ATTR:instance_name | instance-0000020e |
| OS-EXT-STS:power_state | Running |
| OS-EXT-STS:task_state | None |
| OS-EXT-STS:vm_state | active |
| OS-SRV-USG:launched_at | 2021-04-08T01:59:33.000000 |
| OS-SRV-USG:terminated_at | None |
| accessIPv4 | |
| accessIPv6 | |
| addresses | LAN=192.168.2.168 |
| config_drive | |
| created | 2021-04-08T01:59:14Z |
| flavor | nsx-manager-extra-small (38f00cb5-9d5e-43f4-b63e-4da7175f00a0) |
| hostId | 619a1b066ba5e16258c79ded5319a206777219e3e688f5200d74dd72 |
| id | 89d16e20-1807-465f-9703-16d78675db1f |
| image | N/A (booted from volume) |
| key_name | None |
| name | nsx-manager1 |
| progress | 0 |
| project_id | 7a8df96a3c6a47118e60e57aa9ecff54 |
| properties | |
| security_groups | name='default' |
| status | ACTIVE |
| updated | 2021-04-08T01:59:33Z |
| user_id | 34f3cf48b24f41c097555c07961f139e |
| volumes_attached | id='327999a1-8901-4273-be43-d1151f388195' |
| | id='15a3daff-b06e-4a3c-9a00-7ef4639a56da' |
+-------------------------------------+----------------------------------------------------------------+
</code></pre></div></div>
<p>The instance’s console can be checked to ensure the instance is booting:</p>
<div class="language-plaintext highlighter-rouge"><div class="highlight"><pre class="highlight"><code># openstack console url show nsx-manager1
+-------+--------------------------------------------------------------------------------------------+
| Field | Value |
+-------+--------------------------------------------------------------------------------------------+
| type | novnc |
| url | https://10.20.0.10:6080/vnc_lite.html?path=%3Ftoken%3Dcbe20437-6ad4-46e4-9056-014dc791040e |
+-------+--------------------------------------------------------------------------------------------+
</code></pre></div></div>
<p>After a few minutes, a console prompt appeared on screen:</p>
<p><img src="../assets/images/2021-04-07-installing-nsxt-manager-on-openstack/login.png" alt="" /></p>
<p>Using the credentials provided in <code class="language-plaintext highlighter-rouge">guestinfo-manager.xml</code>, login to the console:</p>
<p><img src="../assets/images/2021-04-07-installing-nsxt-manager-on-openstack/loggedin.png" alt="" /></p>
<p>The VMware installation guide walks you through a few additional validation steps, one of those being network validation:</p>
<p><img src="../assets/images/2021-04-07-installing-nsxt-manager-on-openstack/eth.png" alt="" /></p>
<p>The IP is applied, and ICMP responds as well:</p>
<div class="language-plaintext highlighter-rouge"><div class="highlight"><pre class="highlight"><code>64 bytes from 192.168.2.168: icmp_seq=182 ttl=64 time=5.350 ms
64 bytes from 192.168.2.168: icmp_seq=183 ttl=64 time=4.304 ms
64 bytes from 192.168.2.168: icmp_seq=184 ttl=64 time=5.505 ms
64 bytes from 192.168.2.168: icmp_seq=185 ttl=64 time=4.239 ms
64 bytes from 192.168.2.168: icmp_seq=186 ttl=64 time=5.627 ms
64 bytes from 192.168.2.168: icmp_seq=187 ttl=64 time=4.980 ms
64 bytes from 192.168.2.168: icmp_seq=188 ttl=64 time=4.232 ms
</code></pre></div></div>
<h2 id="connecting-to-the-dashboard">Connecting to the Dashboard</h2>
<p>At this point, all signs point to a successful deployment of the NSX-T Manager (unified appliance) on an OpenStack cloud. Using a web browser, connect to the management address defined in <code class="language-plaintext highlighter-rouge">guestinfo-manager.xml</code>:</p>
<p><img src="../assets/images/2021-04-07-installing-nsxt-manager-on-openstack/web.png" alt="" />
<img src="../assets/images/2021-04-07-installing-nsxt-manager-on-openstack/dashboard.png" alt="" /></p>
<p>If you’ve downloaded and installed the VMUG-provided image (like me), configure your individualized license key by clicking on <code class="language-plaintext highlighter-rouge">Manage Licenses</code>. The <em>NSX For vShield Endpoint</em> license is included, but the <em>NSX Data Center Evaluation</em> license is what is (likely) required for the fun stuff.</p>
<p><img src="../assets/images/2021-04-07-installing-nsxt-manager-on-openstack/license.png" alt="" /></p>
<p>In a series of follow-on posts, I hope to explore NSX-T features and OpenStack Neutron integration by deploying a small all-in-one (AIO) cloud using OpenStack-Ansible. Stay tuned!</p>
<hr />
<p>If you have some thoughts or comments on this process, I’d love to hear ‘em. Feel free to reach out on Twitter at @jimmdenton or hit me up on LinkedIn.</p>jamesdentonFor a long time now I’ve been interested in better understanding alternatives to a ‘vanilla’ Neutron deployment, but other than demonstrations and some hacking on OpenContrail a few years ago and Plumgrid years before that, I’ve really kept it simple by sticking to the upstream components and features. VMware’s NSX-T product has been on my roadmap since it was first introduced as “compatible with All The Clouds™”, and I’m hoping to deploy the NSX-T Manager and other components on my OpenStack cloud as virtual machine instances that in turn manage networking for a yet-to-be-deployed OpenStack-Ansible based OpenStack cloud in the home lab.