Using the Cisco ASR1k Router Service Plugin in OpenStack - Part One
- 17 mins2018 is calling, and I’ve been involved with OpenStack for the better part of six years. I’ve seen the ‘Stack mature greatly over that time, Neutron included. I’m very familiar with stock Neutron components, to include namespace-based routers, openvswitch and linuxbridge mechanism drivers, DVR, etc. My overall goal with this series is to wade through various vendor offerings and see how they improve upon those stock Neutron components. First up is one of the plugins offered by Cisco for the Cisco Aggregation Services Router (ASR) known as the Cisco ASR1k Router Service Plugin.
Cisco hosts this plugin, along with others, at https://github.com/openstack/networking-cisco.
Features and Limitations
Cisco documentation states the following features are provided by the L3 router service plugin:
- L3 forwarding between subnets on the tenants’ neutron L2 networks
- Support for overlapping IP address ranges between different tenants
- NAT overload (i.e. SNAT) for connections originating on private subnets behind a tenant’s neutron router
- Static NAT (i.e Floating IP) of a private IP address on a internal neutron subnet to a public IP address on an external neutron subnet/network
- Static routes on neutron routers
- HSRP-based high availability (HA) whereby a neutron router is supported by two (or more) ASR1k routers, one actively doing L3 forwarding, the others ready to take over in case of disruptions
To accomplish this, the Cisco L3 router service plugin relies on two components:
- Device manager plugin (DMP)
- Configuration agent (CFGA)
The device manager plugin manages a repository in which Cisco ASR 1000-series routers are registered. An ASR1k router in the DMP repository is referred to as a hosting device. The configuration agent is a standalone service that monitors hosting devices and performs configurations in them upon instruction from the Layer 3 plugin or the device manager plugin.
The following limitations are also noted within the documentation:
- The neutron deployment must use VLAN-based network segmentation. VXLAN is not supported.
- Access to Nova’s Metadata service via Neutron routers is not supported. Instead, the DHCP service can provide a classless static route for metadata to instances or config-drive can be used.
- Only one router can be attached to a particular internal Neutron network. If a user attempts to attach a router to an internal network that already has another router attached to it, the L3 plugin will reject the request.
I highly recommend reading the Cisco documentation for a proper overview on the architecture of the plugin and agent, related commands, caveats, expectations, etc.
Environment
My lab is equipped with a Cisco ASR 1001 running Cisco IOS XE Software version 03.16.06.S. Cisco mentions prerequisities of IOS XE 03.16.04 and Ubuntu 14.04 and above, but so far I have not experienced any issues that were caused by the IOS or server operating system versions. From what I can see in the documentation, Cisco does not call out a requirement for highly-available ASRs, but we will see later in this blog series how the lack of highly-available ASRs will cause issues with the implementation.
My test environment is an all-in-one OpenStack installation provided by the Ocata release of RDO/Packstack. Packstack offers a pretty straightforward installation experience, and offers the ability to deploy a host of stock drivers and plugins quickly and easily.
My host machine is a CentOS 7 VM in ESXi with the following characteristics:
- 4 vCPU
- 16 GB RAM
- 32 GB Disk
- 3 vNICs (Only 2 are really needed)
The network is configured like so:
[centos@rdo02-ocata ~]$ ip addr show
1: lo: <LOOPBACK,UP,LOWER_UP> mtu 65536 qdisc noqueue state UNKNOWN qlen 1
    link/loopback 00:00:00:00:00:00 brd 00:00:00:00:00:00
    inet 127.0.0.1/8 scope host lo
       valid_lft forever preferred_lft forever
    inet6 ::1/128 scope host
       valid_lft forever preferred_lft forever
2: ens192: <BROADCAST,MULTICAST,UP,LOWER_UP> mtu 1500 qdisc mq state UP qlen 1000
    link/ether 00:0c:29:83:4f:59 brd ff:ff:ff:ff:ff:ff
    inet 10.50.0.235/24 brd 10.50.0.255 scope global ens192
       valid_lft forever preferred_lft forever
    inet6 fe80::20c:29ff:fe83:4f59/64 scope link
       valid_lft forever preferred_lft forever
3: ens224: <BROADCAST,MULTICAST,UP,LOWER_UP> mtu 1500 qdisc mq state UP qlen 1000
    link/ether 00:0c:29:83:4f:63 brd ff:ff:ff:ff:ff:ff
    inet6 fe80::20c:29ff:fe83:4f63/64 scope link
       valid_lft forever preferred_lft forever
4: ens256: <BROADCAST,MULTICAST,UP,LOWER_UP> mtu 1500 qdisc mq state UP qlen 1000
    link/ether 00:0c:29:83:4f:6d brd ff:ff:ff:ff:ff:ff
    inet6 fe80::20c:29ff:fe83:4f6d/64 scope link
       valid_lft forever preferred_lft forever
The ens192 interface is the management interface, and will be used for OpenStack API endpoints as well as access to the Cisco ASR management network. The ens256 interface will be used for OpenStack VM traffic. The ens224 interface won’t be used here, but could be configured to communicate with the Cisco ASR if so desired.
Network Architecture
The following diagram represents at a high-level the connections used by the OpenStack host and the Cisco ASR in this environment:
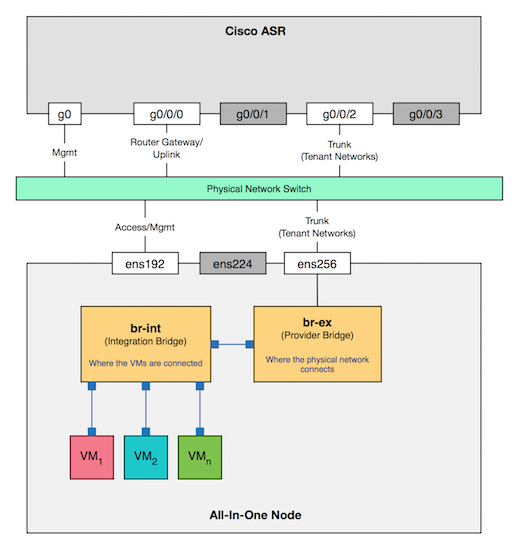
Interface g0 is the management interface of the ASR that Neutron will use to manage the device, while g0/0/0 and g0/0/2 will be configured and leveraged for tenant router traffic. The trunks for both the ASR and the OpenStack host carry tenant VLANs 700-799 that will be used within this environment.
Installation of Packstack/RDO
The installation of RDO is documented at https://www.rdoproject.org/install/packstack/. However, because the Cisco driver is only officially supported up to Ocata, you will want to be sure to substitute the following where needed:
sudo yum install -y https://repos.fedorapeople.org/repos/openstack/openstack-ocata/rdo-release-ocata-3.noarch.rpm
sudo yum install -y centos-release-openstack-ocata
sudo yum-config-manager --enable openstack-ocata
sudo yum update -y
I used a custom answers file to avoid unnecessary services from being installed. I also used it to define my Neutron provider interface label, extnet, as well as a range of VLANs for tenant network allocation. Those VLANs are 700-799. Feel free to create an answers.txt file using the following:
[general]
CONFIG_DEFAULT_PASSWORD=openstack
CONFIG_PROVISION_DEMO=n
CONFIG_NEUTRON_ML2_TYPE_DRIVERS=vlan
CONFIG_NEUTRON_ML2_TENANT_NETWORK_TYPES=vlan
CONFIG_NEUTRON_ML2_MECHANISM_DRIVERS=openvswitch
CONFIG_NEUTRON_ML2_VLAN_RANGES=extnet:700:799
CONFIG_CINDER_INSTALL=n
CONFIG_MANILA_INSTALL=n
CONFIG_SWIFT_INSTALL=n
CONFIG_CEILOMETER_INSTALL=n
CONFIG_AODH_INSTALL=n
CONFIG_PANKO_INSTALL=n
CONFIG_SAHARA_INSTALL=n
CONFIG_HEAT_INSTALL=n
CONFIG_MAGNUM_INSTALL=n
CONFIG_TROVE_INSTALL=n
CONFIG_IRONIC_INSTALL=n
The Cisco L3 plugin should be L2 agnostic, meaning you can potentially use the Open vSwitch, LinuxBridge, or even Cisco L2 mechanism drivers with no issues. This environment will use Open vSwitch.
Install Packstack with the following:
sudo packstack --answer-file=answers.txt
Once installed successfully, you should see a similar message:
 **** Installation completed successfully ******

Additional information:
 * Time synchronization installation was skipped. Please note that unsynchronized time on server instances might be problem for some OpenStack components.
 * File /root/keystonerc_admin has been created on OpenStack client host 10.50.0.235. To use the command line tools you need to source the file.
 * To access the OpenStack Dashboard browse to http://10.50.0.235/dashboard .
Please, find your login credentials stored in the keystonerc_admin in your home directory.
 * Because of the kernel update the host 10.50.0.235 requires reboot.
 * The installation log file is available at: /var/tmp/packstack/20171221-140127-SMx9RH/openstack-setup.log
 * The generated manifests are available at: /var/tmp/packstack/20171221-140127-SMx9RH/manifests
The interface ens256 will be used for provider and tenant VLAN networks, and will need to be added to the br-ex Open vSwitch bridge manually:
ovs-vsctl add-port br-ex ens256
Your environment may vary, so use the interface that’s right for you.
Cisco Plugin Installation
Cisco has installation documentation posted at http://networking-cisco.readthedocs.io/en/latest/install/index.html. However, I ran into a few issues along the way that I will try and point out here. What is most important is that your ASR be configured according to the notes here, mainly:
- Configure a management VRF with a management IP that will be reachable from the OpenStack management network
- Configure a username/password for Neutron to use when interacting with the device
- Configure netconf on the device
- Provide an interface that will be used for internal and external networking managed by Neutron. The same interface can be used for both.
Keep in mind that the Cisco ASR plugin only supports VLAN network types, and VLAN subinterfaces will be created off of the router interfaces you provide.
Install the networking-cisco package
In a vanilla CentOS installation, you will need to install the python-pip package as shown here:
sudo yum install python-pip
Then, install the latest networking-cisco package for Ocata:
sudo pip install networking-cisco==5.3.0
Next, perform a DB schema update for Neutron:
sudo su
su -s /bin/sh -c "neutron-db-manage --config-file /etc/neutron/neutron.conf --config-file /etc/neutron/plugins/ml2/ml2_conf.ini upgrade head" neutron
If your experience is like mine, you may run into the following error:
oslo_db.exception.DBError: (pymysql.err.InternalError) (1832, u"Cannot change column 'subnet_id': used in a foreign key constraint 'cisco_router_ha_groups_ibfk_3'") [SQL: u'ALTER TABLE cisco_router_ha_groups ADD CONSTRAINT pk_cisco_router_ha_groups PRIMARY KEY (ha_port_id, subnet_id)']
To resolve this, make the following change to the Neutron database in MySQL:
mysql -e 'use neutron; ALTER TABLE cisco_router_ha_groups ADD CONSTRAINT pk_cisco_router_ha_groups PRIMARY KEY (ha_port_id, subnet_id);'
Re-run the neutron-db-manage command to complete the upgrade:
su -s /bin/sh -c "neutron-db-manage --config-file /etc/neutron/neutron.conf --config-file /etc/neutron/plugins/ml2/ml2_conf.ini upgrade head" neutron
Modify configuration files
The documentation at http://networking-cisco.readthedocs.io/en/latest/admin/l3-asr1k.html describes how to modify certain Neutron configuration files to support the Cisco L3 plugin.
Neutron configuration file
The Neutron configuration file requires a few tweaks to enable the Cisco service plugin. For this exercise, open the /etc/neutron/neutron.conf file and replace the contents of service_plugins with the following:
[DEFAULT]
...
service_plugins = networking_cisco.plugins.cisco.service_plugins.cisco_device_manager_plugin.CiscoDeviceManagerPlugin,networking_cisco.plugins.cisco.service_plugins.cisco_router_plugin.CiscoRouterPlugin
...
If there are other service plugins by default, feel free to leave them alone except for the router plugin. That can be removed.
Cisco configuration files
The Cisco guide describes creating various configuration files used by the Cisco agent and Neutron server. To make things easy on yourself, create the following directory and files and change their group to allow Neutron to access them:
mkdir /etc/neutron/plugins/cisco/
touch /etc/neutron/plugins/ml2/ml2_conf_cisco.ini
touch /etc/neutron/plugins/cisco/cisco_cfg_agent.ini
touch /etc/neutron/plugins/cisco/cisco_device_manager_plugin.ini
touch /etc/neutron/plugins/cisco/cisco_router_plugin.ini
chgrp neutron -R /etc/neutron/plugins/cisco/
Cisco Device Manager Plugin
The /etc/neutron/plugins/cisco/cisco_device_manager_plugin.ini file is where you supply credentials for the Cisco ASR(s) and also define device templates leveraged by the plugin.
Copy the following block to the cisco_device_manager_plugin.ini file and modify it accordingly, leaving any blank fields alone unless instructed otherwise:
[hosting_device_credentials]
[cisco_hosting_device_credential:1]
name="OpenStack Service User"
description="Service User"
user_name=<local user on asr>
password=<password>
type=
Define the following templates:
[hosting_device_templates]
[cisco_hosting_device_template:1]
name=NetworkNode
enabled=True
host_category=Network_Node
service_types=router:FW:VPN
image=
flavor=
default_credentials_id=1
configuration_mechanism=
protocol_port=22
booting_time=360
slot_capacity=2000
desired_slots_free=0
tenant_bound=
device_driver=networking_cisco.plugins.cisco.device_manager.hosting_device_drivers.noop_hd_driver.NoopHostingDeviceDriver
plugging_driver=networking_cisco.plugins.cisco.device_manager.plugging_drivers.noop_plugging_driver.NoopPluggingDriver

[cisco_hosting_device_template:3]
name="ASR1k template"
enabled=True
host_category=Hardware
service_types=router
image=
flavor=
default_credentials_id=1
configuration_mechanism=
protocol_port=22
booting_time=360
slot_capacity=2000
desired_slots_free=0
tenant_bound=
device_driver=networking_cisco.plugins.cisco.device_manager.hosting_device_drivers.noop_hd_driver.NoopHostingDeviceDriver
plugging_driver=networking_cisco.plugins.cisco.device_manager.plugging_drivers.hw_vlan_trunking_driver.HwVLANTrunkingPlugDriver
Template 1 can be ignored for now. Template 3 defines base characteristics of an ASR, including which set of credentials to use by default, the port used to access the device, and the number of VRFs (slots) supported.
Define the following devices:
[hosting_devices]
[cisco_hosting_device:3]
template_id=3
credentials_id=1
name="asr-01"
description="ASR1k in Basement"
device_id=<serial number>
admin_state_up=True
management_ip_address=<management ip>
protocol_port=22
tenant_bound=
auto_delete=False
The device specified here corresponds to a physical Cisco ASR. Be sure the management IP is reachable by the OpenStack management network. While it is possible to specify more than one device, this walkthrough assumes a standalone Cisco ASR will be used.
Define the interfaces to be leveraged by the plugin:
[plugging_drivers]
[HwVLANTrunkingPlugDriver:3]
internal_net_interface_1=*:GigabitEthernet0/0/2
external_net_interface_1=*:GigabitEthernet0/0/0
In the example above, the GigabitEthernet0/0/0 will be used for interfaces attached to a router object using the openstack router set --external-gateway command. The GigabitEthernet0/0/2 interface will be used for interfaces attached to a router object using the openstack router interface add subnet command. The VLAN subinterface created off the external_net_interface interface will reside in the default VRF, while the subinterface created off the internal_net_interface interface will reside in a unique VRF that corresponds to the tenant router object. We’ll cover this more later in this series.
Cisco Router Plugin
Router types are defined in /etc/neutron/plugins/cisco/cisco_router_plugin.ini. Add the following to that file:
[router_types]
[cisco_router_type:1]
name=Namespace_Neutron_router
description="Neutron router implemented in Linux network namespace"
template_id=1
ha_enabled_by_default=False
shared=True
slot_need=0
scheduler=
driver=
cfg_agent_service_helper=
cfg_agent_driver=

[cisco_router_type:3]
name=ASR1k_router
description="Neutron router implemented in Cisco ASR1k device"
template_id=3
ha_enabled_by_default=False
shared=True
slot_need=2
scheduler=networking_cisco.plugins.cisco.l3.schedulers.l3_router_hosting_device_scheduler.L3RouterHostingDeviceHARandomScheduler
driver=networking_cisco.plugins.cisco.l3.drivers.asr1k.asr1k_routertype_driver.ASR1kL3RouterDriver
cfg_agent_service_helper=networking_cisco.plugins.cisco.cfg_agent.service_helpers.routing_svc_helper.RoutingServiceHelper
cfg_agent_driver=networking_cisco.plugins.cisco.cfg_agent.device_drivers.asr1k.asr1k_routing_driver.ASR1kRoutingDriver

[routing]
default_router_type = ASR1k_router
By default, any router created with openstack router create will be created as a VRF within the Cisco ASR.
Create a service
The Cisco CFG Agent is a service that runs much like the L3 or DHCP agents, and listens for messages on the message bus related to router construction/modification/deletion. Since we installed the plugin by hand, no service exists. Create a service file at /lib/systemd/system/neutron-cisco-cfg-agent.service with the following contents:
[Unit]
Description=Cisco Configuration Agent
After=syslog.target network.target

[Service]
Type=simple
User=neutron
ExecStart=/usr/bin/neutron-cisco-cfg-agent --config-file /usr/share/neutron/neutron-dist.conf --config-file /etc/neutron/neutron.conf --config-file /etc/neutron/plugins/cisco/cisco_cfg_agent.ini --config-file /etc/neutron/plugins/cisco/cisco_router_plugin.ini --config-file /etc/neutron/plugins/cisco/cisco_device_manager_plugin.ini --log-file /var/log/neutron/neutron-cisco-cfg-agent.log
PrivateTmp=false
KillMode=process
Restart=on-failure

[Install]
WantedBy=multi-user.target
Next, modify the neutron-server service at /lib/systemd/system/neutron-server.service to incorporate our new Cisco-related configuration files. Add the following to the ExecStart line:
--config-file /etc/neutron/plugins/ml2/ml2_conf_cisco.ini --config-file /etc/neutron/plugins/cisco/cisco_router_plugin.ini --config-file /etc/neutron/plugins/cisco/cisco_device_manager_plugin.ini
Reload the systemctl daemon and restart neutron-server:
systemctl daemon-reload
systemctl restart neutron-server
Lastly, start the Cisco CFG agent:
systemctl start neutron-cisco-cfg-agent
If everything went well, you should see something similar to the following when checking the status:
[root@rdo02-ocata centos]# systemctl status neutron-cisco-cfg-agent
● neutron-cisco-cfg-agent.service - Cisco Configuration Agent
   Loaded: loaded (/usr/lib/systemd/system/neutron-cisco-cfg-agent.service; disabled; vendor preset: disabled)
   Active: active (running) since Thu 2017-12-21 14:45:29 UTC; 7s ago
 Main PID: 17977 (neutron-cisco-c)
   CGroup: /system.slice/neutron-cisco-cfg-agent.service
           └─17977 /usr/bin/python /usr/bin/neutron-cisco-cfg-agent --config-file /usr/share/neutron/neutron-dist.conf --config-file /etc/neutron/neutron.conf --config-file /etc/neutron/plugins/...

Dec 21 14:45:29 rdo02-ocata.maas systemd[1]: Started Cisco Configuration Agent.
Dec 21 14:45:29 rdo02-ocata.maas systemd[1]: Starting Cisco Configuration Agent...
Dec 21 14:45:30 rdo02-ocata.maas neutron-cisco-cfg-agent[17977]: Option "verbose" from group "DEFAULT" is deprecated for removal.  Its value may be silently ignored in the future.
Dec 21 14:45:31 rdo02-ocata.maas neutron-cisco-cfg-agent[17977]: Option "notification_driver" from group "DEFAULT" is deprecated. Use option "driver" from group "oslo_messaging_notifications".
You can also check the agent is alive using the openstack network agent list command:
root@rdo02-ocata ~(keystone_admin)]# openstack network agent list
+--------------------------------------+--------------------+------------------+-------------------+-------+-------+---------------------------+
| ID                                   | Agent Type         | Host             | Availability Zone | Alive | State | Binary                    |
+--------------------------------------+--------------------+------------------+-------------------+-------+-------+---------------------------+
| 2c44ce05-8d51-47e0-841f-8dfeaabfd1eb | Metering agent     | rdo02-ocata.maas | None              | True  | UP    | neutron-metering-agent    |
| a9a29f40-a6ba-49ca-ae03-f94a5f547f2e | Cisco cfg agent    | rdo02-ocata.maas | None              | True  | UP    | neutron-cisco-cfg-agent   |
| bb4f9a71-87fc-4342-85b1-8f8484e7a457 | DHCP agent         | rdo02-ocata.maas | nova              | True  | UP    | neutron-dhcp-agent        |
| c108d346-d6e1-4c5e-b744-cc8421757bda | Open vSwitch agent | rdo02-ocata.maas | None              | True  | UP    | neutron-openvswitch-agent |
| cbddebd7-bf95-45cb-a899-4fc73c9bfa0b | L3 agent           | rdo02-ocata.maas | nova              | True  | UP    | neutron-l3-agent          |
| d002c478-d330-419d-9cf2-a6c60730f567 | Metadata agent     | rdo02-ocata.maas | None              | True  | UP    | neutron-metadata-agent    |
+--------------------------------------+--------------------+------------------+-------------------+-------+-------+---------------------------+
Disable the Neutron L3 agent
You’ll need to disable the stock Neutron L3 agent to avoid any sort of collisions when creating router objects. To permanently disable the service, run the following:
openstack network agent set <agent id> --disable
The agent should then report in a DOWN state:
[root@rdo02-ocata ~(keystone_admin)]# openstack network agent list
+--------------------------------------+--------------------+------------------+-------------------+-------+-------+---------------------------+
| ID                                   | Agent Type         | Host             | Availability Zone | Alive | State | Binary                    |
+--------------------------------------+--------------------+------------------+-------------------+-------+-------+---------------------------+
| 2c44ce05-8d51-47e0-841f-8dfeaabfd1eb | Metering agent     | rdo02-ocata.maas | None              | True  | UP    | neutron-metering-agent    |
| a9a29f40-a6ba-49ca-ae03-f94a5f547f2e | Cisco cfg agent    | rdo02-ocata.maas | None              | True  | UP    | neutron-cisco-cfg-agent   |
| bb4f9a71-87fc-4342-85b1-8f8484e7a457 | DHCP agent         | rdo02-ocata.maas | nova              | True  | UP    | neutron-dhcp-agent        |
| c108d346-d6e1-4c5e-b744-cc8421757bda | Open vSwitch agent | rdo02-ocata.maas | None              | True  | UP    | neutron-openvswitch-agent |
| cbddebd7-bf95-45cb-a899-4fc73c9bfa0b | L3 agent           | rdo02-ocata.maas | nova              | True  | DOWN  | neutron-l3-agent          |
| d002c478-d330-419d-9cf2-a6c60730f567 | Metadata agent     | rdo02-ocata.maas | None              | True  | UP    | neutron-metadata-agent    |
+--------------------------------------+--------------------+------------------+-------------------+-------+-------+---------------------------+
Check the database
If all went well, the Cisco-related Neutron database tables will have been bootstrapped using the configuration we hard-coded in the Cisco configuration files created earlier, and our templates and router device types will show up when the following commands are run:
neutron cisco-hosting-device-template-list
neutron cisco-router-type-list
The API can also be used to create those objects as opposed to hard-coding them in the configuration files, but that’s not something I’ve tried. If you’re like me, and those commands don’t return any results, you may need to configure the following option in the /etc/neutron/plugins/cisco/cisco_device_manager_plugin.ini file as shown below:
[general]
l3_admin_tenant=services
The neutron user in Keystone, which the Neutron API service uses to perform actions across the cloud, is assigned to the services project with the admin role. Thus, the services project, or tenant, must be specified in the configuration of l3_admin_tenant for the Cisco plugin to perform its operations. After making the change, be sure to restart the neutron-server and neutron-cisco-cfg-agent services:
systemctl restart neutron-server neutron-cisco-cfg-agent
This time, the commands should return results:
[root@rdo02-ocata ~(keystone_admin)]# neutron cisco-hosting-device-template-list
+--------------------------------------+----------------+----------------------------------+---------------+---------------+---------+
| id                                   | name           | tenant_id                        | host_category | service_types | enabled |
+--------------------------------------+----------------+----------------------------------+---------------+---------------+---------+
| 00000000-0000-0000-0000-000000000001 | NetworkNode    | c39ec022ee8b4b8f90e025fa3e13f682 | Network_Node  | router:FW:VPN | True    |
| 00000000-0000-0000-0000-000000000003 | ASR1k template | c39ec022ee8b4b8f90e025fa3e13f682 | Hardware      | router        | True    |
+--------------------------------------+----------------+----------------------------------+---------------+---------------+---------+

[root@rdo02-ocata ~(keystone_admin)]# neutron cisco-router-type-list
+--------------------------------------+--------------------------+----------------------------------+-------------------------------------------------------+--------------------------------------+
| id                                   | name                     | tenant_id                        | description                                           | template_id                          |
+--------------------------------------+--------------------------+----------------------------------+-------------------------------------------------------+--------------------------------------+
| 00000000-0000-0000-0000-000000000001 | Namespace_Neutron_router | c39ec022ee8b4b8f90e025fa3e13f682 | Neutron router implemented in Linux network namespace | 00000000-0000-0000-0000-000000000001 |
| 00000000-0000-0000-0000-000000000003 | ASR1k_router             | c39ec022ee8b4b8f90e025fa3e13f682 | Neutron router implemented in Cisco ASR1k device      | 00000000-0000-0000-0000-000000000003 |
+--------------------------------------+--------------------------+----------------------------------+-------------------------------------------------------+--------------------------------------+
Summary
At this point, we’ve successfully deployed the Cisco L3 plugin and Cisco CFG agent used to interact with the Cisco ASR. The next blog in this series will walk through the process of creating Neutron routers and attaching interfaces using the OpenStack API, and I will demonstrate how those routers are constructed on the Cisco ASR device. In the meantime, feel free to hit me up on Twitter at @jimmdenton with any questions or corrections.

James Denton
openstack, networking, and random musings