
Installing the Cisco NX-OSv on VMWare ESXi 6.5
- 13 minsA colleague recently mentioned the Cisco NX-OSv 9000, a virtual platform that simulates the control plane of a Cisco Nexus 9000-based device. Supposedly, it’s the same software image that runs on the Cisco Nexus 9000 series without any sort of hardware emulation. The idea is that engineers can develop scripts, test maintenance plans, and learn device configurations quicker and cheaper against the NX-OSv versus using hardware alone. Not a bad argument.
Intrigued, I downloaded the virtual image earlier this evening with the end goal of implementing some form of OpenStack Neutron integration over the next few weeks. I’m hoping to leverage the Cisco Nexus mechanism driver to configure and manage a set of these virtual NX-OSv top-of-rack (ToR) switches using the releases available at the following GitHub repository: https://github.com/openstack/networking-cisco.
Installation
If you manage to get ahold of an image for ESXi, it comes in both OVA and VMDK flavors. The version I’m working with is nxosv-final.7.0.3.I7.2.ova. This OVA implements a virtual machine with the following specifications:
- 4 vCPUs
- 8 GB RAM
- 8 GB Disk
- 6 vNICs (First is Management)
The installation is fairly straightforward, and ESXi will likely ask if the VM should be automatically booted when the setup was complete. Of course I chose yes.
Connectivity
After the initial boot started, I ended up with a console that resembled the following:

I turned away and returned about fifteen minutes later only to find that nothing had changed. The console did not accept any keyboard input and no additional progress was observed.
After a brief search in the Google machine, I found that the NX-OSv automatically sends output to its serial interface once the initial bootloader is complete. The Cisco document here was helpful in working through that issue, but I’ll break it down in the next few sections.
Configuring ESXi to allow connections to the remote serial port
The Cisco documentation provides both a CLI and GUI example for enabling ESXi to accept connections to remote serial ports. Unfortunately, the GUI-based example didn’t jive with my particular setup, so CLI was the only option. You’ll need to enable SSH to your ESXi host by choosing Host -> Actions -> Services -> Enable Secure Shell (SSH). Once you’ve SSH’d to the host as the administrative user, the following command can be executed:
esxcli network firewall ruleset set --enabled true --ruleset-id=remoteSerialPort
You can verify the status before and after as shown in this example:
[root@esx1:~] esxcli network firewall ruleset list | grep remoteSerialPort
remoteSerialPort            false
[root@esx1:~]
[root@esx1:~] esxcli network firewall ruleset set --enabled true --ruleset-id=remoteSerialPort
[root@esx1:~] esxcli network firewall ruleset list | grep remoteSerialPort
remoteSerialPort             true
Configuring a network-backed serial port on the VM
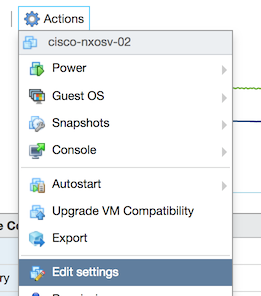
Once the remote serial port functionality has been enabled, you’ll need to add a network-backed serial port to the virtual machine. To do this, first power off the machine and then edit the settings for the virtual machine:
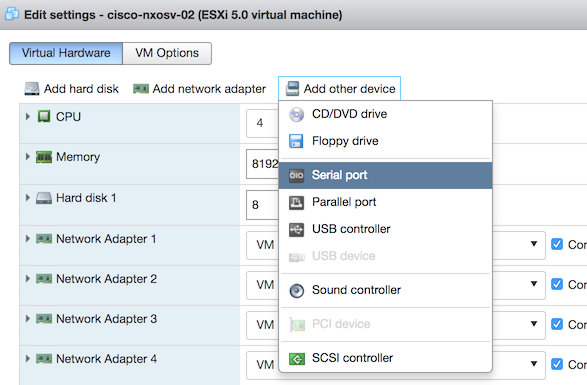
Next, click the Add Other Device button and choose Serial Port from the list:
In the New Serial Port configuration section, choose Use Network from the menu. The Direction menu should be set to Server by default, but the Port URI field will need to be modified similar to that shown here:
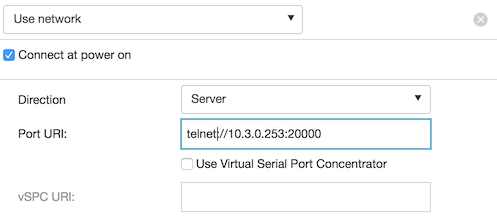
The IP address should reflect that of the management IP of your ESXi host, and the port should a port above 1024 that is not already in use by another service. You will be creating a listener as part of this process. Be sure to set the protocol as telnet, otherwise connections won’t work.
Once the values have been set, close the settings window and power up the VM.
Booting from the loader prompt
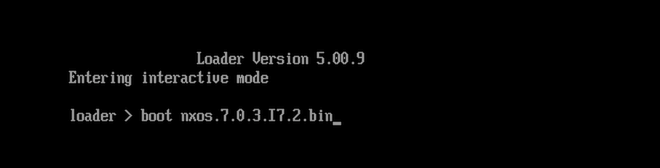
If you’re like me and booted the server prior to a working serial port, you might find yourself starting at a loader> prompt similar to the one here:
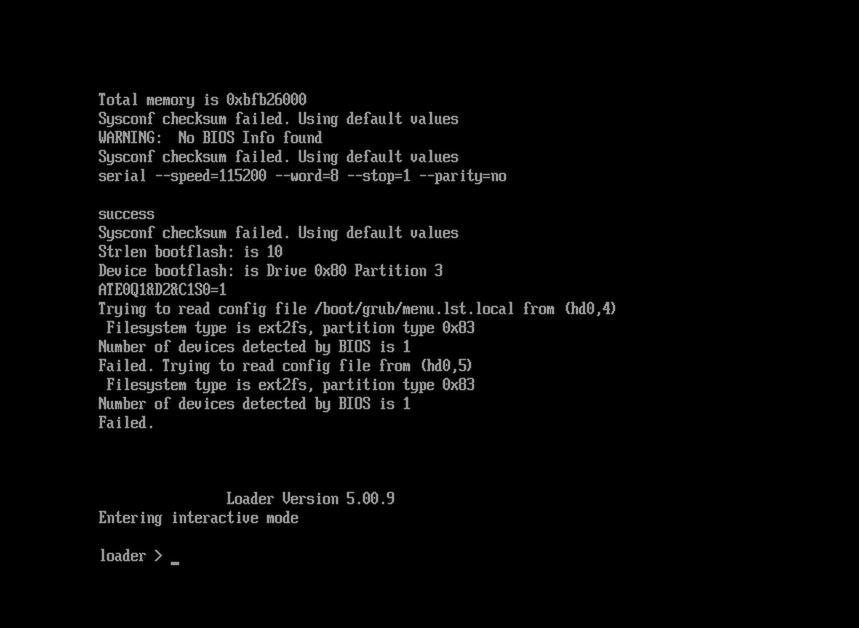
At this point, the device has not been configured with a boot parameter and you must now manually instruct the device to boot from a particular operating system file. Use the dir command to find the version on the disk, enter boot <filename> at the prompt, and press the Enter key to continue:
Connecting to the remote serial port
From your workstation, you can now connect to the remote serial port of the virtual machine over telnet, as shown here:
retina-imac:local jdenton$ telnet esx1.homelab.local 20000
Trying 10.3.0.253...
Connected to esx1.homelab.local.
Escape character is '^]'.
There’s a good chance that you won’t see any output for at least 30-45 seconds or more as the device outputs to the console prior to redirecting to the serial port. At some point you will begin to see output that resembles the following:
[    4.063634] [1513548034] Error: Could not find mtd devices
Installing klm_card_index
done
umount: /torissusda5: not mounted
Linking n9k flash devices
INIT: version 2.88 booting
Installing ata_piix module ... done.
Unsquashing rootfs ...
Installing isan procfs ... done.
Installing SSE module with card index 21099 ... done.
Creating SSE device node 246 ... done.
Loading I2C driver ... done.
Installing CCTRL driver for card_type 29 on a VM without NEED_GEM ... done.
21.69: Interrupt throttling disabled. No cctrl irq detected.
Loading IGB driver ... done.
Not Micron SSD...

Checking all filesystems.Warning: switch is starting up with default configuration

Installing SPROM driver ... IS_N9K done.
Installing pfmsvcs module with SPROM card index 21099 ... done.
Installing nvram module ... done.
Installing if_index module with port mode 6 ... done.
Installing fcfwd
Installing RNI lcnd ... done
Installing LC netdev ... done
Installing psdev module ... done.
Installing veobc module ... done.
Inserting eMMC module ...
done.
Inserting OBFL module ... done.
Making OBFL character devices
mounting plog for N9k!
Trying to mount cdrom...
Starting OpenBSD Secure Shell server: sshd ... done.
tune2fs 1.42.1 (17-Feb-2012)
Setting reserved blocks percentage to 0% (0 blocks)
Starting portmap daemon...
creating NFS state directory: done
starting 8 nfsd kernel threads: done
starting mountd: done
starting statd: done
Saving image for img-sync ...
Loading system software
Installing local RPMS
Patch Repository Setup completed successfully
Creating /dev/mcelog
Starting mcelog daemon
mcelog: Family 6 Model 56 CPU: only decoding architectural errors
Overwriting dme stub lib
File /etc/shared/localtime does not exist.
/bin/ln: failed to create hard link `/usr/bin/dmidecode': File exists
INIT: Entering runlevel: 3
Running S93thirdparty-script...

Populating conf files for hybrid sysmgr ...
Starting hybrid sysmgr ...
Installing FC2 module using inband eth0 vegas 8 fc2_dom_family 25 ...done
inserting /isan/lib/modules/klm_cisco_nb.o ... done
Executing Prune clis.
2017 Dec 17 22:01:41  %$ VDC-1 %$ %USER-0-SYSTEM_MSG:  before access to bkout_cfg  - clis
2017 Dec 17 22:01:43  %$ VDC-1 %$  %USER-2-SYSTEM_MSG: <<%USBHSD-2-MOUNT>> logflash: online  - usbhsd
2017 Dec 17 22:01:44  %$ VDC-1 %$ Dec 17 22:01:44 %KERN-0-SYSTEM_MSG: [    4.063634] [1513548034] Error: Could not find mtd devices  - kernel
2017 Dec 17 22:01:46  %$ VDC-1 %$ netstack: Registration with cli server complete
2017 Dec 17 22:01:57  %$ VDC-1 %$ %USER-2-SYSTEM_MSG: ssnmgr_app_init called on ssnmgr up - aclmgr
2017 Dec 17 22:02:03  %$ VDC-1 %$ %USER-0-SYSTEM_MSG: end of default policer - copp
2017 Dec 17 22:02:03  %$ VDC-1 %$ %COPP-2-COPP_NO_POLICY: Control-plane is unprotected.
2017 Dec 17 22:02:05  %$ VDC-1 %$ %CARDCLIENT-2-FPGA_BOOT_GOLDEN: IOFPGA booted from Golden
2017 Dec 17 22:02:05  %$ VDC-1 %$ %CARDCLIENT-2-FPGA_BOOT_STATUS: Unable to retrieve MIFPGA boot status
2017 Dec 17 22:02:36  %$ VDC-1 %$ %VDC_MGR-2-VDC_ONLINE: vdc 1 has come online
2017 Dec 17 22:02:38 switch %$ VDC-1 %$ %USER-1-SYSTEM_MSG: SWINIT failed. devid:241 inst:0  - t2usd
System is coming up ... Please wait ...
Starting Auto Provisioning ...
Done
You should be prompted to abort auto provisioning, at which point you can choose yes:
Abort Auto Provisioning and continue with normal setup ?(yes/no)[n]
The boot process will continue and begin to prompt for basic switch configurations:
Disabling POAP


         ---- System Admin Account Setup ----


Do you want to enforce secure password standard (yes/no) [y]:

...

Enter the password for "admin":
  Confirm the password for "admin":
Enter a secure password and keep going:
         ---- Basic System Configuration Dialog VDC: 1 ----

This setup utility will guide you through the basic configuration of
the system. Setup configures only enough connectivity for management
of the system.

Please register Cisco Nexus9000 Family devices promptly with your
supplier. Failure to register may affect response times for initial
service calls. Nexus9000 devices must be registered to receive
entitled support services.

Press Enter at anytime to skip a dialog. Use ctrl-c at anytime
to skip the remaining dialogs.

 Would you like to enter the basic configuration dialog (yes/no): no
When all is successful, you will be given the opportunity to login using the admin username and your newly-created password:
User Access Verification
 login: admin
Password:

Cisco NX-OS Software
Copyright (c) 2002-2017, Cisco Systems, Inc. All rights reserved.
Nexus 9000v software ("Nexus 9000v Software") and related documentation,
files or other reference materials ("Documentation") are
the proprietary property and confidential information of Cisco
Systems, Inc. ("Cisco") and are protected, without limitation,
pursuant to United States and International copyright and trademark
laws in the applicable jurisdiction which provide civil and criminal
penalties for copying or distribution without Cisco's authorization.

Any use or disclosure, in whole or in part, of the Nexus 9000v Software
or Documentation to any third party for any purposes is expressly
prohibited except as otherwise authorized by Cisco in writing.
The copyrights to certain works contained herein are owned by other
third parties and are used and distributed under license. Some parts
of this software may be covered under the GNU Public License or the
GNU Lesser General Public License. A copy of each such license is
available at
http://www.gnu.org/licenses/gpl.html and
http://www.gnu.org/licenses/lgpl.html
***************************************************************************
*  Nexus 9000v is strictly limited to use for evaluation, demonstration   *
*  and NX-OS education. Any use or disclosure, in whole or in part of     *
*  the Nexus 9000v Software or Documentation to any third party for any   *
*  purposes is expressly prohibited except as otherwise authorized by     *
*  Cisco in writing.                                                      *
***************************************************************************
switch#
Configure the boot parameter
Cisco is quick to point out in the documentation that failure to set the boot parameter in the configuration prior to shutting down or rebooting the virtual machine will result in the loader> prompt at next boot.
To set the boot parameter, grab the filename of the software image using the dir command:
switch# dir | grep nxos
  885554688    Nov 22 22:06:16 2017  nxos.7.0.3.I7.2.bin
Enter configuration mode and set the parameter:
switch# conf t
switch(config)# boot nxos nxos.7.0.3.I7.2.bin
Performing image verification and compatibility check, please wait....
switch(config)#
Exit configuration mode, write the config to file, and reboot the device:
switch(config)# exit
switch# copy run start
[########################################] 100%
Copy complete, now saving to disk (please wait)...
Copy complete.
switch# reload
This command will reboot the system. (y/n)?  [n] y
2017 Dec 17 23:08:17 switch %$ VDC-1 %$ %PLATFORM-2-PFM_SYSTEM_RESET: Manual system restart from Command Line Interface
Configure an IP address
Upon reboot, you will likely see some activity on the console before the output is redirected to the remote serial port. You should configure the device to whatever is appropriate for your network, remembering that the first interface connected in the VMWare UI corresponds to the mgmt0 interface in the NX-OSv device. You will probably need to power down the VM before making networking changes within the VMWare UI, as well.
The NX-OSv places the mgmt0 interface into the management VRF. Configuring the interface and a default route is fairly straightforward. In my environment, the first interface in ESXi has been reconfigured to connect to a management network known as OOB_MGMT that is trunked to the ESXi hosts and configured as a port group on a virtual switch.
Within the virtual switch, enter configuration mode and configure the respective management address for your environment:
switch# conf t
switch(config)# int mgmt0
switch(config-if)# ip address 10.4.90.5/24
switch(config-if)# exit
switch(config)# vrf context management
switch(config-vrf)# ip route 0.0.0.0/0 10.4.90.1
switch(config-vrf)# exit
switch(config)# exit
switch# copy run start
[########################################] 100%
Copy complete, now saving to disk (please wait)...
Copy complete.
A ping in another window immediately changed state from failure to success upon the configuration of the management interface:
etina-imac:~ jdenton$ ping 10.4.90.5
PING 10.4.90.5 (10.4.90.5): 56 data bytes
Request timeout for icmp_seq 0
Request timeout for icmp_seq 1
Request timeout for icmp_seq 2
Request timeout for icmp_seq 3
Request timeout for icmp_seq 4
...
Request timeout for icmp_seq 305
Request timeout for icmp_seq 306
64 bytes from 10.4.90.5: icmp_seq=307 ttl=255 time=3.163 ms
64 bytes from 10.4.90.5: icmp_seq=308 ttl=255 time=5.351 ms
Using SSH, I successfully connected to the virtual switch:
retina-imac:~ jdenton$ ssh admin@10.4.90.5
The authenticity of host '10.4.90.5 (10.4.90.5)' can't be established.
RSA key fingerprint is SHA256:1IWE0K6ppmBvZfFWR0Tu6HgHkuWmF44dF4Al/oUYMkI.
Are you sure you want to continue connecting (yes/no)? yes
Warning: Permanently added '10.4.90.5' (RSA) to the list of known hosts.
User Access Verification
Password:
...
***************************************************************************
*  Nexus 9000v is strictly limited to use for evaluation, demonstration   *
*  and NX-OS education. Any use or disclosure, in whole or in part of     *
*  the Nexus 9000v Software or Documentation to any third party for any   *
*  purposes is expressly prohibited except as otherwise authorized by     *
*  Cisco in writing.                                                      *
***************************************************************************
switch#
Summary
The Cisco Nexus 9000 is a great platform, and I am looking forward to kicking the tires on the NX-OSv as time allows. If you have any feedback on the Cisco Nexus ML2 mechanism driver in production use I’d love to get your input. As always, feel free to reach out on Twitter at @jimmdenton with any comments good, bad, or otherwise.

James Denton
openstack, networking, and random musings